Theme editor

Scale Model Shop

BIG Bocage Tiger

Status
Not open for further replies.

tr1ckey66

Active member
Joined
Mar 6, 2009
Messages
3,592
Reaction score
1
Points
38
1/3
Thread owner
Hi folks

It's been quite a while since i last posted and after a few false starts I've now turned my attention to the RC Tiger. Things are fairly hectic for me at the mo so I'm hoping I can finish this for the GB but if not I'm not going to beat myself up over it.

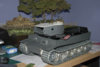
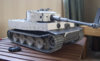
This build is the late Tiger conversion I've mentioned several times before using Tamiya's Full Option Tiger + a lot of after market bits and quite a bit of scratch building. I'm going to try as far as is possible to recreate the Tiger used by Wittman at Villers - Tiger 222. This Tiger was in fact borrowed from Unterscharfuhrer Kurt Sowa (the commander of this particular vehicle) by his company commander Wittman.

The Tiger inside the RC tank is actually a 1/35 build of the same vehicle I did some time ago.

Ok, the build so far...

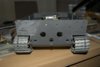
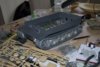
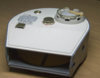
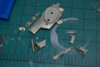
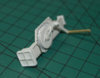
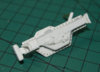
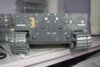
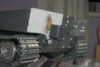
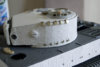
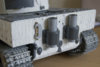
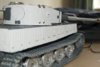
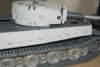
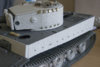
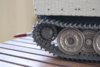
I've obviously replaced the wheels with the correct steel wheel versions from Wecohe and replaced the track with metal late track (with ice cleats) from Kenny Kong. I've also replaced the suspension with Wecohe's simply sublime sprung version - it is truly awesome! The tank needs to be balanced properly with all the components inside but the suspension rides very realistically even at the moment.

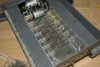
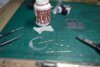
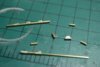
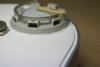
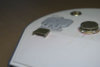
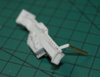
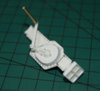
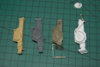
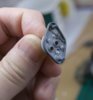
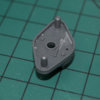
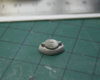
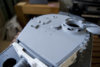
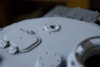
I've now turned my attention to the details that need to be altered on the lower hull. The first of these was the rear mud guards which have a different attachment arrangement to the hull. I've been busy scratch building the hinges for the mud flaps which was quite a fiddly soldering job but I got there in the end. There are a number of holes that needed to be filled on the rear plate as obviously the pfeifel air filters will not be used on this vehicle. Also omitted are the mounts for the tool box and I'm going to probably fill the holes for the jack mount as I intend to super detail this area and scratch build the 20 tonne jack required (as opposed to the 15 tonne jack supplied with kit). Once the holes are filled I can then get on with zimmeriting (don't think that's really a verb but anyhoo) the whole of the hull. Oh I forgot, before that happens I need to sort out the revised track repair cable on the left hand side of the hull.

There may be some bits I've forgotten but I'll try to keep you updated.

Oh yeah, one other thing I reduced the gears for a truer running speed and torque.

Anyway here's some pics.

Any comments welcome.

View attachment 25054View attachment 25049View attachment 25050View attachment 25051View attachment 25052View attachment 25053View attachment 25055

View attachment 31342

View attachment 31343

View attachment 31344

View attachment 31345

View attachment 31346

View attachment 31347

View attachment 31348

View attachment 144368

View attachment 144369

View attachment 144370

View attachment 144371

View attachment 144372

View attachment 144373

View attachment 144374
 

Attachments

  • Upgraded suspension.jpg
    Upgraded suspension.jpg
    2.6 KB · Views: 0
  • Revised hinges01.jpg
    Revised hinges01.jpg
    2.5 KB · Views: 0
  • Revised hinges02.jpg
    Revised hinges02.jpg
    2 KB · Views: 0
  • Rear plate alts.jpg
    Rear plate alts.jpg
    2.2 KB · Views: 0
  • Rear plate alts02.jpg
    Rear plate alts02.jpg
    2.5 KB · Views: 0
  • Big Tiger chasis.jpg
    Big Tiger chasis.jpg
    2.8 KB · Views: 0
  • Size comparison.jpg
    Size comparison.jpg
    2.5 KB · Views: 0
Going to follow this one. Don't know what it is about German tanks and aircraft but i love them. Maybe it was their obsession with maximum firepower lol
 
Thread owner
Hi Al

Yep the Germans certainly had a thing for 'bigger is better' (not always true in practice of course!)

Here's a small update on the rear mud flaps and the commanders cupola.

The flaps are fnished now and the new hinges work a treat so I'm pleased. These will be mounted on to small mounting blocks on the rear plate.

The commanders cupola and hatch is a bit of kit bash - the cupola itself is from Schumo with the hatch being taken from the 1/16 King Tiger. The grab handle is copper wire. I added a subtle cast texture to the hatch with Mr Surfacer (which is why it is grey in colour). I'm going to cast some periscopes in green resin - which, when painted, should look good in the cupola.

As ever any comments welcome.

Cheers

Paul

View attachment 25081

View attachment 31374

View attachment 144400
 

Attachments

  • Hatch and Rear flaps.jpg
    Hatch and Rear flaps.jpg
    2 KB · Views: 0
Hej Paul, Is it your intention that this should be in the Normandy group build?

Just say the word and we can move it to the Under Construction section.

Looking good buy the way. Do you know I had no idea that Tiger tanks had a reserve tank hidden inside them. Genius idea a life tank!! :laughing:

Ian M
 
Thread owner
Hi Ian

Yes, the post was intentional. I've placed it here because the particular vehicle is most definitely within the Normandy brief. If I don't get to finish it within the time I'll just carry on till it is finished. I'm past worrying about deadlines on builds now lol! Too much stuff goes on in other areas of my life to be worrying about hitting a modelling deadline! I'm more interested in finishing it well (as well as I can anyway). I'm actually creating a website at the moment which will outline in detail how exactly I get to the finished thing.

BTW, I've got 2 Typhoons that could fit your SIG build quite nicely - one Eurofighter, one WW2 Hawker Typhoon. I'd include those but I've no idea when the 2 will be finished.

Cheers

Paul
 
No Problems Paul. Normandy it is then.

As for the two Typhoons in the SIG: It dont start until march first and there is six months to build them in. If you can pin them to the same squadron I would say go for it. Unless you have already started them that is!

Ian M
 
Thread owner
Here's an update on the revised turret roof for the late Tiger 1. There are several differences between Early and Late Tiger turrets apart from the most obvious cupola.

These include:-

Thicker 40mm turret roof fabricated from one piece bent to shape

Revised loaders hatch and hinges

Installation of a close defence weapon

Air ventilation moved to centre of turret for better efficiency.

To include all these revisions I decided making an entirely new turret roof would be the way forward, rather than trying to alter the existing roof. Here's a few pics of the progress so far. The roof has taken around 3 days to do so far with the lions share of the work going to the fabrication of the loaders hatch hinges. It's really starting to come together now and I'm pleased with the scratch building and alts so far. From here there's the close defence weapon to fit (toward the rear of the roof) and the loader's periscope and armoured cover - these alts complete the roof. Also needed to complete the alts to the turret are spare track hangers and the deletion of the pistol port (which has been filled but isn't visible on the photo) and then it's on with the Zimmerit.

Here's the pics

Cheers

P

View attachment 25347View attachment 25348

View attachment 31549

View attachment 31550

View attachment 144575

View attachment 144576
 

Attachments

  • DSC_0029.jpg
    DSC_0029.jpg
    2.9 KB · Views: 0
  • DSC_0028.jpg
    DSC_0028.jpg
    3.6 KB · Views: 0
Hi Paul, some great work going on here. Will your Zim be fresh or are you going for the battered look? Mind you, either way it'll look great when finished, going to keep an eye on this.

Have fun, John
 
Thread owner
Hi John

The Zimm will probably be quite well applied with just the odd small chip. I'm trying to depict the vehicle just before the Villers attack - the Zimm will follow 2 patterns with the hull being usual horizontal widths and the turret the larger flatter kind seen on some turrets (because they were manufactured at a different location). There will be light wear-and-tear to the vehicle with the usual staining and chips but it won't be too much - just normal field condition. The tank would have only been a couple of months old anyway!

We must get some vids going when you've got your Panther running!:banana:

All the best

Paul
 
Thread owner
Here's a quick update on the Tiger progress.

I've almost finished the turret roof. I've now placed everything, including the close defence weapon , and added weld seams, texture to the plate and torch cut marks on the edge of the plates. I've also finished the alts to the loader's hatch with handle moved, profile changed and some super detailing - this also received a cast texture.

I'm also including a shot just to show how big this machine is - it really does feel BIG and HEAVY just like the real thing (give or take 60 tons or so!)

I've also solved the jack problem (got some ointment and it cleared up fine!), joking apart this Schumo jack is the dog's b's and although was a devil to clean up the parts are superb. Once this is built I can get on with finishing the rear of the hull (I needed this before I start on the jack mounts).

Here's the pics...

View attachment 25480View attachment 25479View attachment 25483View attachment 25482View attachment 25481

Cheers P

View attachment 31678

View attachment 31679

View attachment 31680

View attachment 31681

View attachment 31682

View attachment 144704

View attachment 144705

View attachment 144706

View attachment 144707

View attachment 144708
 

Attachments

  • Weld seams 02.jpg
    Weld seams 02.jpg
    2.5 KB · Views: 0
  • Roof Complete.jpg
    Roof Complete.jpg
    3 KB · Views: 0
  • Superb Schumo Jack.jpg
    Superb Schumo Jack.jpg
    3.2 KB · Views: 0
  • Imposing Beast.jpg
    Imposing Beast.jpg
    3.4 KB · Views: 0
  • Weld seams.jpg
    Weld seams.jpg
    2.2 KB · Views: 0
looks like quite a technical build. but fun. glad your back in the group build.
 
Thread owner
Jack types and scratch building...

After receiving the Schumo Jack (which is superb) and building it, I did a little more research and realised that this Jack is in fact the 20 ton Short version (normally seen on Panthers). The Jack that was supposed to go on Tigers was the Long version - DAMN, Oh well! after scouring the net for a suitable replacement I drew a blank and had to face the fact that the only way I was going to get suitable jack for my late Tiger was to scratch build one. So here it is...

View attachment 25601View attachment 25602View attachment 25603View attachment 25604View attachment 25605

The Jack took me 3 days, longer than I first intended but then all scratch builds seem to take me longer than I think. Punch and dyes, various plastic card and rod plus rivets from my 'Nutter' tool went into completing it. I'm happy with the results andcan now move on to the jack mounts (finally). The first pic gives a comparison in detail with the jack from the Tiger II, Tiger I (15 ton), Schumo 20 ton S, and my scratch built 20 ton L. The thing above my Jack is the scratch built armoured cover for the engine coolant heater which was introduced on the Tiger in early 1944. This will appear on the rear plate just below the left exhaust stack.

Another couple of days and I think I may be able to Zimmerit the hull and turret.

Hope you like it so far.

Paul

View attachment 31784

View attachment 31785

View attachment 31786

View attachment 31787

View attachment 31788

View attachment 144810

View attachment 144811

View attachment 144812

View attachment 144813

View attachment 144814
 

Attachments

  • Scratch Jack 04.jpg
    Scratch Jack 04.jpg
    3.1 KB · Views: 0
  • Scratch Jack 02.jpg
    Scratch Jack 02.jpg
    3.4 KB · Views: 0
  • Jack comparison.jpg
    Jack comparison.jpg
    2.9 KB · Views: 0
  • Scratch Jack 01.jpg
    Scratch Jack 01.jpg
    3.1 KB · Views: 0
  • Scratch Jack 03.jpg
    Scratch Jack 03.jpg
    3.1 KB · Views: 0
Thread owner
Quick up date on the Tiger conversion

I've finished the alts to the rear plate which enabled me to start the Zimmerit covering. I'm using Milliput and it does take some time working it to get it thin and even but, in my opinion, it is worth it as it gives a really good representation of the real thing. It's going to take me some time to complete the entire hull but this is a bit of a labour of love and I really don't want to spoil the finish. Slow and steady is the name of the game! Here's a list of the alts since last time.

1. Mounting points for the 'C' hook on the rear plate added.

2. Modified Starter Plate completed.

3. Engine Coolant Heater cover finished.

4. All the redundant holes in the rear plate filled and mounting points (small blocks of plastic card) added where appropriate.

Here's the pics...

View attachment 25753View attachment 25752View attachment 25754View attachment 25751View attachment 25755View attachment 25750

As ever, any comments welcome

Cheers

P

View attachment 31875

View attachment 31876

View attachment 31877

View attachment 31878

View attachment 31879

View attachment 31880

View attachment 144901

View attachment 144902

View attachment 144903

View attachment 144904

View attachment 144905

View attachment 144906
 

Attachments

  • Zimmerit Close up.jpg
    Zimmerit Close up.jpg
    2.8 KB · Views: 0
  • Rear Plate Ats.jpg
    Rear Plate Ats.jpg
    3.2 KB · Views: 0
  • Modified Starter Plate.jpg
    Modified Starter Plate.jpg
    2.5 KB · Views: 0
  • Original Starter Plate.jpg
    Original Starter Plate.jpg
    3.5 KB · Views: 0
  • Heater Hatch Cover.jpg
    Heater Hatch Cover.jpg
    2.6 KB · Views: 0
  • Zimmerit Started.jpg
    Zimmerit Started.jpg
    2.9 KB · Views: 0
Really fantastic work. Another im looking forward to seeing progress too.

Andy
 
Hi Paul, that zim is going to look great. The last time i did zimmerit it looked like a brick wall on the side of the turret lol, but i did use the green Milliput.

Have fun, John
 
Thread owner
Hi John

This is my first Zimm attempt using milliput, although I've used other putties in 1/35. I am using the Super Fine white Milliput. I think the trick to it is to roll it nice and thin and then apply the thin sheets in small sections. Even then I felt the need to press it down even flatter and thinner with my thumb before applying the texture. I know you can buy the pre-formed latex sheets of Zimmerit that you simply glue on, but I don't think they make a set for a late Tiger and, to be honest, I think the putty method will look better. I've completed the rear plate now but I'll not post pics again until the whole hull is done.

Cheers P

Bobby, thanks for the words mate I am glad to be back in the GB!

Andy - we'll (you, me and John) have quite a collection of big cats in a month or so!
 
Thread owner
Quick update on the RC Tiger...

The zimmerit is now complete and I'm fairly happy with the results although I think it could have done with being just a tad neater (something I'm going to have to practice a little more). Having said that I'm ok with the result.

Lots of other alts needed to be done before I could finish the zimm application though. These included:-

Altering the position of the track cable mounts.

Altering the profile of the escape hatch on the turret (Late Tigers had simplified hatches without a beveled edge to follow the contours of the turret).

Altering the escape hatch hinges to allow clearance for the turret ring (which needs to be scratched built for the deck).

Installing the turret track hangers (Schumo parts that work)

I've also tested the RC equipment and had the thing trundling round my living room (without a turret) which was fun!

I also needed to do some surgery to the speaker box to fit the batteries properly. After installing the gear reduction I found that the batteries were pushed further back and clearance was needed for the bottom of the 2 batteries.

I'm getting close to the detailing of this tank now and I intend to scratch build both fenders and exhaust shrouds from sheet brass or my old friend the tomato puree tube! I'm also adding etch fasteners for the tools and etch radiator screens and I'm going to try and detail the tools and try and make wooden handles for them, this may not work it I'll give it a go!

I'm also realising that I need to plan the painting stage carefully as this tank is so heavy it will be quite tricky to do. I may even paint the lower hull before detailing the deck as I think the etch parts may not stand up to the man handling required to get to the running gear.

Anyway, here's the pics of the Zimm (the gun is not mounted properly yet but is there just to give an idea of how this will look).

Cheers, Paul

As always any comments welcome

View attachment 26438View attachment 26439View attachment 26440View attachment 26441View attachment 26442View attachment 26443

View attachment 32403

View attachment 32404

View attachment 32405

View attachment 32406

View attachment 32407

View attachment 32408

View attachment 145429

View attachment 145430

View attachment 145431

View attachment 145432

View attachment 145433

View attachment 145434
 

Attachments

  • Finished Zimm08.jpg
    Finished Zimm08.jpg
    3.2 KB · Views: 0
  • Finished Zimm07.jpg
    Finished Zimm07.jpg
    3.3 KB · Views: 0
  • Finished Zimm02.jpg
    Finished Zimm02.jpg
    3.3 KB · Views: 0
  • Finished Zimm05.jpg
    Finished Zimm05.jpg
    3.3 KB · Views: 0
  • Finished Zimm01.jpg
    Finished Zimm01.jpg
    3.3 KB · Views: 0
  • Finished Zimm06.jpg
    Finished Zimm06.jpg
    3.3 KB · Views: 0
Thread owner
Tiger update

The model doesn't look a great deal different but the build has moved on...

1. Soldered on the brass rod to the white metal transmission covers (this requires low melt solder and a 'tinning' of the brass) to support the spare track.

2. Fitted the commander's hatch with a spring mechanism so that the hatch works

3. Detailed the roof with the screws for the internal gun lock mechanism and for the close defence weapon.

4 Added more weld beads to the roof to finish and primed.

5. Started the first bits of etch which are the latches to the turret stowage bin.

6. Fitted 600mm idlers. These are meant to fit the Heng Long Tiger but with a bit of surgery and some careful work with a metal file can be made to fit. I would have preferred to use Wecohe 600mm idlers as they look a lot more accurate but they've stopped making them so these will have to do. To be fair the original Tamiya ones don't look accurate either.

Here's a few pics...

View attachment 26746View attachment 26743View attachment 26747View attachment 26744View attachment 26745View attachment 26748

View attachment 32654

View attachment 32655

View attachment 32656

View attachment 32657

View attachment 32658

View attachment 32659

View attachment 145680

View attachment 145681

View attachment 145682

View attachment 145683

View attachment 145684

View attachment 145685
 

Attachments

  • Gun Lock Screws.jpg
    Gun Lock Screws.jpg
    2.4 KB · Views: 0
  • Complete Roof Primed.jpg
    Complete Roof Primed.jpg
    3.5 KB · Views: 0
  • Turret Bin Latches.jpg
    Turret Bin Latches.jpg
    2.3 KB · Views: 0
  • Bow Plate Track Hangers.jpg
    Bow Plate Track Hangers.jpg
    3.2 KB · Views: 0
  • CDW Screws.jpg
    CDW Screws.jpg
    2.7 KB · Views: 0
  • 600mm Idlers.jpg
    600mm Idlers.jpg
    3.3 KB · Views: 0
That is some fantastic detailing you have done there! Tell me, how did you do the screws in the top of the turret. They look very nice indeed.

All in all its coming together rather nicely Paul.

Ian M
 
Status
Not open for further replies.
Back
Top