Theme editor

Scale Model Shop

BMW R75 motorbike and sidecar with figures 1:35 - Italera

pjgtech

SMF Supporters
Joined
Dec 28, 2023
Messages
1,554
Reaction score
1,358
Points
113
Age
61
Location
Kent, UK
1/3
Thread owner
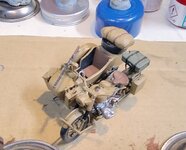
So next little project will be this one, a 1:35 scale BMW R75 motorbike and sidecar, popular with the Germans in WW11, which enabled them to have many more mobile units. I think these were originally civilian bikes, but then utilised for military use?
ISTR reading somewhere that they were armour plated, so must have been bloody heavy units, and bearing in mind they were relatively low powered anyway, they probably were not that quick! (Especially two up with all the gear!)
Seems like a nice little kit, quite detailed.
Usual pics to start....
Click image for larger version  Name:	BMW R75 sidecar jan25 (2).jpg Views:	0 Size:	547.3 KB ID:	1247998
Click image for larger version  Name:	BMW R75 sidecar jan25 (3).jpg Views:	0 Size:	457.5 KB ID:	1247999
 
Last edited:
They are fiddly I speak from experience. The only advice I can give is to take your time and ley things dry before trying to do something else as it can fall to pieces while trying to do the next bit.
 
Thread owner
Right, thats it, I'm not showing you lot any more photos, of when I inevitably b*gger it up! You''ve all jinxed it, I'm going off into the corner to sulk....
😉😆😎
 
Thread owner
Didn't do anything model related yesterday, first time in ages....
But a little update today, its coming along, slowly, slowly.
Most parts now assembled and painted, just a few little bits still to do, then can get on with clear coat, decals and weathering.
Pic....
bmw r75 bike 8feb25 (3).jpg
 
Thread owner
Moving along a little bit more, see photos below....
Figures are now all pretty much done, just need to add rifle slings.
The bike and sidecar combo are now joined.
Click image for larger version  Name:	bmw r75 bike 10feb25  (1).jpg Views:	0 Size:	886.9 KB ID:	1248595
Here are the rifle slings, Tamiya tape, cut to length, stuck on and painted.
Click image for larger version  Name:	bmw r75 bike 10feb25  (1).jpg Views:	0 Size:	886.9 KB ID:	1248595
Rifle sling on the other figure and you can clearly see his nicely detailed map, complete with annotations.
The main bike rider is shown on the box, and in the instructions, holding a map, and they do include a very basic and small map for you to cut out on the instruction sheet. I did not want to damage the instructions/cut them, plus it was a bit basic!
So I wanted a larger, folded map. I found a suitable sort of map online, copied it a word doc (multiple times), then made the copies all various sizes on the page, then printed the page. The smallest one seemed the right size to me, folded over like a real map would be. So cut it out and placed in the riders hands, and it does not look too bad and certainly much better than the included original map.
Click image for larger version  Name:	bmw r75 bike 10feb25  (1).jpg Views:	0 Size:	886.9 KB ID:	1248595
Also later added a fuel can to the rear of the bike and made some straps for that.
So getting there, just need some final touch ups, then varnish ad weathering.
Click image for larger version  Name:	bmw r75 bike 10feb25  (5).jpg Views:	0 Size:	470.5 KB ID:	1248596
Also put some eyes in......I bloody hate eyes! Why are they so difficult to do so that they like "right"? Lol....
Mine always looks surprised and wide eyed..... 😂
 

Attachments

  • bmw r75 bike 10feb25  (4).jpg
    bmw r75 bike 10feb25 (4).jpg
    361.7 KB · Views: 0
Last edited:
Thread owner
This one is now finished. 👍
For display I have placed it on the small diorama I previously used for my German Half Track build.
As the main bike rider is looking at his map, and my diorama has a prominent road sign, it seemed appropriate.
Anyway here are the final pics....
NB: As a final coat, after all the priming, painting, gloss coat, decals and weathering, I am using Tamiya Flat clear varnish, (XF86) but its still a bit too "shiny" to me, can anyone recommend another good flat varnish or am I doing something wrong?
Cheers
bmw r75 bike final pics no flash  (1).jpg
bmw r75 bike final pics no flash  (2).jpg
bmw r75 bike final pics no flash  (3).jpg
bmw r75 bike final pics no flash  (4).jpg
bmw r75 bike final pics no flash  (5).jpg
bmw r75 bike final pics no flash  (6).jpg
bmw r75 bike final pics no flash  (7).jpg
bmw r75 bike final pics no flash  (8).jpg
bmw r75 bike final pics no flash  (9).jpg
bmw r75 bike final pics no flash  (10).jpg
 
Great result Peter, nice layout 👍
I remember making those figures as a kid, quite fragile to play with though! Cheers
 
Nice Peter, I remember building this kit when only Tamiya and Italeri had them. The Italeri kit was by far the more detailed then with the right brake and clutch grips attached from the outside of the yoke handles. The spokes, wheels and engine block were nicely detailed. Surprisingly the figures weren't bad either and nicely posed.
Regarding the Tamiya flat clear, like most flat paints, the main ingredient usually settles to the bottom so it needs stirring. The bulk of it is made up of clear varnish so I'm guessing you're still clear coating your finish.
I swear by Testors flat varnish that can be brushed on to little areas that show some shine but usually use Mr Ultra flat varnish rattle cans for larger parts of my diorama.

Cheers,
Wabble
 
Thread owner
Yeah, it was an old jar TBH, so may have all settled, and can't honestly remember if I gave it a stir/shake, so could easily be as you suggest. I must get in the habit of properly stirring/shaking my paints, as I don't always do it and they are sometimes a bit, what shall we say? "Claggy"!
 
Last edited:
Thread owner
So had another go with the clear matt varnish, as my last coat ended up being a bit shiny?
This time giving it a good stir, as its an old jar and the last little remnants of whats left, but being a tight wad, don't want to waste it! Also gave me another opportunity to just tidy up a few more little bits here and there.
Gave everything a bit more weathering, some tiny highlights on the clothes and the bundles on the stowage, etc.
Added a few rust spots and highlighted a few flecks of chipped paint on the bike and sidecar, bit more of a fuel wash on the engine, etc.
Nothing major, but I'm reasonably happy with it.
Pics...
bmw r75 germ bike 19feb25 (6).jpg
bmw r75 germ bike 19feb25 (7).jpg
bmw r75 germ bike 19feb25 (8).jpg
bmw r75 germ bike 19feb25 (9).jpg

bmw r75 germ bike 19feb25 (11).jpg
 
This looks good Peter. Nicely finished and well staged. You should be very pleased with this one 👍
Pity about the slight shine though. Matt varnishes are an absolute pig to get to work when brush painting. The only ones I’ve got to work properly are Humbrol Matt Cote and Daler Rowney . The secret with both is to mix them for about three times as long as you think necessary.
Reading through you have also mentioned you find it awkward to paint eyes. I will give you my take on this, because I’ve done it hundreds of times on slightly smaller scale figures, but if it’s of no interest, or you are happy with what you do, just ignore it 👍. Part of the secret, I think, is not to use white as a basis. I find it simply too stark and that it amplifies any mismatch between them. I use ivory instead of white because it covers better anyway, and looks more natural. The other way to avoid this problem is once you have painted in the eyeball, cut it back to size with whatever colour you’ve used for the flesh. No one expects you to get this right first time…so you shouldn’t either. Eyes are not round, by the way, at very best they are almond shaped, and in bright outdoor conditions they are usually little more than slits. As to iris and pupil, I wouldn’t bother with those details on a figure this small. Personally I go for the thinnest of thin black lines outlining the top of the eyeball, and then just put a vertical black line down through the eyeball where the iris and pupil would be. The whole forms a sort of T shape, better defines the eyeball, and is far easier to do, especially when you remember you can overpaint with the surrounding colours to get rid of any ragged or imperfect lines…..you will always find one eye easier to paint than the other, by the way (usually the figures left eye if you are right handed) because the nose gets in the way…. I minimise that problem by turning the figure upside down when doing the other eye 😇
 
Back
Top