
You are using an out of date browser. It may not display this or other websites correctly.
You should upgrade or use an alternative browser.
You should upgrade or use an alternative browser.
Bowcat's 1/48 Revell F-15E Strike Eagle
- Thread starter Mr Bowcat
- Start date
- Status
- Not open for further replies.
Cheers. ")
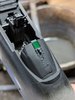
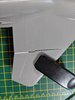
I'm getting closer to connecting the nose to the fuselage. Just a few small jobs to finish, first of which was the HUD.
View attachment 301764View attachment 301765View attachment 301766
Next was prepping the canopy and frame. It's the first time I've had to remove a centre seam, I'd say it was semi sucesfull. There's still a few marks but it's going to be modelled up so I can live with it. I also painted the frame up, this just needs the mirrors painted on to the hoop, then it can be glued to the canopy, masked and temporarily glued down for painting.
View attachment 301767
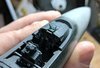
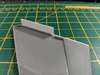
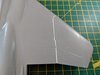
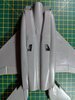
I then decided to attach the wings, and this is when things went downhill.
Here's the left side, not too bad, just a bit of filling.
View attachment 301769
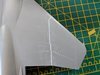
Here's the right side.
View attachment 301770
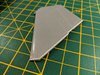
I wasn't completely sure what to do with this, so my solution was to glue some plasticard onto the flap section that I can shape when dry. I will probably do the same with thinner card for the upper portion, then fill whatever gap is left.
View attachment 301771
I'm getting closer to connecting the nose to the fuselage. Just a few small jobs to finish, first of which was the HUD.
View attachment 301764View attachment 301765View attachment 301766
Next was prepping the canopy and frame. It's the first time I've had to remove a centre seam, I'd say it was semi sucesfull. There's still a few marks but it's going to be modelled up so I can live with it. I also painted the frame up, this just needs the mirrors painted on to the hoop, then it can be glued to the canopy, masked and temporarily glued down for painting.
View attachment 301767
I then decided to attach the wings, and this is when things went downhill.
Here's the left side, not too bad, just a bit of filling.
View attachment 301769
Here's the right side.
View attachment 301770
I wasn't completely sure what to do with this, so my solution was to glue some plasticard onto the flap section that I can shape when dry. I will probably do the same with thinner card for the upper portion, then fill whatever gap is left.
View attachment 301771
Attachments
Cheers Fernando.
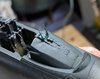
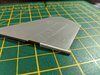
The repair seems to be going ok, I got the flap section sanded down and glue more card into the other areas. I'll trim and sand those tomorrow.
View attachment 301915View attachment 301916
Also got the front of the canopy glued on, and the rear glued to the frame.
View attachment 301917View attachment 301918
Attachments
G
Guest
Guest
Nice recovery!
rickoshea52
Active member
1/3
I used the plasticard as a shim trick on my Phantom, a tip I got from this site....just goes to show the benefit of this forum.
Good work.
Good work.
Attachments
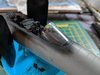
So, the repair seems to have worked, just waiting for a small section of filler to dry on the leading edge. Once sanded to shape I should finally be able to get the nose attached.
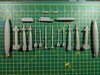
While I was waiting I got the jet nozzles and ordnance glued up.
View attachment 302358View attachment 302359View attachment 302360View attachment 302361View attachment 302362
While I was waiting I got the jet nozzles and ordnance glued up.
View attachment 302358View attachment 302359View attachment 302360View attachment 302361View attachment 302362
Attachments
Cheers Ian, I was quite please with how it came out. First time I've had to do something like that.
I've since come across some other fitment issues, starting to think I won't be building a Revell kit again.
I've since come across some other fitment issues, starting to think I won't be building a Revell kit again.
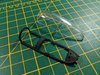
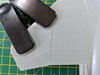
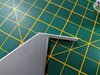
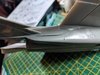
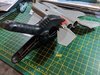
I decided to get the conformal tanks installed before adding the nose, and I'm glad I did.
Some parts fitted well, but at the rear there were some pretty significant gaps which required some serious clamping before glue was applied.
View attachment 302778View attachment 302779View attachment 302780
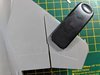
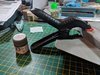
Edited to add:
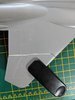
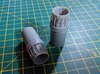
To give you an idea of the size of that clamp, here's a picture of it next to the standard modellers reference.
View attachment 302781
Some parts fitted well, but at the rear there were some pretty significant gaps which required some serious clamping before glue was applied.
View attachment 302778View attachment 302779View attachment 302780
Edited to add:
To give you an idea of the size of that clamp, here's a picture of it next to the standard modellers reference.
View attachment 302781
Attachments
G
Guest
Guest
The not-so-conformal fuel tanks. Great clamp. I need that.
- Status
- Not open for further replies.
Legal Notice
scalemodelling.co.uk is a privately operated online discussion forum. All content posted by members reflects their own views and opinions and does not necessarily represent those of the forum owners or administrators. While reasonable efforts are made to moderate content, no responsibility is accepted for user-generated material. By using this site, you agree to comply with UK law and the forum rules.