Theme editor

Scale Model Shop

BUILDING FOR THE SU 76.

  • Thread starter Thread starter Guest
  • Start date Start date
Status
Not open for further replies.
Thread owner
Evening John,
Coming along very nicely indeed. That foam board looks like very versatile stuff, ideal for your purposes. I watched a guy build a complete building out of it on you tube.....made it look so easy :thinking:
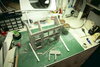
Thanks Si...... Such great stuff to work with, I could quite happily just make buildings !

well, I use a hotwire cutter - it helps, but I still bodge it on occasion - its a case of "designed by a genius, build by a craftsman - operated by an idiot" :rolling:
P5hhSo1.jpg
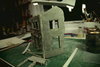
Wow that looks a serious bit of kit Steven.
Some times I manage a good cut,but so easy to go off square I even at 5 mm

Hi John very nice brick and stone work, looks the bizz to me :thumb2: the paint and weathering will bring the hole thing to life.
Pete.
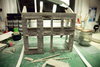
Thanks Pete....... Each stage has its enjoyable sections, the first colour wash it always daunting. Its will the filler fall off !
John .
 
Thread owner
John, finally catching up with this, great start again, and glad all ok on the personal front. :thumb2::thumb2:
 
Thread owner
Hi John don't you seal your plaster ?
Pete.

Pete...... This time instead of using water to mix I've used a PVC additive that is used to seal plaster. Rather like a watered down normal wood PVA In the past I've used dry wall adhesive, but found it would start to become wet again.! Hopefully this will work, was a little concerned that the sealer would stop the paint blocking out.

John, finally catching up with this, great start again, and glad all ok on the personal front. :thumb2::thumb2:
Thanks Brad..... Glad this week is over !
John.
 
Thread owner
Hi John have you tried hair spray, that's what I use have always work for me, I don't know what you are going to use so try it on a scrap piece see what you think.
Pete.
 
Thread owner
Hi John have you tried hair spray, that's what I use have always work for me, I don't know what you are going to use so try it on a scrap piece see what you think.
Pete.
Thanks Pete.
When I looked up my ref sheets of Emmanuel Nouaillier he makes no mention of sealing. Now I find this strange in one sense that normally we would seal the sub layer, on the other hand a thin coat of paint to seal plaster is all that is required on a wall. Does the acrylic paint go on the dry hair varnish alright ?
John.
 
Thread owner
Hi John I have never had any issues, remember I brush paint so I actually have contact with the work piece. But if you can try it out on a test piece.
Pete.
 
Thread owner
Hi John I have never had any issues, remember I brush paint so I actually have contact with the work piece. But if you can try it out on a test piece.
Pete.
Nothing for loose so will give it a try Pete.:thumb2:


Very impressive update John you my friend are a artists of the foam board

Very kind of you to say Lee :smiling4:
John .
 
Thread owner
Greetings from the world of foam board.
Feel in my element here :smiling:
Applied the first thin coats of a grey wash to all surfaces of the board.
View attachment 323335

View attachment 323336

View attachment 323337
The end will be set to the front edge when fully painted .

View attachment 323339

Usings kitchen towel I dappled the surface of the foam, this just removed the extra paint and allows it to dry quicker.Its now in the kitchen to dry over night... I leave for at least 24 hrs to allow the first coat to fully before applying a slightly darker wash. The next wash will be dark indeed more like a black,this will pick out the cracks and brick work.
While this was drying in the house I set up the Balsa cutter. It was quite cheap and serves its purpose. They suggest several thin cuts, as trying to cut 1/4 inch 6 mm is not possible the tools just gets stuck and then wants to twist. I set it for nearly 3 mm and lift the back end slightly on the first cut. To make it quicker I then turn the board over and do the same from the other side. The second cut is made with the cutter in the flat position and results in the board breaking away.

View attachment 323340
Right of the photo are the roof joists , then the head and to the left the floor joists, all on the flat. So much easier with the jig, just have to be patient with the depth. They say to keep adjusting the blade depth , but the screw appear rather soft so I can see the heads giving up with to much adjusting.

Thanks for looking in, comments always welcome

John.
 

Attachments

  • _MG_4149.jpgB1.jpg
    _MG_4149.jpgB1.jpg
    3.7 KB · Views: 0
  • _MG_4150.jpgB2.jpg
    _MG_4150.jpgB2.jpg
    3.7 KB · Views: 0
  • _MG_4151.jpgB3.jpg
    _MG_4151.jpgB3.jpg
    3 KB · Views: 0
  • _MG_4154.jpgB4.jpg
    _MG_4154.jpgB4.jpg
    3 KB · Views: 0
  • _MG_4155.jpgB5.jpg
    _MG_4155.jpgB5.jpg
    2.9 KB · Views: 0
That's quite a pile of kindling you have there John. Looks like the "stripper" is doing a good job.
Cheers, Rick H.
 
Very nicely done John. Had I discovered foam earlier my David and Goliath build would have been much easier and faster. Think I'll revisit it on seeing this...what an inspiration.

Cheers,
Richard
 
Just had a good catch up mate. Very impressive indeed. You are certainly bringing your talents from the past build and improving. Really looks the DB's. Permission to carry on:thumb2::smiling3:
 
Thread owner
WOW SUPERB UPDATE
Thanks Greg.......... Nice to read :smiling2::thumb2:

That's quite a pile of kindling you have there John. Looks like the "stripper" is doing a good job.
Cheers, Rick H.
Cheers Rick........ At first you expect it to just slice any thickness and it could soon go off line, but with careful adjustment of the depth and cutting from both sides seems to be the trick. Going to be fun cutting some very thin laths for the roof, about . 7 of a mm ! That will be the test .:tongue-out3:


Looking good John
Thanks Simon .......... There will be some pewter ! ! Brkts for the down pipes and gutter clips :smiling2:

Very nicely done John. Had I discovered foam earlier my David and Goliath build would have been much easier and faster. Think I'll revisit it on seeing this...what an inspiration.

Cheers,
Richard
Richard ,............ Well worth it, I don't know if you can get the Kapa board in Malaysia, failing that the other one where you use the hair dryer to remove the paper skin is ok ,but the Kapa takes detail far better .

Just had a good catch up mate. Very impressive indeed. You are certainly bringing your talents from the past build and improving. Really looks the DB's. Permission to carry on:thumb2::smiling3:
Thank you Steve..........if I can get my a** in gear I might just do that. Seem to have lost the plot at the moment .

Thanks gang, as I've just said to Steve I've somewhat lost the mojo, no doubt It will return once we get back to normal in the New Year.
John
 
Status
Not open for further replies.
Back
Top