Theme editor

Scale Model Shop

Colin's English Electric Lightning 1/32 Trumpeter

Status
Not open for further replies.
Thread owner
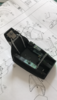
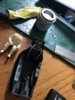
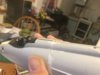
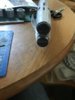
Just finished having a fight with eduard cockpit details I honestly have to say some of those parts are to me impossible to construct the throttle handles spring to mind so I ended up whiltling down a tooth pick to the correct diameter and used that instead
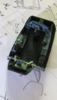
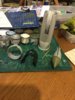
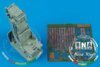
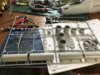
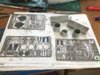
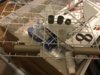
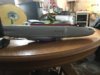
One thing eduard need to do is improve on their instructions yes they show you where and what to do but they should also give you a view of the piece in place so you know you have put it in the correct orientation anyway here's the cockpit after being the application of pe it still needs a touch up to remove the roughness and bare metal but that is the cockpit finished next onto the seat

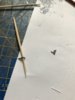
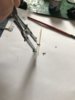
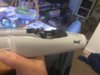
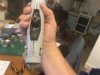
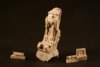
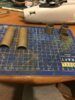
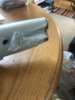
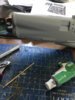
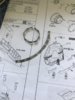
1st part of seat making some sort of steel tube that goes across the top of the ejector seat again good old tooth pick whilted down to fit

Regards

Colin
 

Attachments

  • IMG_5861.PNG
    IMG_5861.PNG
    11.4 KB · Views: 0
  • IMG_5862.PNG
    IMG_5862.PNG
    11.2 KB · Views: 0
  • IMG_5853.JPG
    IMG_5853.JPG
    1.9 KB · Views: 0
  • IMG_5854.JPG
    IMG_5854.JPG
    2.1 KB · Views: 0
  • IMG_5855.JPG
    IMG_5855.JPG
    3.3 KB · Views: 0
Thread owner
Latest small update just did a bit of painting of cockpit front end basically matt black to make the pe stand out and splitter inside the duct dull aluminium still got some more eduard pe to add hopefully get the cockpit seat and the fuselage all buttoned up by the weekend

Regards

Colin
 

Attachments

  • IMG_5875.JPG
    IMG_5875.JPG
    3 KB · Views: 0
Thread owner
Well I think my lightnings office is finished I found the pe side tedious and frustrating but the end result is not too shabby sorry I couldn't get a good picture to capture the cockpit properly so have included 3 from the batch I took during a dry run assembly to check part alignment and overall look

Regards

Colin
 

Attachments

  • IMG_5879.JPG
    IMG_5879.JPG
    2.6 KB · Views: 0
  • IMG_5882.JPG
    IMG_5882.JPG
    2.8 KB · Views: 0
  • IMG_5883.JPG
    IMG_5883.JPG
    2.6 KB · Views: 0
I can see what you mean about the pe for the two different scales yours should have a lot detail being a bigger scale but nice kit bashing so far.
 
Cracking work so far Colin.
I must really get a move on and start mine. But I just can't get interested in building it.
 
Thread owner
Wait till you get to detailing the cockpit numerous swear words and hunting for bits of pe that ping out of the tweezers which I flattend literally with the application of a enginners ball pein hammer in the troublesome area wouldn't reccomend it only for therapeutic reasons

Regards

Colin
 
Wait till you get to detailing the cockpit numerous swear words and hunting for bits of pe that ping out of the tweezers which I flattend literally with the application of a enginners ball pein hammer in the troublesome area wouldn't reccomend it only for therapeutic reasons

Regards

Colin
But a nice tip all the same Colin I may need to try it later.
 
Thread owner
Greetings folks small update and so not encroach on Peterairfix build with anymore of my stuff I have just ordered from France from a company called Musthavemodels the attached photo interesting experience as the whole website was in french anyway the 1/32 seat and eduard after market parts leaves a lot to be desired and in my opinion do not represent what a martin baker mk 4 should look like so after checking Hannants their 1/32 also required pe which looked ok but seems a lot of work compared to the 1/48 scale seat with all the detail in place I searched the internet and found a french website called www.musthavemodels.fr they do kits resin parts and a whole lot more besides so I found a 1/32 seat for a mirage IIIc which looks identical to the Hannants 1/48 only this time it's 1/32 which is what I need the pictures are 1st 1/48 Hannants 2nd 1/32 Hannants along with pe & finally the Musthavemodels 1/32 seat as you can see its the same as the Hannants 1/48

Regards

Colin
 

Attachments

  • IMG_5920.JPG
    IMG_5920.JPG
    1.8 KB · Views: 0
  • IMG_5919.JPG
    IMG_5919.JPG
    2.3 KB · Views: 0
  • IMG_5916.PNG
    IMG_5916.PNG
    9.5 KB · Views: 0
Thread owner
Finally got the fuselage together some serious gaps need filling and smoothing but once done should look ok

Regards

Colin
 

Attachments

  • IMG_5941.JPG
    IMG_5941.JPG
    2.8 KB · Views: 0
Thread owner
Steve that radome is a mixture of if recall 3 greens 2 browns 1 red and 2 greys and was applied on each whilst wet to hopefully get brownish tinged green colour which I matched to numerous photo's on the net and my reference books

Regards

Colin
 
Wait till you get to detailing the cockpit numerous swear words and hunting for bits of pe that ping out of the tweezers which I flattend literally with the application of a enginners ball pein hammer in the troublesome area wouldn't reccomend it only for therapeutic reasons

Regards

Colin
If you really want to practice 'naughty' words, try 1:72 PE. I invented new 'naughty' word while working with this stuff.
 
Thread owner
Engine building time my god look at all the pe to go on the exterior of the model

Regards

Colin
 

Attachments

  • IMG_5943.JPG
    IMG_5943.JPG
    3.4 KB · Views: 0
  • IMG_5944.JPG
    IMG_5944.JPG
    3.3 KB · Views: 0
Thread owner
Engine parts now painted when dry assemble and add pe as required

Regards

Colin
 

Attachments

  • IMG_5947.JPG
    IMG_5947.JPG
    2.9 KB · Views: 0
  • IMG_5948.JPG
    IMG_5948.JPG
    3.1 KB · Views: 0
Thread owner
Another lousy fit for the engine assembly held in place by force with tape whilst the glue sets more filler required I reckon after it has stuck
Yep I was correct huge gap around engine mount and fuselage so more filler should look ok when sanded smooth and repainted etc While I was at it I went over the entire fuselage join and filled in all gaps ready for priming and finishing with foil thats the plan

Regards

Colin
 

Attachments

  • IMG_5950.JPG
    IMG_5950.JPG
    2.6 KB · Views: 0
  • IMG_5951.JPG
    IMG_5951.JPG
    2.5 KB · Views: 0
  • IMG_5956.JPG
    IMG_5956.JPG
    2.9 KB · Views: 0
Thread owner
Latest update found I had to cut off the hinges to the airbrakes and then cement the airbrakes in closed position and then sand down the cut off hinges so they would fit back into the fuselage as the airbrakes were rarley if ever seen in the open position when the aircaft was at rest on the ground
Whilst I was at it I decided to paint the spine red as this kit will be foil covered no masking was deemed neccasry for this point
I also painted the engine exhaust and still have some pe to apply to finish them off
 

Attachments

  • IMG_5953.JPG
    IMG_5953.JPG
    2.6 KB · Views: 0
  • IMG_5961.JPG
    IMG_5961.JPG
    2.7 KB · Views: 0
Status
Not open for further replies.
Back
Top