Theme editor

Scale Model Shop

COMPLETED AT LAST!!....Dragon 1/6 MG42 with tripod...

Status
Not open for further replies.

spanner570

New member
Joined
May 26, 2009
Messages
15,599
Reaction score
613
Points
0
1/3
Thread owner
Something a bit different boys!

This 160 odd piece 1/6th MG42 Dragon kit is very well engineered, with loads of detail and 'working bits'

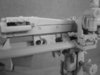
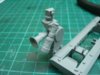
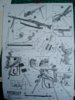
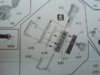
The down side are the instructions. Apart from a split drawing of the rear angle adjuster, the rest of the kit instructions consist of blurred images of the built model, with arrows pointing to where the relevent bits go....This means dry fitting around six pieces at once, (including miniscule springs) to get the correct sequence for glueing and more to the point on this model where not to glue! Then trying to remember the correct way with all the bits loose in front of you.....

There are quite a few parts not used and some supposed to be, but for the life of me I couldn't see where, as the instructions forgot to mention them anyway!!...Follow that!

I tried to get the pictures in line a second time, but failed. So rather than go to embarrassment

of asking the mods to delete this thread a second time, I've gone for en-mass pictures.

O.K., the build:-

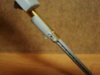
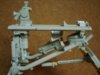
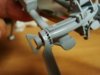
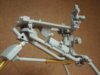
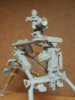
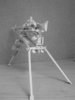
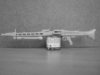
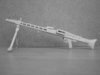
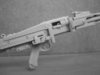
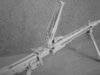
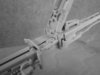
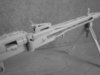
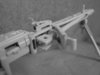
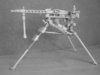
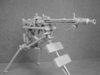
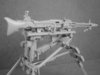
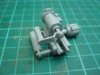
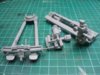
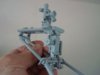
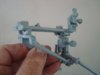
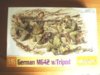
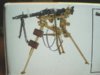
In sequence. The box art / The instructions ( note the only bit of 'exploded' diagram) / The tripod rear vertical angle adjuster thingy with collapsable hinges. / The rear telescopic sight and adjuster fixed to the top of the tripod cum gun rest. / The three main top parts. Note the calibrated horizontal gun slide on the left hand piece. Finally, the three components fixed together.

The finished thing is all hinge pins and goes up and down, side ways and folds flat! It is really complicated and I reckon a bit fiddly in the field and easily 'bent'!

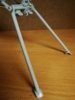
That's it for now. Next comes the telescopic tripod legs, which are part brass tube and part plastic...and more bl***y diddy springs!

I hope you like this slight move from the norm.

Cheers,

Ron

View attachment 50395

View attachment 50396

View attachment 50397

View attachment 50398

View attachment 50399

View attachment 50400

View attachment 50401

View attachment 50402

View attachment 50403

View attachment 163421

View attachment 163422

View attachment 163423

View attachment 163424

View attachment 163425

View attachment 163426

View attachment 163427

View attachment 163428

View attachment 163429
 

Attachments

  • one sixth MG42 004.jpg
    one sixth MG42 004.jpg
    2.7 KB · Views: 0
  • one sixth MG42 006.jpg
    one sixth MG42 006.jpg
    3 KB · Views: 0
  • one sixth MG42 011.jpg
    one sixth MG42 011.jpg
    2.9 KB · Views: 0
  • one sixth MG42 013.jpg
    one sixth MG42 013.jpg
    1.9 KB · Views: 0
  • one sixth MG42 014.jpg
    one sixth MG42 014.jpg
    2 KB · Views: 0
  • one sixth MG42 017.jpg
    one sixth MG42 017.jpg
    2.9 KB · Views: 0
  • one sixth MG42 001.jpg
    one sixth MG42 001.jpg
    2.9 KB · Views: 0
  • one sixth MG42 002.jpg
    one sixth MG42 002.jpg
    2.4 KB · Views: 0
  • one sixth MG42 003.jpg
    one sixth MG42 003.jpg
    2.3 KB · Views: 0
Looking very good Ron. It really puts it into perspective in the photos of you holding it. It will look great when you have done your magic paint brush trick on it!

Ian M
 
Lookin' good so far Ron. Beats me why the Germans should need something so complicated though. Just look at Arnie! He gets away with slinging a minigun from a canvas strap over his shoulder and shooting one handed! AND he hits everything he aims at!

Gern

PS Forgot to answer your question on your last Vietnam post. I've not got much going on at the moment. I'm struggling to get my airbrush working with either Vallejo or Citadel paints and I'm waiting for a PE tool from John. (He's kindly ordered one from the States for me. They're quick enough to send their military to any country in the world - as long as they can find someone to tell them where it is of course - but a simple thing like a parcel seems to be beyond them!)
 
You found one then mucker! I know youve been looking for one of these since cosford , ive been keeping my eye out too. This looks like a tricky build ,especially with the not very helpful instructions! Looking great so far , its a very different type of kit isnt it? cant wait to see it progress , cheers tony
 
Thread owner
Thanks for your posts boys.....

Dave, surely you don't think Arnie shooting up the town, whatever, was stage managed?...Here's me thinking it was for real!!!

Tony, it is tricky in as much as because the instructions show the thing built, there are parts that fit in parts that you can't see from the picture, so you have this rubic cube in front of you! It would be reasonably straight forward if the diagram was 'exploded' ....thanks for looking out for one mate, but Justine beat us all to it. bless her!

Cheers all,

Ron
 
Thread owner
As it's raining...No, can't be! I've done a bit more on the tripod:-

The first picture shows the clever telescopic leg mechanism. You can just make out the diddy spring under the grey handle...Press the handle, the spring lifts the locating pin from the hole, move the inner leg to a new hole release the handle...presto!

Next the tripod components ready for assembly / The front leg and under spreader leg in place / The rear two tripod legs. Note the clever toothing in pic. 6, this allows angle adjustment of the rear legs. The big wing nut has a capsulated nut inside....

Picture eight shows well the left/right traverse bar. This has very nice calibrations moulded into the plastic.

The remaining pictures show the completed tripod. Note the 'spares' box, brackets for the rear legs when folded and the empty cases deflector. The whole thing needs a bit more tidying and the handle pins sorting before painting.

The real thing was quite a feat of engineering, but I question why so complicated, when the weapon could presumably be set up on it's own using the bipod legs?....A darn sight quicker too, me thinks.....

Over simplified thinking perhaps, but you know what I mean.

Next up will be the weapon itself. First look shows it's quite a straight forward construction. Lots of working bits mind!

Cheers,

Ron

View attachment 50422

View attachment 50423

View attachment 50424

View attachment 50425

View attachment 50426

View attachment 50427

View attachment 50428

View attachment 50429

View attachment 50430

View attachment 50431

View attachment 50432

View attachment 163448

View attachment 163449

View attachment 163450

View attachment 163451

View attachment 163452

View attachment 163453

View attachment 163454

View attachment 163455

View attachment 163456

View attachment 163457

View attachment 163458
 

Attachments

  • one sixth MG42 033.jpg
    one sixth MG42 033.jpg
    2.2 KB · Views: 0
  • one sixth MG42 034.jpg
    one sixth MG42 034.jpg
    2.9 KB · Views: 0
  • one sixth MG42 032.jpg
    one sixth MG42 032.jpg
    2.4 KB · Views: 0
  • one sixth MG42 030.jpg
    one sixth MG42 030.jpg
    2.3 KB · Views: 0
  • one sixth MG42 029.jpg
    one sixth MG42 029.jpg
    2.9 KB · Views: 0
  • one sixth MG42 036.jpg
    one sixth MG42 036.jpg
    2.6 KB · Views: 0
  • one sixth MG42 015.jpg
    one sixth MG42 015.jpg
    2.5 KB · Views: 0
  • one sixth MG42 016.jpg
    one sixth MG42 016.jpg
    2.6 KB · Views: 0
  • one sixth MG42 018.jpg
    one sixth MG42 018.jpg
    2 KB · Views: 0
  • one sixth MG42 019.jpg
    one sixth MG42 019.jpg
    2.5 KB · Views: 0
  • one sixth MG42 020.jpg
    one sixth MG42 020.jpg
    2.5 KB · Views: 0
\ said:
Thanks for your posts boys.....Dave, surely you don't think Arnie shooting up the town, whatever, was stage managed?...Here's me thinking it was for real!!!
Oh no. Nothing like that Ron. It was a documentary so no need for you to worry.

Gern
 
That looks like fun Ron.

What an amazingly complicated piece of engineering just to lay a machine gun. It's very interesting,I'll be staying tuned.

Cheers

Steve
 
from the pictures it looks like the germans needed a mechanical degree to put this tripod up lol,on the plus side i`m loving this build,given me something else in mind to try my hand at in the future

mobear
 
Thread owner
Thanks for the input boys.....

It certainly is a maze of bits and bobs. I had a look at the Maxim set up, and compared with the mg42 tripod, it looks very basic.....But sensible!

Cheers,

Ron
 
Thread owner
Hi all, here is the finished and primed MG42......and sat on it's tripod.

Quite straight forward considering the loads of working bits. The cocking handle opens, closes and slides along the weapon on a return spring. The top hinges to reveal the breach and there is a mechanism that when opened slides out the replacable barrel.

The bipod folds and clicks under the weapon. Strange thing though, the weapon can't be placed on the tripod with the bipod snapped closed! Also when the MG is on the tripod, the trigger is tucked in meaning the gunner has to weave his hands through the tripod bits and bobs to get at it.....

The MG justs rests on the tripod and is not fixed in any way. This seems daft to me......I have a load of unmentioned bits still left, perhaps these are some sort of clip arrangement? I'll have to have a second look next week some time.

So here are some pictures of the finished MG42 sat on it's tripod....Next will be the two ammo drums, a spare barrel and the ammo belt, then the painting.

Cheers all,

Ron

View attachment 50754

View attachment 50755

View attachment 50756

View attachment 50757

View attachment 50758

View attachment 50759

View attachment 50760

View attachment 50761

View attachment 50762

View attachment 50763

View attachment 50764

View attachment 50765

View attachment 50766

View attachment 163780

View attachment 163781

View attachment 163782

View attachment 163783

View attachment 163784

View attachment 163785

View attachment 163786

View attachment 163787

View attachment 163788

View attachment 163789

View attachment 163790

View attachment 163791

View attachment 163792
 

Attachments

  • one sixth MG42 049.jpg
    one sixth MG42 049.jpg
    1.6 KB · Views: 0
  • one sixth MG42 037.jpg
    one sixth MG42 037.jpg
    1.4 KB · Views: 0
  • one sixth MG42 038.jpg
    one sixth MG42 038.jpg
    1.4 KB · Views: 0
  • one sixth MG42 039.jpg
    one sixth MG42 039.jpg
    1.7 KB · Views: 0
  • one sixth MG42 040.jpg
    one sixth MG42 040.jpg
    1.8 KB · Views: 0
  • one sixth MG42 041.jpg
    one sixth MG42 041.jpg
    1.9 KB · Views: 0
  • one sixth MG42 042.jpg
    one sixth MG42 042.jpg
    1.8 KB · Views: 0
  • one sixth MG42 043.jpg
    one sixth MG42 043.jpg
    1.8 KB · Views: 0
  • one sixth MG42 044.jpg
    one sixth MG42 044.jpg
    1.9 KB · Views: 0
  • one sixth MG42 045.jpg
    one sixth MG42 045.jpg
    1.7 KB · Views: 0
  • one sixth MG42 046.jpg
    one sixth MG42 046.jpg
    1.7 KB · Views: 0
  • one sixth MG42 047.jpg
    one sixth MG42 047.jpg
    2 KB · Views: 0
  • one sixth MG42 048.jpg
    one sixth MG42 048.jpg
    2.1 KB · Views: 0
looking good, excellent work the detail is amazing. I think modelling is such a learning hobby you start to appreciate the work which goes into the real thing.

Robert
 
I can't imagine painted and weathered too!!! Will be amazing, knowing your models Ron.

Cheers
 
The gunner would not have to weave his hands through.

There was a hand lever on the left side of the horizontal traverse with linkage to the trigger, perhaps this was one of the pieces that was not in the instructions.

As for the reason to have bipod and Lafette, the lafette could be locked on to a specific vertical traverse (chest height for example) and you could simply rock the gun left to right and you would be able to decimate attacking Russian Hordes. It also allowed you to sit in a trench below ground level and operate the gun without exposing your head to enemy gunfire.

The bipod was designed to be used if you were "on the move" and needed to rattle off some rounds and change position.

I am a WWII German reenactor, so I know my ins and outs of this kind of stuff.

Hope this helps.

-Chris.
 
Status
Not open for further replies.
Back
Top