I'm not ready for 'serious' building just yet, but when I was reading Jack10's excellent Panther build, I noticed Jen's reference to summat called 'Disk Camo'
That old devil 'curiosity' bit me......
When I saw the images of the camouflage I thought. "Now there's a challenge and a half for us brush wallahs!
So I set to experimenting. I came up with the idea of using an old paintbrush with a suitable diameter ferrule, and cutting the bristles almost down to nothing.(I did the same with a smaller brush)
After loading the near bald brush with suitably thinned paint, I found that by twisting the brush through a few degrees, a circle can be made.
I was about to buy a 1/35 Stug kit, when I remembered I built one for one of my first ever dioramas in 2009. So up in the loft I goes and there it was. The dio. is long gone, but the Stug remains......Sorted!
I had a play on the bottom of the model.....
It's one thing practicing with paints where things can't be seen, but quite another actually applying your 'Idea' to the model itself. I sat in front of the thing for ages.....
I didn't pencil in any guide lines, I just started in a corner and let the pattern develop where it would.
There are a few bits missing from the kit, but as this is really a painting exercise, please excuse the model's inaccuracies..
Anyway, here is the result so far. Still the weathering to do.
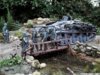
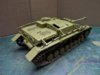
Here's the German Grey Stug IV in the original diorama.
View attachment 290070
Stripped down and re-painted. The Commander's off on leave! Mud still on the tracks.
View attachment 290071
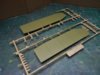
Luckily, I still had the original side plate thingies.
View attachment 290072
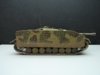
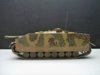
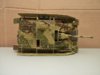
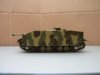
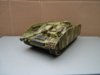
Here are the shots of my attempt at a 'Squeeky Clean' Disc Camo. Brush 'swirled' with Vallejo Model Air Acrylics.
Detail and tools etc., painted with those lovely little pots of Airfix paints...Honest!
View attachment 290073
View attachment 290074
View attachment 290075
View attachment 290076
View attachment 290077
View attachment 290078
A few rugby balls here and there, but overall, I don't mind admitting I'm really chuffed at this first time stab at it. I hope you approve too?
Next I'll touch up, and tone down the paintwork, then muck it all up etc., and place it on a base of some sort.
Cheers all and thanks for looking.
Ron
That old devil 'curiosity' bit me......
When I saw the images of the camouflage I thought. "Now there's a challenge and a half for us brush wallahs!
So I set to experimenting. I came up with the idea of using an old paintbrush with a suitable diameter ferrule, and cutting the bristles almost down to nothing.(I did the same with a smaller brush)
After loading the near bald brush with suitably thinned paint, I found that by twisting the brush through a few degrees, a circle can be made.
I was about to buy a 1/35 Stug kit, when I remembered I built one for one of my first ever dioramas in 2009. So up in the loft I goes and there it was. The dio. is long gone, but the Stug remains......Sorted!
I had a play on the bottom of the model.....
It's one thing practicing with paints where things can't be seen, but quite another actually applying your 'Idea' to the model itself. I sat in front of the thing for ages.....
I didn't pencil in any guide lines, I just started in a corner and let the pattern develop where it would.
There are a few bits missing from the kit, but as this is really a painting exercise, please excuse the model's inaccuracies..
Anyway, here is the result so far. Still the weathering to do.
Here's the German Grey Stug IV in the original diorama.
View attachment 290070
Stripped down and re-painted. The Commander's off on leave! Mud still on the tracks.
View attachment 290071
Luckily, I still had the original side plate thingies.
View attachment 290072
Here are the shots of my attempt at a 'Squeeky Clean' Disc Camo. Brush 'swirled' with Vallejo Model Air Acrylics.
Detail and tools etc., painted with those lovely little pots of Airfix paints...Honest!
View attachment 290073
View attachment 290074
View attachment 290075
View attachment 290076
View attachment 290077
View attachment 290078
A few rugby balls here and there, but overall, I don't mind admitting I'm really chuffed at this first time stab at it. I hope you approve too?
Next I'll touch up, and tone down the paintwork, then muck it all up etc., and place it on a base of some sort.
Cheers all and thanks for looking.
Ron


")