Theme editor

Scale Model Shop

Cyber Hobby (Dragon) Bf109E Trop

Status
Not open for further replies.

BarryW

Active member
SMF Supporters
Joined
Jul 23, 2011
Messages
6,147
Reaction score
462
Points
83
Age
70
1/3
Thread owner
I thought I would make a start before my trip to Croatia as I have a bit of time to spare.

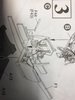
This is my second Dragon model the first being the 1/32 bf110. I loved the bf110 build, nice crisp plastic and a good fit but it had appalling instructions. I remember downloading Eduard 1/48 scale 110 instructions to help and they were more use than the kit ones. I don’t think the 109 instructions are that bad but they are not great. I am really looking forward to this.

The box:
View attachment 297859
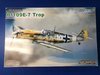
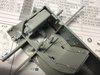
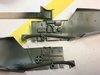
I am not keen on the box top illustration, it looks a bit toy like but what’s inside the box is superb at least as good as the 110 plastic, in fact slightly better if anything as the exhausts are hollowed at the tips. Interestingly sprue J is actually sprue J from the 110 and is labelled as such. It is the 110 engine for use in the 109. I will be depicting this aircraft buttoned up.

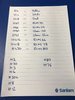
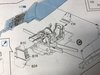
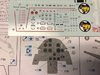
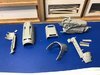
All I have done so far is label up the sprues for easy identification and worked through the colours needed. The instructions just give paint numbers for several ranges including GSI Aequos. In these situations I write down the paint numbers listing the colours next to it. The instructions do give a list of colours against the names but it seems a little ‘short’ and on checking I found a lot more colours used in the instructions.

In the picture those listed in the instructions are at the top, at the bottom are the numbers I picked out from the body of the instructions....
View attachment 297860
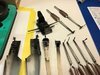
I used Google to identify and write down the paint colours next to each number. This will make identification a lot easier during the build without paging through the instruction.

I will be using paint masks for all major markings and I am ready to start cutting plastic. I might get a chance to do a little more and post again before I leave for the airport Monday. If not I will update when I am back in a little over a week.
 

Attachments

  • 28E50D74-A915-401D-BF34-07F0BCEE486E.jpeg
    28E50D74-A915-401D-BF34-07F0BCEE486E.jpeg
    3.2 KB · Views: 0
  • 087C0D0E-A636-4209-A68A-C5428F19F297.jpeg
    087C0D0E-A636-4209-A68A-C5428F19F297.jpeg
    3 KB · Views: 0
Barry
I am new to the site and a big fan of the 109 so I will tag along if I may and see how the build goes. Good luck
Steve
 
Can't go wrong with a BF109! Looking forward to see how it compares to an Eduard one, I'll take a front seat as well.

Cheers
 
Thread owner
Welcome to you all, great to have you along. I have built the Eduard some years back take a look.
View attachment 298209View attachment 298210

First impression is that the Dragon is slightly better but we will see how it pans out.

I have been working big on the i.p. and here is how it looks.
View attachment 298211
It is made up of a lot of parts and in my view bettter than the Eduard one. I have a lot more work to do prepping the cockpit sub assemblies for painting but won’t find any more time to get on with that and post again for over a week.
 

Attachments

  • 9D27D41B-97B6-455F-8464-D2C9ECEFB75C.jpeg
    9D27D41B-97B6-455F-8464-D2C9ECEFB75C.jpeg
    2.7 KB · Views: 0
  • 859FC4D7-055C-4208-B66E-B1CAAC53E41E.jpeg
    859FC4D7-055C-4208-B66E-B1CAAC53E41E.jpeg
    2.1 KB · Views: 0
  • A83923EC-B354-48FF-84BF-20FF94E755D3.jpeg
    A83923EC-B354-48FF-84BF-20FF94E755D3.jpeg
    2.2 KB · Views: 0
Hi Barry

I've recently finished the Eduard kit myself mate, interested to read that you think this one is a better kit. At least you will have the Eduard instructions to go off if Dragon's are anything like normal.

Anyway I'll sit in and follow the build if you don't mind.

cheers
Ross
 
Hi Barry,

I'd like to join in with the guys and sit amongst them if you don't mind. Having built the 1/24 Airfix kit am interested on how this goes. Must surely be miles apart from the old Airfix kit.
Dragon instruction sheets are affectionally referred to as distruction sheets by Milmodians. :tears-of-joy:

Cheers,
Richard
 
Thread owner
Sat right now outside my hotel in Split, booted and suited waiting for some others to go to a reception and decided to look in. Been having a nice relaxed time, good food, too much to drink and enjoying great company but nevertheless I am keen to get on with this build. Perhaps Monday.

Yes the instructions are not great but do seem to be reasonably ‘adequate’ so far, it is easy enough to deal with the colour issue. They are certainly nowhere near as bad as the Bf110 were. It certainly is sad that such great plastic is not backed up with good instructions. I will also need to research things like the walk lines which will have to be painted. Not difficult.
 
Thread owner
Finally back at the bench.

Those instructions! Nothing major, more annoying than anything.

View attachment 300644
See those parts F43 and F44. I really cannot work out how they fit or exactly in what position. Looking at a drawing showing this area and these parts are not illustrated in position!
View attachment 300645
I have played around and know that the are fillets to fit a gap between the floor and fuselage sides but was unable after over an hour of dry fitting and playing to work out what to do with them.

My dry fit did show that the area won’t be visible when buttoned up even with the canopy open so I am just leaving these parts off. Frustrating though!
View attachment 300646
 

Attachments

  • 8C1D121B-1ED5-4AB3-B1DD-969E36267CA4.jpeg
    8C1D121B-1ED5-4AB3-B1DD-969E36267CA4.jpeg
    3.7 KB · Views: 0
  • BFB94FED-AA4C-45A5-B77D-298AF2EE97CF.jpeg
    BFB94FED-AA4C-45A5-B77D-298AF2EE97CF.jpeg
    3.3 KB · Views: 0
  • E5B5E541-2749-4FF9-99C9-2C7CEB0B5EDC.jpeg
    E5B5E541-2749-4FF9-99C9-2C7CEB0B5EDC.jpeg
    3 KB · Views: 0
Hi Barry
I am building a 1/48 Eduard Spitfire and have little experience of plane builds. I will follow your work closely as I'm sure there will be tips to pick up along the way.
Jim
 
Thread owner
Hi Joe - yes I cam to the same conclusion and left them out.

Jim - glad to have you along.

Here I am as of last night.

With the exception noted the interior parts just fall perfectly into place, no fit issues. I have finished the sub-assemblies needed prior to closing the fuselage halves and have primed them with MRP Black Primer.
View attachment 300735

You can see the Fine Molds seat harness all primed and ready to paint. This time I will try attaching with CA after painting, with my last experiment with these of course I painted them after cementing them to the seat and because they are so well defined and molded it was easy enough.

I have also been working on the engine and its panels. I will not be displaying the enigine (beautifully molded as it is) and I am proceeding carefully only using the engine parts needed to hold and fix everything together.

View attachment 300736

I love the plastic - so clean and crisply molded with virtually no clean up apart from sprue attachments.

Tonight, hopefully, I will be able to lay down the main interior colour using MRP50 RLM02 and progress the nose area a little more.
 

Attachments

  • IMG_3375.jpg
    IMG_3375.jpg
    3.1 KB · Views: 0
  • IMG_3374.jpg
    IMG_3374.jpg
    3.8 KB · Views: 0
Looking good there, looking forward to see that cockpit painted.

How are those MRP paints performing through the ab btw?

Cheers
 
Thread owner
More progress

Laid down the RLM02 base in the 'pit
View attachment 300888
View attachment 300889
Sprayed the seat belts.
View attachment 300890
RLM66 on the instrument panel.
View attachment 300887
An I have been working on the engine and the panels. I am very optimistic about the fit of these from my dry fitting.
View attachment 300891
Preparing to paint details on the i.p. and elsewhere I looked at the decals for the internal areas and the Dragon instructions bite again!! You may be able to see how the decals are mis-numbered in the instructions. I will have to work out what goes where by Mk 1 eyeball only.
View attachment 300886
 

Attachments

  • IMG_3382.jpg
    IMG_3382.jpg
    1.5 KB · Views: 0
  • IMG_3381.jpg
    IMG_3381.jpg
    2.6 KB · Views: 0
  • IMG_3380.jpg
    IMG_3380.jpg
    2.7 KB · Views: 0
  • IMG_3379.jpg
    IMG_3379.jpg
    1.9 KB · Views: 0
  • IMG_3377.jpg
    IMG_3377.jpg
    3.1 KB · Views: 0
  • IMG_3383.jpg
    IMG_3383.jpg
    3.3 KB · Views: 0
Looking good Barry I’m not that great at cockpit painting I use the right colours but never seems to stand out all that well. The curse of dragon strikes again I don’t like their instructions it gives me brain ache trying to work them out.
 
All looks rather good Barry. I'm looking closely at the MRP paint in the cockpit. It looks lovely.
 
Status
Not open for further replies.
Back
Top