Theme editor

Scale Model Shop

Dave Ward's 1/35 HobbyBoss Vickers Medium Mark I

Status
Not open for further replies.

Dave Ward

New member
Joined
Apr 27, 2018
Messages
10,549
Reaction score
43
Points
0
1/3
Thread owner
Whilst on the final approach on my FJ-4Fury ( also by HobbyBoss ), I've opened the box on this, and taken a few detail pics of some parts:View attachment 304282

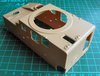
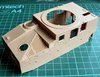
The Hull is in one ( box! ) piece - some nice detail..........View attachment 304280View attachment 304279

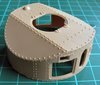
The turret similarly is in one piece
View attachment 304288

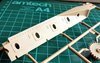
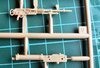
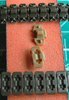
No coaxial machine guns but two Vickers in the hull, and a Hotchkiss that could be swapped around between ball mounts in the turretView attachment 304283
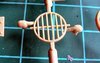
Thers's no interior at all, but despite this HB provide PE details for the Vickers breech end ( no no no! )
This looks more appropriate to a drain cover!
View attachment 304281

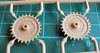
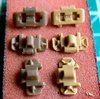
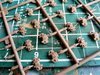
Some nice details on the suspension/drivetrain partsView attachment 304286View attachment 304285View attachment 304284

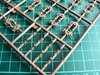
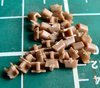
I think the real tricky/tiresome part will be the track links
View attachment 304287
I'll need 65 links per side - 260 bits to fit.
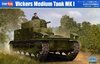
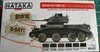
The Vickers Medium Mk I was the first 'mass produced' tank, around 80 were built, but constantly modified as experience dictated. The road wheel axles were fragile, and there are two options for variations in the kit. New Improved suspension bogies were fitted to the Mark II onwards . I hope to start construction at the weekend - somehow I don't think this will be as fast a build as my FJ-4!!
Dave
 

Attachments

  • box hull 01.jpg
    box hull 01.jpg
    3.3 KB · Views: 0
  • turret.jpg
    turret.jpg
    3.3 KB · Views: 0
  • track links 01.jpg
    track links 01.jpg
    4.5 KB · Views: 0
  • suspension mounts.jpg
    suspension mounts.jpg
    3.5 KB · Views: 0
  • sprockets.jpg
    sprockets.jpg
    2.9 KB · Views: 0
  • returns.jpg
    returns.jpg
    2.9 KB · Views: 0
  • machine guns.jpg
    machine guns.jpg
    3.3 KB · Views: 0
  • hb vickers medium mk i.jpg
    hb vickers medium mk i.jpg
    2.9 KB · Views: 0
  • grating.jpg
    grating.jpg
    3 KB · Views: 0
  • box hull 02.jpg
    box hull 02.jpg
    3.7 KB · Views: 0
Dave those tracks look like carpet monster food !
The rest looks fine, doesn't look to be any flash .
John .
 
Thread owner
I have read that it is possible to use Tamiya Matilda tracks as replacement. The 'new' Tamiya Matilda has both 'link & length' and flexible tracks. I'll dig mine out, and have a look, but I want to use the kit parts if possible.
Dave
 
This one is a first for me:surprised: so you know i'll be watching.

Tony lee
 
Very nice dave , looks to be beautifully moulded , those hundreds of track bits look like a PITA though!! Cheers tony
 
Looking like an interesting build so I’ll tag along as well.....tracks could be a bit of a drag though. I would be tempted to stick the little bits on the big bits while the big bits are still on the sprue, it should make some of the handling easier.....depends on the clean up though.
Cheers
Tim
 
Thread owner
Tony - HobbyBoss make 4 versions of the Vickers tank, from mine, the Mark I, to the Mark II**, which looks quite different.
Tim - yes, I always try to make as much on the sprues as possible, even down to priming.
I've located the Tamiya Matilda, so I'll be able to compare the track bits.
Dave
 
Thread owner
I assembled a few HB tracks to compare with the Tamiya link & length parts:
View attachment 304342
HB on the left. Small differences, but the overall dimensions are the same.

The Tamiya model gives you the alternative L & L, and flexible.............
View attachment 304341

I am keeping the link & length tracks for the Matilda, but, the flexible tracks I will keep as a backup for the HB model, in case I get really fed up with assembling the individual links. I want to use the kit parts, but it's nice to have a fallback.
Dave
p.s. the Matilda is the 35300 issue ( the 300th Military model from Tamiya )
 

Attachments

  • tamiya vs HB .jpg
    tamiya vs HB .jpg
    4.6 KB · Views: 0
  • Tamiya flex vs HB.jpg
    Tamiya flex vs HB.jpg
    3.2 KB · Views: 0
Very interesting model Dave, lovely finish and moulding as the guys have pointed out, nice work so far.
 
Hi Dave
Looks OK as a kit. One piece hull and one piece turret. They are saving you time for the track :smirk: Someone like Tristar or MiniArt would have had two sprues for the hull and another for the turret!!!
Jim
 
Thread owner
Construction started! I'm going to split the construction of the tracks up - 4 sprues, 4 sessions.
First track sprue done about 3/4 hr, with P!ink blasting out ( not Pink Floyd ), a bit fiddly, but OKView attachment 304450View attachment 304452

These are not clickable links, I'll do the same as I always do, create straight runs, then fill in with individual links.
There is only one colour option, in which HB calls for overall 'olive drab'. I don't think that is correct, so I'm going with the Khaki Green No.3 ( G3 ) from the Hataka Set:
View attachment 304451
I've had good results with Hataka paint, so no worries
Dave
 

Attachments

  • hataka paint.jpg
    hataka paint.jpg
    2.7 KB · Views: 0
  • guide teeth.jpg
    guide teeth.jpg
    4.1 KB · Views: 0
  • links complete.jpg
    links complete.jpg
    4.6 KB · Views: 0
Dave,

Loving this so far, :thumb2::thumb2:
Do you use a hairy stick or the hissy stick with the Hataka paints?

Paul.
:smiling2:
 
Thread owner
Paul,
Hataka Red Line paints are optimised for airbrush, their Blue Line paints are for the hairy stick ( not that I've had any of these Blue lines ). There is an Orange Line, which is a lacquer based paint link: Hataka Site
Dave
 
There is only one colour option, in which HB calls for overall 'olive drab'. I don't think that is correct,
Not according to Mike Starmer’s book, British Army Colours & Disruptive Camouflage in the United Kingdom, France & N.W. Europe, 1936 -1945. I quote:

Mike Starmer said:
An examination of immediate pre-war monochrome photographs frequently shows tanks and other vehicles with a very dark and glossy, almost black, appearance which the writer believes to be examples of B.S.C. No.24 Deep Bronze Green.

The model paint mixture he provides for this in the same book is 6 parts Humbrol 3 Brunswick Green, 3 parts Humbrol 10 Service Brown and 1 part Humbrol 2 Emerald Green, and apply a satin varnish over the paint. The paint chip also included is basically a glossy, very dark green.
 
Thread owner
Jakko,
yep, fair enough - although the Medium Mk I was produced in 1924, so before Mr Starmers reference period. I do have several types of Deep Bronze Green, but I don't have to decide for a while yet!
Dave
 
Dave I think you need to invest in a new nipper,those rough cuts on the links only add to the clean up in my opinion:thumb2:.
 
Thread owner
Tony,
Ah, but there is a reason for the cuts - the guides are so small, I can't get a tighter cut - so I will clean them up after having glued the guide link to the track plate. I did try using a scalpel, but the carpet monster was ready and waiting! It's a matter of being able to handle the bits with my fat fingers!
Dave
 
Status
Not open for further replies.
Back
Top