Theme editor

Scale Model Shop

Dave Ward's 1/48 ICM Henschel Hs 126A-1 Condor Legion

Status
Not open for further replies.

Dave Ward

New member
Joined
Apr 27, 2018
Messages
10,549
Reaction score
43
Points
0
1/3
Thread owner
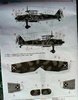
After my Interwar Vickers Mk I, my next build is also pre-WWII............. OOBView attachment 305415
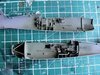
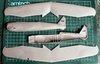
Nice crisp mouldings in a fairly soft plastic. It's quite large 30cm wingspan
View attachment 305418
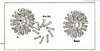
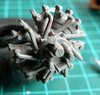
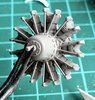
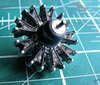
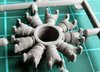
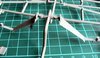
Engine bits are nice
View attachment 305414View attachment 305413View attachment 305411

Some bits look a bit too delicate, and will need real care to remove from the sprue & clean up
View attachment 305416
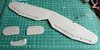
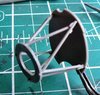
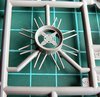
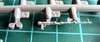
One piece undercarriage legs
View attachment 305417

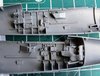
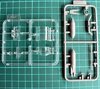
Canopy & bomb sprues - not sure about the clear instrument panels
View attachment 305409
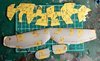
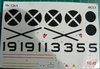
Decals
View attachment 305412

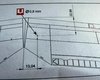
The instructions look OK, but the quality could be better - the B & W profiles are poor, it's impossible to see the difference between some colours
View attachment 305410
Luckily, I've found a much better view from the internet. Construction will start shortly...............
Dave
 

Attachments

  • canopy & bomb.jpg
    canopy & bomb.jpg
    4.1 KB · Views: 0
  • colour call out.jpg
    colour call out.jpg
    3.1 KB · Views: 0
  • cowling bits.jpg
    cowling bits.jpg
    2.8 KB · Views: 0
  • decals.jpg
    decals.jpg
    3.6 KB · Views: 0
  • engine rods.jpg
    engine rods.jpg
    4.7 KB · Views: 0
  • engine.jpg
    engine.jpg
    3.5 KB · Views: 0
  • ICM Hs 126.jpg
    ICM Hs 126.jpg
    3.5 KB · Views: 0
  • mg.jpg
    mg.jpg
    2.2 KB · Views: 0
  • Underc legs.jpg
    Underc legs.jpg
    3.2 KB · Views: 0
  • wings & fuselage.jpg
    wings & fuselage.jpg
    2.8 KB · Views: 0
Thread owner
Whilst looking through the instructions, I found this:
View attachment 305444

OOOH such precision! what tolerance should I apply?
Sod it, I'm drilling 23mm & 13mm, hang the consequences!

I did say the ICM instructions were OK, but you get this-
View attachment 305445
The induction pipe on the back of the cylinders C54, 9-off. Not exactly clear how it's supposed to fit.
Now, the ICM kit has been reboxed by Italeri, and I was able to download the instructions from 'Scalemates'
View attachment 305441

Now, I think that is a little bit clearer. - I may be consulting the Italeri instructions again!
Dave
 

Attachments

  • P1050151.JPG
    P1050151.JPG
    3.2 KB · Views: 0
  • italeri engine instr.jpg
    italeri engine instr.jpg
    2.1 KB · Views: 0
  • P1050150.JPG
    P1050150.JPG
    2.7 KB · Views: 0
Thread owner
Construction started - I've assembled the wing! Since the Hs 126 is a parasol, I can finish the wing to a large degree - especially the tricky camo.View attachment 305512

The engine is assembled, but unless I leave off the cowlings, not a lot will be seen..................
View attachment 305510View attachment 305511
I'm not going to spend any time on the back of the engine, as you can't see it anyway ( hence the seams left untouched )
Dave
 

Attachments

  • wings tail.jpg
    wings tail.jpg
    2.4 KB · Views: 0
  • engine 02.jpg
    engine 02.jpg
    3.8 KB · Views: 0
  • engine 01.jpg
    engine 01.jpg
    4.5 KB · Views: 0
Looks a nice kit of an interesting subject. Ive picked up the italeri boxing in my local hobby shop and looked at it a few times. Might have to get it after seeing this. The ICM instructions look bad.
 
Thread owner
Dave,
the instructions are alright, as far as they go, but leave a lot to the imagination! The worst part is the poor marking profiles. The ICM version has two finish options, and a bomb rack, but the Italeri has 7 decal options - a nice choice
Dave
 
Thread owner
All the bits added to the sidewalls - lot of them! View attachment 305550

The engine mount - a bit flimsy!
View attachment 305548

For the camo finish, I'm going to use this
View attachment 305549
I don't think that I would have got this far without the Italeri instructions - at least not as fast! I have the seats, panels and floors etc to add before I can even think of priming!
Dave
 

Attachments

  • engine mount.jpg
    engine mount.jpg
    4.5 KB · Views: 0
  • pre wr luftwaffe.jpg
    pre wr luftwaffe.jpg
    3.3 KB · Views: 0
  • side walls.jpg
    side walls.jpg
    3.5 KB · Views: 0
Thread owner
Ready for priming the interior - the pilots seat & panel are still loose, as I have to add the panel clear bitsView attachment 305559

There are a lot of parts that will not be seen when the fuselage is closed, but hey-ho!
Dave
 

Attachments

  • interior prepriming.jpg
    interior prepriming.jpg
    2.4 KB · Views: 0
Thread owner
Some of the assemblies are way over engineered - I still have to make up the observer's machine gun - which consists of 6 tiny parts!View attachment 305564
I'm going to leave this until really late...............
Dave
 

Attachments

  • mgs.jpg
    mgs.jpg
    3.7 KB · Views: 0
Hi Dave
Another unusual model from your good self :thumb2: Good that you found the other instructions. Interested to see what you think of the paint set.
Jim
 
Thread owner
I've primed the interior, and a/b RLM 02 Grau ( Vallejo Model Color 886 Green Grey ), and detail painted - View attachment 305602

An ink wash, and the fuselage will be ready to close.
Engine - aluminium,, black pushrod covers, dk grey gearbox, and overall wash............
View attachment 305603
I primed the wings top & bottom, sprayed the wingtips white then masked them off. The underside has been sprayed with RLM 65 Hellblau ( AK Air AK-2003 ).
View attachment 305604 I'm going to prepare masks for the top wing, after spraying with the lightest colour, might be a bit fiddly...
Dave
 

Attachments

  • cockpit RLM 02.jpg
    cockpit RLM 02.jpg
    3.6 KB · Views: 0
  • engine washed.jpg
    engine washed.jpg
    4.1 KB · Views: 0
  • undersurfaces rlm 65.jpg
    undersurfaces rlm 65.jpg
    1.8 KB · Views: 0
Thread owner
Next up - the mask I drew round the wing, onto masking film, then drew out the camo demarcation lines, using the centre line and the ailerons/flaps as datums.
View attachment 305630
I've sprayed the wing with the lightest colour, RLM 63 Lichtgrau ( AK Air AK-2034 ). Then the masks marked '1' will be applied. I'm not sure about which colour to do next, as green and brown are of a similar colour density - I'll have to experiment - and I musn't forget the tailplane! ( The wing looks shorter, 'cos the wingtips are missing - all white! )
Dave
 

Attachments

  • mask.JPG
    mask.JPG
    2 KB · Views: 0
Thread owner
The wing is easy enough, it's flat. The fuselage, though, may be a bit more problematical, and may take a bit more time!
The fuselage is at the moment clamped together - it was a bit of a struggle to get the halves to mate nicely - I think that filler will be needed!
Dave
 
Thread owner
First mask applied!
View attachment 305690

I'll spray the next colour, then wait at least 12 hours before adding the 2nd mask, and the final colour. Any faster, and the chance of lifting the underlying coat is greater.
Dave
 

Attachments

  • first mask.jpg
    first mask.jpg
    3.4 KB · Views: 0
Hi Dave
That masking is very clever. Hope it works out OK.
Jim
 
Thread owner
I sprayed green yesterday, then applied the second mask......................View attachment 305777
I'll give the final brown coat shortly - then wait for it all to dry before the anxious business of peeling all the masks off!
Dave
 

Attachments

  • second mask.JPG
    second mask.JPG
    2.3 KB · Views: 0
Just seen and caught up on this one Dave, it looks a very nice and detailed kit. Nice work so far and a great idea with the masking.
 
Status
Not open for further replies.
Back
Top