Theme editor

Scale Model Shop

Dave W's Revell 1/48 Tornado ADV Saudi Air Force

Status
Not open for further replies.

Dave W

New member
Joined
Jan 8, 2011
Messages
4,713
Reaction score
0
Points
0
1/3
Thread owner
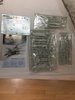
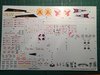
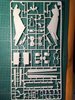
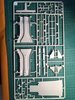
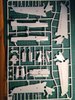
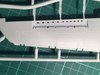
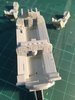
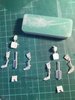
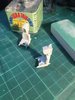
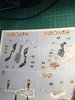
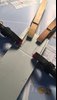
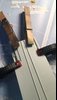
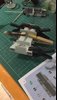
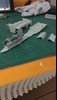
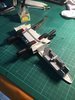
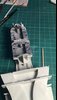
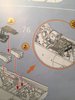
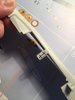
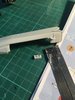
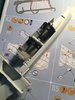
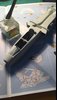
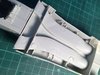
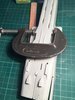
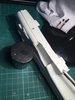
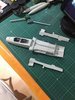
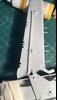
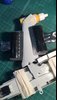
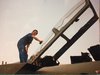
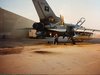
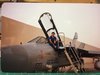
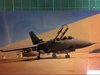
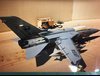
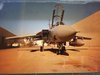
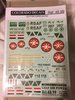
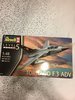
I've decided to build this one first. With the Revell 1/32 GR1 to follow if I have time. It's the new Revell 1/48 ADV and looks to be a very nice kit. From 1988 to 1995 I was employed by British Aerospace as a crew chief on Royal Saudi Air Force Tornado's at Dhahran on the Gulf coast. So I thought I would build one of the aircraft I used to work on. During the first Gulf War they carried a full missile load and the 2,250L external tanks. So that's how I will build mine. I will also have the flaps and slats out,as that's how we used to leave them parked up. And I won't do much weathering as we kept them very clean. Ive got an after market decal sheet and a brass pitot tube for it. The squadron badge on the decal sheet is a bit crap. So i may try to find a better sheet.View attachment 292458View attachment 292459View attachment 292460View attachment 292461View attachment 292462View attachment 292463View attachment 292464View attachment 292465View attachment 292466View attachment 292467
 

Attachments

  • 671BB3C4-E552-48C3-B6E0-526DFA9B00F5.jpeg
    671BB3C4-E552-48C3-B6E0-526DFA9B00F5.jpeg
    2.9 KB · Views: 0
  • 804F832D-C9CC-4EA6-8C79-948AE5032DF4.jpeg
    804F832D-C9CC-4EA6-8C79-948AE5032DF4.jpeg
    2.4 KB · Views: 0
  • 9E53A813-67AD-4427-AA23-601A5B22B1E2.jpeg
    9E53A813-67AD-4427-AA23-601A5B22B1E2.jpeg
    2.4 KB · Views: 0
  • 0CB46B89-C3EA-4FC9-AE4C-46A23852A988.jpeg
    0CB46B89-C3EA-4FC9-AE4C-46A23852A988.jpeg
    2.8 KB · Views: 0
  • E7F24CA9-B57A-4162-B946-91B8930A7DB8.jpeg
    E7F24CA9-B57A-4162-B946-91B8930A7DB8.jpeg
    2.4 KB · Views: 0
  • D06FF3F3-7C60-4C6F-9D4C-450AA2F6D6C8.jpeg
    D06FF3F3-7C60-4C6F-9D4C-450AA2F6D6C8.jpeg
    3.2 KB · Views: 0
  • A8E379AB-5490-4312-B20F-7D4D66CD5141.jpeg
    A8E379AB-5490-4312-B20F-7D4D66CD5141.jpeg
    2.7 KB · Views: 0
  • 4CAD5386-9944-428D-B447-DBBFD1A33BD0.jpeg
    4CAD5386-9944-428D-B447-DBBFD1A33BD0.jpeg
    2.8 KB · Views: 0
  • F6075E4C-06F7-4C71-8A90-C8A6A351F94E.jpeg
    F6075E4C-06F7-4C71-8A90-C8A6A351F94E.jpeg
    3.4 KB · Views: 0
  • D84E6108-60EF-4D6F-B5A3-E6317CCEE6CF.jpeg
    D84E6108-60EF-4D6F-B5A3-E6317CCEE6CF.jpeg
    2.9 KB · Views: 0
All looks very good Dave, and a big trip down memory lane for you.
 
Thread owner
Im about to make a start on this one. Ive just flown up to Glasgow where im back on shift tomorrow. The kit box was too big to get in my cabin bag . So i unpacked the box and managed to get most of the sprues in my case. Im home again at the weekend and will bring the rest of the kit back next week. Ive included some sprue shots here. And im very happy with the quality of the parts. Revell have even moulded in the APU exhaust to the right fuselage side. Panel lines are nicely engraved. Im sure Tamiya could make a better job of it. But having grown up building the very basic kits in the 60’s and 70’s, im very happy with the level of detail in these modern Revell kits.View attachment 292649View attachment 292650View attachment 292651View attachment 292652View attachment 292653View attachment 292654View attachment 292655
 

Attachments

  • AE0F38A0-7A7A-4348-A50B-0B613462E306.jpeg
    AE0F38A0-7A7A-4348-A50B-0B613462E306.jpeg
    2.2 KB · Views: 0
  • EAA4B0B4-DC09-4261-B04B-2469CCF266FD.jpeg
    EAA4B0B4-DC09-4261-B04B-2469CCF266FD.jpeg
    2.9 KB · Views: 0
  • ECBB7338-7237-4B34-85D1-65B94991E92E.jpeg
    ECBB7338-7237-4B34-85D1-65B94991E92E.jpeg
    4 KB · Views: 0
  • 03A85D56-DBD1-48B7-B652-E9DF3D8ACE53.jpeg
    03A85D56-DBD1-48B7-B652-E9DF3D8ACE53.jpeg
    3.7 KB · Views: 0
  • BE32D5E2-2BBF-4723-93C9-126AE34883C0.jpeg
    BE32D5E2-2BBF-4723-93C9-126AE34883C0.jpeg
    4.1 KB · Views: 0
  • E9FE8B82-054E-4781-B614-D7044137F13A.jpeg
    E9FE8B82-054E-4781-B614-D7044137F13A.jpeg
    1.2 KB · Views: 0
  • 2F0D427A-56C2-40F7-A227-591BF04CD46D.jpeg
    2F0D427A-56C2-40F7-A227-591BF04CD46D.jpeg
    2.9 KB · Views: 0
Thread owner

Attachments

  • 2256B491-352B-44A6-9E23-09022A7CC87D.jpeg
    2256B491-352B-44A6-9E23-09022A7CC87D.jpeg
    2.9 KB · Views: 0
  • 85387CF5-7C34-489F-ABDA-D3C19E7FA48F.jpeg
    85387CF5-7C34-489F-ABDA-D3C19E7FA48F.jpeg
    2.9 KB · Views: 0
  • 7DDFD4A5-EDC4-47B8-9EDB-4F4360CABE67.jpeg
    7DDFD4A5-EDC4-47B8-9EDB-4F4360CABE67.jpeg
    3.1 KB · Views: 0
  • 82DD0FB5-CC8C-42A1-AE41-D8F91A9A5336.jpeg
    82DD0FB5-CC8C-42A1-AE41-D8F91A9A5336.jpeg
    2.7 KB · Views: 0
A model with history!!!
Nice one Dave. I’m sure you will turn it a very special build.
 
Thread owner

Attachments

  • 49EA9B31-11D4-4BC7-A1BF-0933ADE09012.jpeg
    49EA9B31-11D4-4BC7-A1BF-0933ADE09012.jpeg
    2.2 KB · Views: 0
  • 41997561-FF19-4786-A383-7FC644E30BE9.jpeg
    41997561-FF19-4786-A383-7FC644E30BE9.jpeg
    2.2 KB · Views: 0
  • 868EC8EB-C3A0-4DC9-ADB4-F61E08A4D6BC.jpeg
    868EC8EB-C3A0-4DC9-ADB4-F61E08A4D6BC.jpeg
    2.5 KB · Views: 0
  • C5E2D9EA-85D9-4C00-AE62-EC5E152229F3.jpeg
    C5E2D9EA-85D9-4C00-AE62-EC5E152229F3.jpeg
    2.5 KB · Views: 0
Thread owner
Cockpit and nose gear bay glued to lower fuselage piece. A complicated kit this one. Lets hope i can get everthing lined up properly.
View attachment 292958
 

Attachments

  • 3195B137-8AEB-4ED3-A5C2-7DA889268E5C.jpeg
    3195B137-8AEB-4ED3-A5C2-7DA889268E5C.jpeg
    2.3 KB · Views: 0
Nice work Dave, an interesting way of building it, but like you say if your slightly out anywhere there could be trouble later on.
 
Thread owner
Nice work Dave, an interesting way of building it, but like you say if your slightly out anywhere there could be trouble later on.
I'm sure there will be trouble Ian. The cockpit is a gnats tadger too far back. So the fuselage sides need a tiny bit of trimming where they meet the cockpit aft bulkhead
 
Thread owner

Attachments

  • 88EDB607-F76D-40F8-BE4B-89266871FEB1.jpeg
    88EDB607-F76D-40F8-BE4B-89266871FEB1.jpeg
    2.6 KB · Views: 0
  • 3B7AE86F-7E58-4035-B0A5-6029F4106E72.jpeg
    3B7AE86F-7E58-4035-B0A5-6029F4106E72.jpeg
    2.3 KB · Views: 0
  • 1D357885-AB7D-48B2-A34A-12328CA9E3DB.jpeg
    1D357885-AB7D-48B2-A34A-12328CA9E3DB.jpeg
    2.9 KB · Views: 0
  • 0C1F7342-63A8-4F9C-A4CE-894AFE65DBEC.jpeg
    0C1F7342-63A8-4F9C-A4CE-894AFE65DBEC.jpeg
    3.2 KB · Views: 0
Thread owner
Ive worked out that the piece i cut out is a shelf that sits against the rear cockpit instrument panel bulkhead. lve checked and everything is lined up correctly. My advice to anyone building this kit is to just glue the instrument panel in where it touches the cockpit floor. That way the panel can be tilted back slightly when the fuselage sides are fitted. Then you wont have to do the surgery i have done. Not a problem though as i will use some plastic card to replicate the shelf i cut off.
 
Thread owner

Attachments

  • 36AC2FED-B19A-41E8-ADC1-35D8554D5854.jpeg
    36AC2FED-B19A-41E8-ADC1-35D8554D5854.jpeg
    3.2 KB · Views: 0
  • 0E8A2550-9782-44D1-97FB-1566E4CD42B7.jpeg
    0E8A2550-9782-44D1-97FB-1566E4CD42B7.jpeg
    2.8 KB · Views: 0
  • 9AAE745C-05AC-4E02-BCA1-DF02704AC4DE.jpeg
    9AAE745C-05AC-4E02-BCA1-DF02704AC4DE.jpeg
    2.9 KB · Views: 0
  • 839D1D15-D4D9-4E98-81BD-FB9C2840CA6E.jpeg
    839D1D15-D4D9-4E98-81BD-FB9C2840CA6E.jpeg
    3 KB · Views: 0
  • A0859043-C459-48A3-A05F-6A9D281A63D0.jpeg
    A0859043-C459-48A3-A05F-6A9D281A63D0.jpeg
    3.4 KB · Views: 0
Thread owner
A bit more progress. Thought i would assemble the mechanism that keeps the pylons in line when the wings are swept. Not that im going to play with it. I will be having the wings forward.I managed to glue the wrong spine section to the fuselage upper panel. Luckily i realised my cock up before the glue had set!. Correct panel shown fitted in photo. Thats what happens when you dont read the instructions properly!View attachment 293176View attachment 293177View attachment 293178
 

Attachments

  • 9D303758-6425-4E9E-B93C-DF6B40A1F68F.jpeg
    9D303758-6425-4E9E-B93C-DF6B40A1F68F.jpeg
    2 KB · Views: 0
  • 79FF4420-0731-4380-98A5-8613C27BFC9A.jpeg
    79FF4420-0731-4380-98A5-8613C27BFC9A.jpeg
    2.5 KB · Views: 0
  • 1615DB81-B71F-4F8A-ADF0-D7A508B64599.jpeg
    1615DB81-B71F-4F8A-ADF0-D7A508B64599.jpeg
    2.6 KB · Views: 0
Status
Not open for further replies.
Back
Top