Hi there, this is my first posting on this site. I'd like to share this build that I have being slowly working on over some time. I've actually forgotten how long that I've taken thus far....
Anyway, I'm trying my hand at "super detailing" this rather simple kit and am have a ball of time doing it!
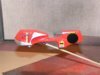
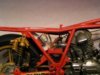
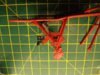
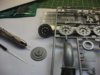
I started off modifying the frame in a similar fashion, as most of the "cafe racers" would lighten the frame and replaced the moulded battery tray with a PE tray that I had fashion up.View attachment 90731
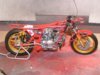
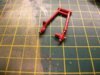
The trimming of the frame followed the tray with a revised brake booster lay out. mimicking the "cafe racer" style and did some wiring + battery cables.
View attachment 90736
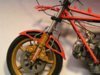
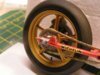
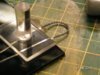
I drilled out the disk brakes for a realistic visual effect.
View attachment 90733
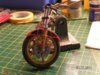
On the trailing arms I replaced the moulded bolts with 0.8mm & 1.2mm threaded bolts and nuts. I told you I was having fun doing this!")
View attachment 90734
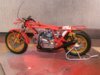
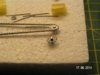
Plumbed the front braking with braided hose, though I'm not totally happy with the end result.
View attachment 90735
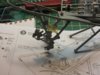
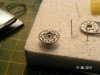
I replace the moulded chain with a PE version for a Honda RC211V - what a stress test! I nearly gave up on it a couple of times, super fiddly. But, in the end I really like the realistic look it gave the kit.
View attachment 90747
View attachment 90737
View attachment 90738
View attachment 90739
View attachment 90740
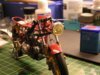
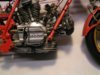
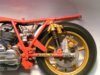
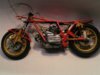
The kit is finally heading towards assembly!!
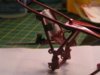
Here are a couple more pics of it partially assembled.
View attachment 90741
View attachment 90742
View attachment 90743
View attachment 90744
View attachment 90746
I appreciate your time taken to read this blurb and I hope I have passed on some ideas and some inspiration to complete that kit that quietly waiting for you in a box or on the work bench. Any crits & suggestions are most welcome.
Have a great build!")
View attachment 90732
View attachment 90745
View attachment 203754
View attachment 203755
View attachment 203756
View attachment 203757
View attachment 203758
View attachment 203759
View attachment 203760
View attachment 203761
View attachment 203762
View attachment 203763
View attachment 203764
View attachment 203765
View attachment 203766
View attachment 203767
View attachment 203768
View attachment 203769
View attachment 203770
Anyway, I'm trying my hand at "super detailing" this rather simple kit and am have a ball of time doing it!
I started off modifying the frame in a similar fashion, as most of the "cafe racers" would lighten the frame and replaced the moulded battery tray with a PE tray that I had fashion up.View attachment 90731
The trimming of the frame followed the tray with a revised brake booster lay out. mimicking the "cafe racer" style and did some wiring + battery cables.
View attachment 90736
I drilled out the disk brakes for a realistic visual effect.
View attachment 90733
On the trailing arms I replaced the moulded bolts with 0.8mm & 1.2mm threaded bolts and nuts. I told you I was having fun doing this!
View attachment 90734
Plumbed the front braking with braided hose, though I'm not totally happy with the end result.
View attachment 90735
I replace the moulded chain with a PE version for a Honda RC211V - what a stress test!
I nearly gave up on it a couple of times, super fiddly. But, in the end I really like the realistic look it gave the kit.View attachment 90747
View attachment 90737
View attachment 90738
View attachment 90739
View attachment 90740
The kit is finally heading towards assembly!!
Here are a couple more pics of it partially assembled.
View attachment 90741
View attachment 90742
View attachment 90743
View attachment 90744
View attachment 90746
I appreciate your time taken to read this blurb and I hope I have passed on some ideas and some inspiration to complete that kit that quietly waiting for you in a box or on the work bench. Any crits & suggestions are most welcome.
Have a great build!
View attachment 90732
View attachment 90745
View attachment 203754
View attachment 203755
View attachment 203756
View attachment 203757
View attachment 203758
View attachment 203759
View attachment 203760
View attachment 203761
View attachment 203762
View attachment 203763
View attachment 203764
View attachment 203765
View attachment 203766
View attachment 203767
View attachment 203768
View attachment 203769
View attachment 203770
Attachments
-
 PE battery tray.JPG2.8 KB · Views: 0
 -
 LHSV 3.JPG3.3 KB · Views: 0
 -
 RHSV 2.JPG3 KB · Views: 0
 -
 RHSV 4.JPG3 KB · Views: 0
 -
 RHSV1.JPG3.2 KB · Views: 0
 -
 PE chain RC211V.JPG3 KB · Views: 0
 -
 LHSV 2.JPG3.2 KB · Views: 0
 -
 LHSV 1.JPG2.4 KB · Views: 0
 -
 chain 6.JPG3 KB · Views: 0
 -
 modified rear brake bracket.JPG3.1 KB · Views: 0
 -
 Drilling disc brakes.JPG2.8 KB · Views: 0
 -
 Main shaft nut and end tensioners.JPG2.9 KB · Views: 0
 -
 Front fork.JPG3.2 KB · Views: 0
 -
 battery cable 2.JPG2.6 KB · Views: 0
 -
 Chain 3.JPG2.8 KB · Views: 0
 -
 chain 1.JPG2.5 KB · Views: 0
 -
 PICT0012.JPG2.2 KB · Views: 0