Theme editor

Scale Model Shop

Eduard 1:48 FW 190 A-5 - John

Status
Not open for further replies.

John

Administrator
Staff member
Joined
Mar 4, 2004
Messages
4,739
Reaction score
294
Points
83
Age
57
Website
www.scalemodelshop.co.uk
Location
Halifax
How do you identify?
Apache Attack Helicopter
Pronouns
Whatever / Works
1/3
Thread owner
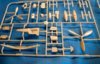
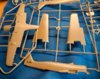
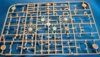
Here are my shots, I must admit I forgot to take a picture of the box and thought I had taken pictures of all the sprue's before I put my camera away, so there's one missing.

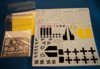
The options I have with this kit are

A: Hptm. Walter NOWOTNY, Commander of I./JG54Grünherz, Orel, Fall 1943

B: Hptm. Egon MAYER, Commander of III./JG2 Richthofen, France, Spring 1943

C: Uffz. Walter KÖHNE, 1./JG1, Deelen, the Netherlands, July, 1943

D: Oblt.Rolf STROHAL, Stab I./JG1, Deelen, the Netherlands, April, 1943

I am going for A, this decision was made because I have a full pot of yellow paint and I don't know when I will get to use it again

View attachment 22551

View attachment 22552

View attachment 22553

View attachment 22554

View attachment 22555

View attachment 22556

View attachment 135077

View attachment 135078

View attachment 135079

View attachment 135080

View attachment 135081

View attachment 135082
 

Attachments

  • P1030277..jpg
    P1030277..jpg
    3.5 KB · Views: 0
  • P1030276..jpg
    P1030276..jpg
    4 KB · Views: 0
  • P1030282..jpg
    P1030282..jpg
    4.2 KB · Views: 0
  • P1030280..jpg
    P1030280..jpg
    2.9 KB · Views: 0
  • edu_8174_title..jpg
    edu_8174_title..jpg
    2.7 KB · Views: 0
  • P1030279..jpg
    P1030279..jpg
    3.4 KB · Views: 0
John this a first for me using etched parts, hope I don't end up pulling my hair out ain't got much now haha
 
Thread owner
Not a good start, I started putting the PE's on the cockpit using superglue, got my fingers stuck together took a while to separate them, I hate that stuff, wasn't much to show really with the cockpit as the superglue didn't react well and made some of the dials cloudy, when I put the cockpit in the fuselage I had to put another PE in the top, the drop of superglue, and it was only a drop, ran and bubbled up and totally ruined it, I have managed to fill it with squadron green putty and sand it down, it looks better than it did but not perfect, not a happy bunny :coffee2:

Any ideas how to smooth it off it always ends up pitted

View attachment 22591

View attachment 135117
 

Attachments

  • P1030368..jpg
    P1030368..jpg
    2.7 KB · Views: 0
Thread owner
No I haven't, I will pic one up tomorrow, does it need rubbing down?
 
It depends how many layers of it you put on. I use it alot for 'sealing' gaps between the wings and main body. But it does rub down very easy and paints over well. It's also very quick to apply and dry
 
Hi John,

I've used Mr Surfacer for bits like this. It only works with shallow marks but it can be sanded and polished to an almost glass smooth finish.

Gern
 
Hi John, apart from the superglue problems how are you finding the build quality of the kit? I haven't started mine yet only posted box and sprue photos so far. SWMBO has asked for her table back so have got to change the spare bedroom around a bit before I can start, so that will be todays job. I will let you know if I come across any problems when I start which might be today you never know. Hope you can recover your build OK with the tips you have been given, Good luck. By the way SWMBO picked the same version you are doing because she likes YELLOW and that had the most yellow on it.
 
Thread owner
I've only done the cockpit and put it in the fuselage so not done that much, still filling it at the moment but it doesn't seem that bad
 
The problems with superglue is why PVA or Gator glue is used. It takes longer to dry but you do have loads of time to position it and time is not an issue here. Sometimes when the materials you use force you to work slower, it helps to calm the build down and relax the whole experience. A bit like photography. Rather than snap away at a landscape, get the tripod out, set it up slowly and then move around looking through the camera. when you get a good viewpoint and composition, plonk the tripod down, clamp the camera on top, step back and view the scene, plug in the remote shutter lead and take the time to check every square mm of the viewfinder to see what you are going to get, then press the shutter release. Given practice, I will guarantee that this will improve your pictures. Gater Glue will improve your experience with PE.

Trust me, I used to be a photographer lol.
 
Just to add to what Graham said. Gator glue will not stick your fingers to the tweezers either!!!

Must order some more before I forget.
 
Thread owner
I only got superglue because it was recommend as the best thing by the guy at the model shop, I didn't get chance to pick up some tipex so I filled it again and sanded it, just re-painted it and it looks fine just wait to see what it's like when it's dried, I am going to get some gator glue, I think I do need to slow things down.

btw Graham I not long got a Panasonic G1 so might be pm'ing you for some advice :photographer:
 
\ said:
A bit like photography. Rather than snap away at a landscape, get the tripod out, set it up slowly and then move around looking through the camera. when you get a good viewpoint and composition, plonk the tripod down, clamp the camera on top, step back and view the scene, plug in the remote shutter lead and take the time to check every square mm of the viewfinder to see what you are going to get, then press the shutter release. Given practice, I will guarantee that this will improve your pictures. Trust me, I used to be a photographer lol.
Hey, me too. 10 years of weddings and child portraits!

But great advice.

DD
 
I just quit 10 years of portrait photography too. I see a pattern...

Tony B

sorry John, waffling nonsense in your build thread.
 
Thread owner
Thought I would update my thread, it's not been going too good, stupid little things going wrong like bits just not fitting right, I've had a glue puddle and then I wasn't paying attention when airbrushing and tilted my brush a little too much and poured paint on the wing, anyway I seemed to have recovered ok from the problems, to I've masked the canopy

Did a little pre-shading, and that could have gone a bit better

But in the end turned out ok
 
Thread owner
Engine done just need to put the exhausts on
 
Status
Not open for further replies.
Back
Top