Theme editor

Scale Model Shop

Eduard 1/72nd Hellcat F6F-3 Profipack

Status
Not open for further replies.

dave

New member
Joined
Nov 16, 2012
Messages
1,844
Reaction score
32
Points
0
Age
60
Location
Brussels
1/3
Thread owner
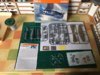
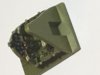
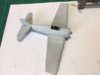
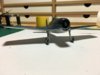
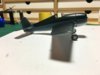
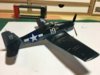
This is my next build. As it is the profipack version I have a couple of frames of photoetch and canopy masks on this one.

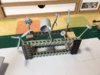
The intention is to build it with the wheels down and canopy open to show off the interior a bit more. Parts are provided for the open or closed canopy, the Eduard kits currently have no option to build with the wings folded so the wings will be unfolded.

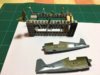
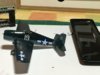
There are five marking options provided from 1943-44 all in the tricolour scheme. I am going for option D, BuNo 40467, Lt. Alexander Vraciu, VF-6, USS Intrepid in February 1944.

This aircraft is the one he used during the Battle of the Philippine Sea when he made Ace in a day. Up until 2015 the aircraft was in flying condition with the Fighter Collection at Duxford when she was sold to an American collector, not sure what happened after that.

Paints will be Gunze-Sangyo aqueous acrylics and I will be trying Mr Paint for the tricolour camouflage.

There are not a lot of parts to this kit, but I am expecting the small photoetch in the cockpit to provide some challenges in construction.

View attachment 286172
 

Attachments

  • IMG_1478.JPG
    IMG_1478.JPG
    3.5 KB · Views: 0
Thread owner
I have now made a start on this, the cockpit components have been cut of the sprues, cleaned up and primed then given a coat of Gunze-Sangyo H58 interior green.
One slight problem I broke the piece with the rudder pedal in half, this shouldn't be an issue as the break will be out of sight behind the main control panel.
It is intersting to note there are no locating pins on the fuselage halves on this kit.
Next step is to paint the details and add the photoetch.

View attachment 286391
 

Attachments

  • IMG_1479.JPG
    IMG_1479.JPG
    2.9 KB · Views: 0
Thread owner
Been hard at work on the photo etch, beer bootle cap for size comparison There are 13 pieces of pe on the central piece. The pe is finished on these pieces, a bit more paintwork and some weathering to do.
Time to give my eyes a rest and relax with a bottle of beer.

View attachment 286427
 

Attachments

  • IMG_1486.JPG
    IMG_1486.JPG
    2.2 KB · Views: 0
All looks very nice Dave. I've built a couple of the profipacks and really like the idea of everything in the box you'll need.
 
Looking good dave , like colin i really like the idea that you only have to buy the kit and nothing else . cheers tony
 
Thread owner
The Eduard profipacks are good kits, and are a good price if you figure in the cost of buying the masks and pe separately.
This is the first time I have tried one in 1/72 scale rather than 1/48th, and some of the pe has proved challenging to handle. Lost one bit to the wooden floor monster the normally benign cousin of the carpet monster.
 
Thread owner
There has been a little bit of a haitus, but back to it now. The pictures are not brilliant but the cockpit subassembly is now complete and ready to go into the fuselage.

Once the fuselage is closed up the view of the cockpit interior will be quite restricted.


View attachment 286885
View attachment 286886
 

Attachments

  • cockpit2.jpg
    cockpit2.jpg
    2 KB · Views: 0
  • cockpit 1.jpg
    cockpit 1.jpg
    1.9 KB · Views: 0
Thread owner
Managed to get a little more work done. Main fuselage and wing assembly done and a coat of primer (Vallejo acrylic polyurethane) on that and some sub assemblies.

I will have a better look once the primer has completely cured, but there looks to be minimal corrective filling and sanding at this stage. The dark line on the wing is a shadow not a gap.

The engine and the inside of the cowling will need painting and then the front of the aircraft can be assembled.

View attachment 287812 View attachment 287813
 

Attachments

  • B - Copy.jpg
    B - Copy.jpg
    2.9 KB · Views: 0
  • C - Copy.jpg
    C - Copy.jpg
    1.8 KB · Views: 0
Looking very good indeed.

Especially like your use of the lego bricks to make a paint stand - that is very smart.
 
Thread owner
After 3 weeks of travel for work and a weeks holiday, I do not want to see another hotel room for a while. Although I did get to Bletchley Park which has been on my to do list for a while, and I managed to persuade my wife that a visit to the IWM Duxford was good idea, so came away with memory cards full of photographs.

I have managed to get back to the bench and progress has been made, poor photo below. Just sprayed the MRP Insignia White (ANA601) on the underside and slightly up the side. You can still just about see some pre-shading underneath, this was done in dark grey for the underside and black on top/sides as I was concerned the black would be too heavy through the white.
The first time with this paint and I was very impressed with the way it handled, I would back all Barry's remarks on the paint. I am a definite convert for airbrushing.


View attachment 289725
 

Attachments

  • IMG_1543.JPG
    IMG_1543.JPG
    2.4 KB · Views: 0
Thread owner
Work is progressing slowly, main paintwork now done. The line between the insignia white and intermediate blue was masked with white tack, whereas that between the two blues with tape. I prefer the lower, the tape edge looks a bit harsh.

The reason for the tape was I did not have room above the wings for the tack so used tape. With hindsight I should have sprayed the dark blue separately for the wings and fuselage allowing me to use the tack, another lesson learned.View attachment 290619 View attachment 290620
 

Attachments

  • 0BB12AE0-2402-4203-872C-24EA76566C23.jpeg
    0BB12AE0-2402-4203-872C-24EA76566C23.jpeg
    2.3 KB · Views: 0
  • FB18E3D2-284E-4C3D-80DB-9D33C0BD4FA1.jpeg
    FB18E3D2-284E-4C3D-80DB-9D33C0BD4FA1.jpeg
    2.3 KB · Views: 0
Thread owner
First decals now on. I was not as brave as Barry and gave a coat of Humbrol Clear gloss varnish beforehand rather than devaluing directly to the paint surface.
On the right is the tray I use for soaking the decals, it came free with some sushi. Nice and shallow with sloping sides. Only downside is the colour, some of the small decals can be difficult to spot if you leave them a little long and they float off the backing paper.
Not going to get a lot done tomorrow at a workshop from 9 in the morning till 7 in the evening, but hopefully will complete the decals wednesday.View attachment 290711
 

Attachments

  • 016E19D5-E1C9-43BC-8142-420D302A251C.jpeg
    016E19D5-E1C9-43BC-8142-420D302A251C.jpeg
    2.7 KB · Views: 0
That's looking very nice indeed Dave. Good use of the sushi container too, but can see how you might lose sight of the darker decals with the black background.
 
Thread owner
The decals are now all on, they have settled in pretty well but have had a coat of micro set to make sure.
Next step is a coat of gloss to protect everything then a little weathering.View attachment 290846
 

Attachments

  • 503AF5C2-A779-4AEA-9315-CAA9BC1ABF72.jpeg
    503AF5C2-A779-4AEA-9315-CAA9BC1ABF72.jpeg
    2.9 KB · Views: 0
Status
Not open for further replies.
Back
Top