Theme editor

Scale Model Shop

Fernando N's Trumpeter 1/72 M1A1 with Mine Roller Set

Status
Not open for further replies.

Fernando N

New member
Joined
Apr 27, 2018
Messages
2,448
Reaction score
0
Points
0
1/3
Thread owner
View attachment 325034
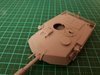
Good evening all,

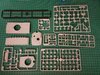
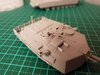
Being inspired by Ian’s and Steve’s choices in the GB, I’ve bought this one to build.
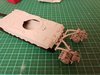
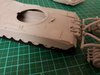
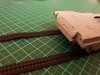
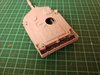
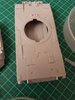
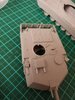
Not too many parts in the box and of decent moulding quality, this’ll be a fun one for the weekend and then some:smiling::
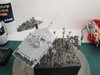
View attachment 325035
No decals, but that doesn't matter.
Paint scheme is an odd one too with Sand Brown and Black, maybe someone at Trumpeter was on a creative run:smiling5:, I'll just give it a simple Sand finish.
Great way to test some paints I have in that colour too.:smiling4:

Happy weekend everyone.
Fernando
 

Attachments

  • 20190104_172932_resized.jpg
    20190104_172932_resized.jpg
    2.7 KB · Views: 0
  • 20190104_173319_resized.jpg
    20190104_173319_resized.jpg
    3.5 KB · Views: 0
Got any tinted windows?? I know a man who might be able to help!:smiling5::smiling5::smiling5::smiling5::cool:

A terrific little kit to get stuck into. Looking forward to seeing how it goes together. Good luck:thumb2::thumb2::thumb2:
 
Thread owner
Good morning all from a cold and sunny Holland:smiling4:,

Steve and Ian, thanks guys.:thumb2:

Been busy building this one up and forgot to post the progress, sorry…:rolling:
First built the hull and the mine rollers and replaced some cables and handles on the hull as I found them to be a bit small:
View attachment 326641
View attachment 326642
Tow eyes and a couple of small handles were added to the rear:
View attachment 326643
Next step was building the turret and made the thermal sight covers from card and a bit of pe fret, also added a mesh floor in the rear stowage rack:
View attachment 326644
View attachment 326645
Making all these small details was a good opportunity to test out a small light I bought to have some extra light during the greyish winter days:
View attachment 326647
Later on I decided to replace some of the lightly moulded handles on the engine deck, the handles on the turret side boxes and replaced the thermal sight covers I previously made as they looked too thick:
View attachment 326648
View attachment 326649
Last parts on the turret, cupola and machine guns and it’s ready for the paint:
View attachment 326650
Thanks for looking in and have a great weekend everyone.
Fernando
 

Attachments

  • 20190113_203932_resized.jpg
    20190113_203932_resized.jpg
    3.1 KB · Views: 0
  • 20190113_204018_resized.jpg
    20190113_204018_resized.jpg
    2.9 KB · Views: 0
  • 20190113_204040_resized.jpg
    20190113_204040_resized.jpg
    2.8 KB · Views: 0
  • 20190113_203955_resized.jpg
    20190113_203955_resized.jpg
    2.7 KB · Views: 0
  • 20190113_204004_resized.jpg
    20190113_204004_resized.jpg
    3 KB · Views: 0
  • 20190117_202929_resized.jpg
    20190117_202929_resized.jpg
    3.9 KB · Views: 0
  • 20190117_202814_resized.jpg
    20190117_202814_resized.jpg
    2.9 KB · Views: 0
  • 20190117_202830_resized.jpg
    20190117_202830_resized.jpg
    3.1 KB · Views: 0
  • 20190118_175643_resized.jpg
    20190118_175643_resized.jpg
    3.1 KB · Views: 0
Cracking update Fernando. I must get one of those lights. They really are the DB's. I considered taking off the handles of my Abrams but it was a step too far for me. I admire your resolve to have done it. Well done mate:thumb2::thumb2:
 
Thread owner
Evening all,

Steve, thanks mate:thumb2:. Taking off the handles was easy replacing them with a suitable small one was the challenge….
The lamp has 3 different light levels and although small it’s pretty easy to topple over, some care is advised when in use moggelling.
Si, rolling in the right direction indeed:smiling5:, thank you.:thumb2:
Mick, :thumb2:yep careful it’s highly contagious:upside:…..thanks
Ian and Jim, thanks guys.:thumb2:

With the kind assistance of mother nature providing a nice sunny day, painting the Abrams was pretty easy in the good light.:smiling4:
First gave all the parts a coat of Vallejo Grey primer, been awhile too when a complete model fitted on the block:tongue-out3::
View attachment 326845
When the primer was dry, A.Mig-085 Nato Brown was sprayed on in a 50/50 thinned mix using a 0.15mm needle at 20 psi for the pre-shade:
View attachment 326844
The Nato Brown was dry pretty quick so the base coat of A.Mig-025 FS33446 Us Modern Vehicles was applied with the same mix, needle and pressure.
Three light mists and a couple of spots here and there gave the desired finish and let enough of the pre-shade intact (it show up better in real life):
View attachment 326843
I’ll let it dry for the night, tomorrow a coat of gloss or two for the weathering and handling.
As this one is drying and the Toon challenge coming up, work has started on a Tammie Fw190 D-9 as an in between project:smiling:, more on that tomorrow.

Thanks for looking in.
Fernando
 

Attachments

  • 20190119_100205_resized.jpg
    20190119_100205_resized.jpg
    2.8 KB · Views: 0
  • 20190119_124755_resized.jpg
    20190119_124755_resized.jpg
    2.9 KB · Views: 0
  • 20190119_151231_resized.jpg
    20190119_151231_resized.jpg
    2.8 KB · Views: 0
Nice one Fernando and the grab handles are neat.

Someone gave me a BattleFront Miniatures Tiger 1 that I might just join in.

Cheers,
Richard
 
Oops my mistake...just checked, the Tiger is 1/100 so not joining in. Real shame as it looks really detailed for that size. I'll build it on my own for fun.

Cheers,
Richard
 
Thread owner
Evening all,

Paul, Richard, Polux and Simon, thanks.:thumb2:
Richard, looking forward to see your Tiger, hope I don’t miss it in all the treads.:rolling:

Sorry for the late update, with work taking away a lot of energy the last two weeks I missed out on posting but with some work here there and most today, this little tank is finished.:smiling:

Before I’ll show the finished look, some progress pics during the last steps.
After the paintjob and clear coat, it was time for the detail painting with most time spent on the road wheels as they were the most numerous items to paint on this one, gave the grilles a wash of A.Mig 1005 Dark Brown much easier than painting:
20190126_152006_resized.jpg
20190126_195807_resized.jpg
20190126_195818_resized.jpg
After running into something like Steve Jones had with his lens colours, I made a little paint chart to pick the best out in line with my reference photo’s, turned out to be a silver background Gunze Clear Green and a top coat of Tamiya Smoke:
20190202_120503_resized_1.jpg
With most of the details on and painted it was weathering time, gave it a wash of AK 121 Brown and AK 123 for the streaking effects, the latter toned down with a saw brush for the effect:
20190127_170230_resized.jpg
20190127_170248_resized.jpg
Two coats of VJ Matt, some dusting with VJ 71.027 Light Brown and VJ 71.037 Mud Brown, two antennas and sticking it all together, I’m calling this one finished:
20190202_120329_resized.jpg
20190202_120347_resized.jpg
20190202_120405_resized.jpg
20190202_120425_resized.jpg
20190202_120440_resized.jpg
I’ll try to take a better lit set for the completed section tomorrow.

Thanks for looking in.
Fernando
 
Great attention to detail Fernando. A very nice finish as well. The tinting has come out well. Looking forward to seeing the final pics.
 
Status
Not open for further replies.
Back
Top