Theme editor

Scale Model Shop

Fiat Topolino in German Service

Status
Not open for further replies.

TIM FORSTER

Active member
Joined
Apr 28, 2018
Messages
308
Reaction score
61
Points
28
Age
57
1/3
Thread owner
This vehicle is destined to be part of my WWII diorama 'Liberation, Italy 1944'.

See the blog at: http://www.scale-models.co.uk/threads/liberation-italy-1944.30350/

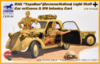
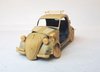
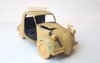
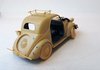
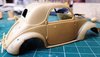
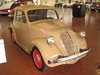
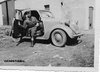
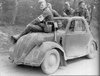
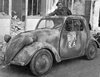
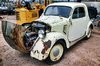
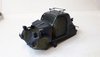
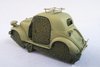
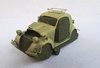
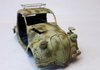
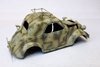
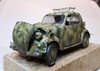
The original idea was to have some sort of small German vehicle crashed into the ravine in front of the bridge - as if it failed to take the corner during the flight ahead of the Allies from Rome. I had already settled on the lovely little Fiat Topolino because it was used by the Germans as a staff car and it looks the part - but it's also very, very tiny and thus fits into a small space.

Although Tamiya make a very nice (and much simpler) equivalent as the Simca, I chose the Bronco DAK version which is, after all, Italian!

View attachment 305659

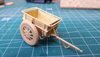
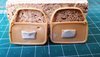
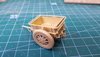
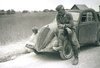
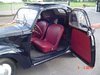
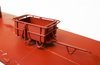
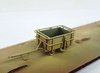
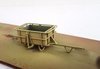
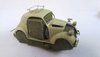
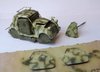
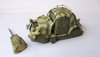
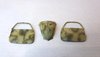
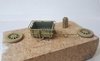
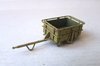
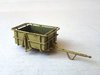
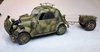
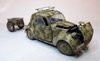
Although it doesn't come with the tortoise, it does come with a roof rack and an infantry cart. The idea is to have this vehicle piled high with booty by its original owners - hence more 'liberation' - although, obviously, they failed to get away with their ill-gotten gains!

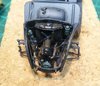
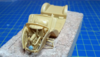
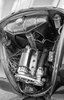
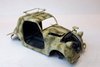
I must say that the kit is exquisite, including a very detailed engine. I plan to have the bonnet open to show this off. The infantry cart is also a model in its own right.

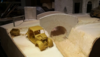
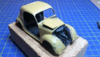
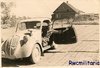
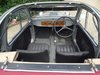
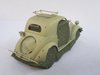
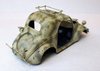
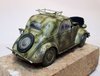
In the end I decided that the crash into the ravine was just a little too dramatic, so I decided instead to have the car bellied in a field of sunflowers, doors open and contents strewn about...

View attachment 305663
 

Attachments

  • 1529700557866.png
    1529700557866.png
    11.2 KB · Views: 0
  • 1529699090217.png
    1529699090217.png
    14.3 KB · Views: 0
Certainly will add to the balance Tim having something on the left. Never seen that model before, but it will fit the bill left like that in the field, as if it had been strafed .Nice .
John .
 
Thread owner
After many months I have been getting this little car ready for painting. So here is a brief update on the build...

Unlike the Tamiya Simca (the French version) this 'Italian Job' spares few details. I added to the (already nicely detailed) engine bay by adding an internal horn (courtesy of a Dragon Panzer / Stug III) and a few wires. I am no expert on cars (including my own) and I suspect that this one may also be missing a battery. Apologies to those car aficianados out there - but I won't be losing any sleep over that!

The chassis, engine, interior, etc received an airbrushed base coat of Valejo black primer followed by a highlight of the same mixed with a little blue, white and metallic black. I'm working on the assumption that this car was one of the many 'requisitioned' from Italian civilian use so I may be heading towards a chipped yellow with green camouflage on the exterior, but this seems like a logical starter to me...

View attachment 307827

View attachment 307828

View attachment 307829

View attachment 307830

View attachment 307831

View attachment 307832

As you can see, I added quite a lot of damage. The serious prang to the front offside was accomplished with a little bit of heat from a miniature blowtorch, then bent with pliers and finally sanded to give sharper edges. The bullet holes in the rear were made using a sharp scalpel blade after the plastic had been thinned from the rear.

The wheels are only temporarily held in place with blutac here, but one of the front wheels will be stuck at quite an angle to represent the impact where the car eventually came to rest. I'm thinking about making the tyre on this wheel look flat, but other than that it's ready for the paint shop...
 

Attachments

  • Topolino pre paint 4.jpg
    Topolino pre paint 4.jpg
    1.8 KB · Views: 0
  • Topolino pre paint 3.jpg
    Topolino pre paint 3.jpg
    1.8 KB · Views: 0
  • Topolino pre paint.jpg
    Topolino pre paint.jpg
    2 KB · Views: 0
  • Topolino engine painted.jpg
    Topolino engine painted.jpg
    3.5 KB · Views: 0
  • 1531174260760.png
    1531174260760.png
    13.6 KB · Views: 0
  • 1531174239497.png
    1531174239497.png
    12.9 KB · Views: 0
Thread owner
Below you can see the map pockets on the inside of the doors which were re-sculpted with Magicsculp. I will have folded map poking out of the drivers door which will be swung open.

View attachment 307959

I also added another bullet hole heading diagonally through the driver's door - perhaps explaining why the vehicle came to crash.

View attachment 307962

Here are a couple of shots of the infantry cart - or Infanteriekarren (IF8) to give it its correct title. Like the Topolino, this is also an exquisite little kit...

View attachment 307960
View attachment 307961
 

Attachments

  • Infantry cart 1.jpg
    Infantry cart 1.jpg
    2.7 KB · Views: 0
  • Door pockets.jpg
    Door pockets.jpg
    2.8 KB · Views: 0
  • Infantry cart 2.jpg
    Infantry cart 2.jpg
    2.6 KB · Views: 0
  • Bullet holes.jpg
    Bullet holes.jpg
    2.8 KB · Views: 0
Thread owner
Here are a few pics of Topolinos I found on the internet which may prove to be of interest...

Mint condition and restored...

View attachment 308155

But then we all know how 'restored' vehicles can often look better then they ever looked when 'new'. Still, this is pretty close to the Bronco version. It's even yellow! I took note of the the shiny FIAT hubcaps...

This one is apparently a 1947 version. And it's tired. But the engine and fender damage are interesting... again, shiny hubcaps...

View attachment 308156

View attachment 308163

This is where I got the idea to add the internal horn.

View attachment 308157

An interior shot. This one has the fold-down roof, just like the Tamiya (French) Simca.

View attachment 308158

I suspect this is a (restored) post-war version. Fold-down roof and rear seat (although hardly big enough for a dog).

Then some shots of Topo's / Simca's in wartime German (and other) service...

View attachment 308160

Who says it's a two-man car?

View attachment 308161
One proud owner... This one reminds me of the Bronco box lid (but still no tortoise!)

View attachment 308164

Actually this looks more like the classic pose... possibly Eastern Europe judging by the house.

View attachment 308162

This guy doesn't look so proud... I suspect it was hardly a smooth ride.

View attachment 308159

These guys look more jolly! Is that fender symbol Free French? If so, presumably in France... also B.M.R.A. may stand for 'Brigade Major Royal Artillery'. But that camouflage is what I'm looking for!

Watch this space!
 

Attachments

  • 1024px-1936Fiat500CoupeTopolino.jpg
    1024px-1936Fiat500CoupeTopolino.jpg
    3.4 KB · Views: 0
  • Topolino in Russia.jpg
    Topolino in Russia.jpg
    3.1 KB · Views: 0
  • images (1).jpg
    images (1).jpg
    2.8 KB · Views: 0
  • German soldier and his Italian-built Fiat 500 marked with the double cross insignia of Panzer ...jpg
    German soldier and his Italian-built Fiat 500 marked with the double cross insignia of Panzer ...jpg
    2.7 KB · Views: 0
  • Fiat 500 Topolino - German Army Staff Car.jpg
    Fiat 500 Topolino - German Army Staff Car.jpg
    2.7 KB · Views: 0
  • Fiat 500 Topolino - German Army Staff Car 2.jpg
    Fiat 500 Topolino - German Army Staff Car 2.jpg
    2.8 KB · Views: 0
  • Autre Fiat Topolino au service de sa gracieuse majesté.jpg
    Autre Fiat Topolino au service de sa gracieuse majesté.jpg
    3 KB · Views: 0
  • 4990096227_48cce66539_o.jpg
    4990096227_48cce66539_o.jpg
    3.2 KB · Views: 0
  • 40495d.jpg
    40495d.jpg
    4.1 KB · Views: 0
  • 1947-Fiat-Topolino.jpg
    1947-Fiat-Topolino.jpg
    4.4 KB · Views: 0
Great up date Tim.
Reminds me of the Fiat 500 from the bonnet back.
The map pockets certainly add along with the horn, and that looks so right. Suppose the battery was the first thing to be nicked !
John.
 
Thread owner
Well today was the day I got busy with the paint...

Since this is a civilian car pressed into German service I decided to give it an undercoat of dark grey / blue. This was all done (as was all other painting hereafter unless otherwise noted) with Vallejo acrylics. However, to give a bit of variety, I decided to take inspiration from the restored Topolino in the post above and paint the hubcaps a nice shiny metal - this was done with a rattle can of Humbrol polished steel.

View attachment 308278
View attachment 308279

However, the infantry cart - being German - was given the traditional undercoat of primer red.

View attachment 308280

Once I had done that I gave everything a coat of gloss varnish (again from an aerosol).

The next step was to give everything a coat of Vallejo Chipping Medium. This was the first time I have used this (previously having been an advocate of the hairspray technique). Ultimately, I can recommend it. I wasn't so sure once I had sprayed it on because it came out of my airbrush very thick and gloopy (despite being thinned). However, in the end, once I had left it to dry over night, it turned out fine - a perfectly invisible layer.

Then the fun bit commenced...
 

Attachments

  • Undercoat 2.jpg
    Undercoat 2.jpg
    2 KB · Views: 0
  • Undercoat 3.jpg
    Undercoat 3.jpg
    1.6 KB · Views: 0
  • Undercoat 1.jpg
    Undercoat 1.jpg
    1.6 KB · Views: 0
Thread owner

Attachments

  • Cart first coat 2.jpg
    Cart first coat 2.jpg
    2 KB · Views: 0
  • Cart first coat.jpg
    Cart first coat.jpg
    1.8 KB · Views: 0
  • First coat 4.jpg
    First coat 4.jpg
    1.9 KB · Views: 0
  • First coat 3.jpg
    First coat 3.jpg
    2 KB · Views: 0
  • First coat 2.jpg
    First coat 2.jpg
    1.9 KB · Views: 0
  • First coat 1.jpg
    First coat 1.jpg
    1.7 KB · Views: 0
Thread owner
Now the camouflage... this was the bit I was not looking forward to... although I have helped my sons with some of their camo patterns over the years, this is the first time I have done my own since I was about 15. So that's a mere 35 years...

It was also the first time I used my new Iwata Neo TNR 1 airbrush ( a finer version of the TNR 2 I have been using so far).

Now I have read an awful lot of books and on-line tutorials about how to airbrush camo on to models - but, as this experience showed, I am no expert. In the end it was really trial and error. As you will see, some passes were better than others. However, it helps to bear in mind that the soldier in the field was hardly likely to be an expert either. So mistakes are fine - so long as they look 'in scale'.

Here goes...

View attachment 308287
View attachment 308289

As you can see, I went over it afterwards with a lighter shade of yellow in some places. It still looks rough, I know - but wait for the chipping!
 

Attachments

  • Camo all.jpg
    Camo all.jpg
    2.5 KB · Views: 0
  • Camo all 2.jpg
    Camo all 2.jpg
    1.9 KB · Views: 0
Thread owner

Attachments

  • Chipped 1.jpg
    Chipped 1.jpg
    2.2 KB · Views: 0
  • Chipped 2.jpg
    Chipped 2.jpg
    2.3 KB · Views: 0
  • Chipped 3.jpg
    Chipped 3.jpg
    2.2 KB · Views: 0
  • Doors and bonnet chipped.jpg
    Doors and bonnet chipped.jpg
    1.6 KB · Views: 0
  • Cart chipping 4.jpg
    Cart chipping 4.jpg
    1.8 KB · Views: 0
  • Cart chipping 3.jpg
    Cart chipping 3.jpg
    1.9 KB · Views: 0
  • Cart chipping 2.jpg
    Cart chipping 2.jpg
    1.7 KB · Views: 0
  • Cart chipping.jpg
    Cart chipping.jpg
    1.9 KB · Views: 0
  • Chipped 4.jpg
    Chipped 4.jpg
    2.1 KB · Views: 0
Totally missed this one Tim. Just a had a wonderful read through. Great work on the research. A very tidy build and the wet stuff is looking great. Well done sir:thumb2:
 
Thread owner
Well, the Topolino is almost done...

View attachment 312732
View attachment 312733
View attachment 312734
View attachment 312735

So this is the outcome of enamel washes, various mud products (mostly AK Interactive Kursk Earth) and some metal chips around bullet holes, etc.

The cracked glazing was achieved by etching the transparent plastic window inserts with a craft knife (better done on the inside) and the dusty effect by spraying the windows with matt varnish and then wiping away with a little airbrush thinner and a cotton bud.

I will be the first to admit that the overall chipping (see above) looks a little extreme in these shots. However, this little car had clearly led an interesting life prior to being pranged on the flight from Rome. And besides, once it's on the base and I hit it with dusty pigments I am confident everything will calm down...

Now all I have to do is fill it (as well as the roof rack and trailer) with 'liberated' wares. Please note from the number plate that I am trying to be even-handed here by blaming the Luftwaffe for this particular crime de guerre...

Oh yes - please ignore the half-hearted attempt at a flat tire (done by softening the wheel edge over a flame before squashing it against a hard surface). This tyre is going to be half-buried in soft earth in any event...
 

Attachments

  • Topo weathered 4.jpg
    Topo weathered 4.jpg
    2 KB · Views: 0
  • Topo weathered 3.jpg
    Topo weathered 3.jpg
    2.8 KB · Views: 0
  • Topo weathered 2.jpg
    Topo weathered 2.jpg
    2.1 KB · Views: 0
  • Topo weathered 1.jpg
    Topo weathered 1.jpg
    2.7 KB · Views: 0
Top Class for a Topolino Tim. Yes, the final dusting will take away the wet and stark look it has now. Looking forward to that.

Cheers,
Richard
 
Tim that looks great, never seen this model before and it looks really good for your DIO
 
This is a very interesting build to me, too, with regard to it being a Bronco kit (I have some of their cars, but am also wary about buying more, especially tracked vehicles, after seeing sprue pictures and as they review both positively and negatively), and the damage modifications you are making. I certainly enjoy watching what you have done so far with regard to bullet holes, bent plastic, etc. Keep up the good work!
 
Tim.
Did I read flame ! I've tried that on a tyre as well, yours has come out well.
As you say some further dusting will tone it down, but I think it looks stunning as it is.
John.
 
Status
Not open for further replies.
Back
Top