Theme editor

Scale Model Shop

First attempt at weathering.

Del640

SMF Supporters
Joined
May 8, 2020
Messages
1,243
Reaction score
82
Points
48
1/3
Thread owner
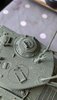
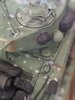
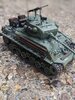
Nothing spectacular, just playing around with ideas... salt.

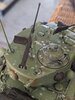
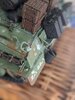
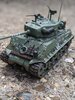
Applied water mist then various salt crystals to build, dried and this is what I'm left with, chipped rusted look?

I'm totally green to this so please be gentle!!

Ignore paint colour, just experimenting with various outcomes!

Oh, and the salt, ignore the salt I haven't taken it all off yet!
 

Attachments

  • IMG-20200614-WA0013.jpeg
    IMG-20200614-WA0013.jpeg
    2.1 KB · Views: 0
  • IMG-20200614-WA0015.jpeg
    IMG-20200614-WA0015.jpeg
    2.4 KB · Views: 0
Not bad actually, the next time you can concentrate some of the salt granules to corners to vary the chipping. Think of where paint is likely to chip on the hull from brushing against obstacles like walls. Also where crew tend to walk on often and equipment and storage areas. Lifting hooks, hatch edges get worn out from excessive contact.

Cheers,
Richard
 
That's looks a great first attempt looking FWD to seeing the finished thing

Warren
 
Nothing better than trying out ideas Del.
Richard is right in his advice.
Hope you post your final results.:thumb2:
 
Del,
that looks pretty good - I've used the salt method for chipping ( 'cos I don't have any hairspray ).
I think it can be overused on models, particularly in areas where wear wouldn't occur, so edges of mudguards, hatches, areas where there's foot traffic are the places to concentrate on. Remember scale - If you found a 25mm chip on your car, you'd be horrified - that equates to 0.7mm in 1/35, so try not to overdo it!
Dave
 
I've done salt a couple of times and really like this process. I sound like a parrot here, but YouTube is great for videos explaining weathering.
Salt weathering is just part of the weathering process, just one layer if you like. What you've achieved looks good.
 
Thread owner
Ok!!

Finished a Sherman fury tank.

It's a mash up of weathering effects that had no real direction other than I decided to use the model to experiment.

Painting straps and other extremely fine painting I can't do due to my shaky hands so please excuse real attention to detail!!!

I enjoyed trying different things out, and love the advice from here..

This should go in under completed 'Armoured Vehicles' in the forum but the standard is so high I thought I'd leave it here to complete my first weathering attempt.

Thanks for reading!

Del
 

Attachments

  • 00000PORTRAIT_00000_BURST20200616165721921.jpg
    00000PORTRAIT_00000_BURST20200616165721921.jpg
    3.7 KB · Views: 0
  • 00000PORTRAIT_00000_BURST20200616165713086.jpg
    00000PORTRAIT_00000_BURST20200616165713086.jpg
    3.7 KB · Views: 0
  • 00100lrPORTRAIT_00100_BURST20200616165713086_COVER.jpg
    00100lrPORTRAIT_00100_BURST20200616165713086_COVER.jpg
    3.3 KB · Views: 0
  • 00100lrPORTRAIT_00100_BURST20200616165639585_COVER.jpg
    00100lrPORTRAIT_00100_BURST20200616165639585_COVER.jpg
    3.5 KB · Views: 0
  • 00000PORTRAIT_00000_BURST20200616163026147.jpg
    00000PORTRAIT_00000_BURST20200616163026147.jpg
    4.4 KB · Views: 0
  • 00100trPORTRAIT_00100_BURST20200616163026147_COVER.jpg
    00100trPORTRAIT_00100_BURST20200616163026147_COVER.jpg
    4.2 KB · Views: 0
  • 00100trPORTRAIT_00100_BURST20200616162933804_COVER.jpg
    00100trPORTRAIT_00100_BURST20200616162933804_COVER.jpg
    4.2 KB · Views: 0
Del,
Looking very good for a first attempt. The lads have given some great advise as to where the wear appears.
 
Well you are off and running with the weathering. Something to build on and take forward to your next build with improvements as you go. Thanks for sharing
 
Back
Top