Theme editor

Scale Model Shop

Has anybody seen my suitecase

Status
Not open for further replies.
Thread owner
Hi Alun...good to have you follow this old build.

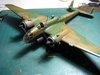
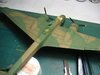
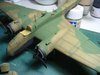
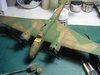
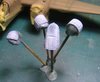
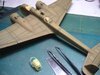
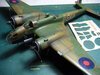
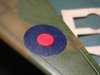
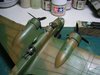
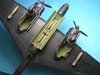
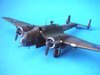
Jim, thanks. Yes, the one that I worked with sanding down to thin it, had a rub down with rubbing compound and then polished with Tamiya plastic polish and then dipped into Future. Polishing wasn't necessary for the other clear parts and only dipped after making sure they were dust free. As for the tissue masking...the engine as you see was molded to the cowling therefore had a shallow depth which a sponge could not take hold. Soaking the tissue, I could with a sharp tweezer, tease and stuff it into the shallow nooks just like paper mache. When it's semi dry I airbrush and then remove later after soaking it with water again for easy removal.

Cheers,
Richard
 
Thread owner
Since the bomb bay doors were going to be left open I decided to add some strip for the framework and painted them roughly lighter.

View attachment 315895

This time I used tape to mask all openings prior to pre-shading using the Nato black that I sprayed the underside and all attachments that were in black.

View attachment 315896

The propeller tips were coated in white before the yellow was painted on then masked and black layered to the rest of the propeller.

View attachment 315897

The underbelly and wings were masked. The wavy demarcation between the black and camo along the fuselage was drawn on the masking tape and cut before applying.

View attachment 315898

The remainder Nato black paint was diluted to nearly translucent to airbrush the pre-shade. Propeller hub tips were prepared as well with the same paint

View attachment 315899

Cheers,
Richard
 

Attachments

  • 440936.jpg
    440936.jpg
    2.5 KB · Views: 0
  • 443251.jpg
    443251.jpg
    2 KB · Views: 0
  • 443250.jpg
    443250.jpg
    2.9 KB · Views: 0
  • 442648.jpg
    442648.jpg
    2.9 KB · Views: 0
  • 442647.jpg
    442647.jpg
    3.1 KB · Views: 0
Thread owner
Hi Ken, thanks. She'll look better once the camo goes on.

Cheers,
Richard
 
Richard,
It's good to see one of the lesser know bombers being built and as usual you are doing a great job of it.
 
Thread owner
Thanks Scottie, it is one of the unsusual aircraft of its time.

Cheers,
Richard
 
Interesting progress.
One day, I will sit down with someone who knows how to pre-shade and solve that little mystery.
 
Thread owner
Hi, the first layer of colour goes on with earth brown. The pre-shadow is quite strong showing through the layer of paint.

View attachment 316123

After masking the clear parts I sprayed interior green and then primer over that to create an opaque frame solid enough so light doesn't pass through it when seen against a bright background.

View attachment 316124View attachment 316125

Green goes on next. I used blu-tac for the masking...

View attachment 316126View attachment 316127

After a layer of varnish I removed the masking and used a toothe pick to clean any paint residue at the edges of the frame.

View attachment 316128

Cheers,
Richard
 

Attachments

  • 444886.jpg
    444886.jpg
    2.9 KB · Views: 0
  • 444613.jpg
    444613.jpg
    2.7 KB · Views: 0
  • 444612.jpg
    444612.jpg
    3 KB · Views: 0
  • 444611.jpg
    444611.jpg
    3.1 KB · Views: 0
  • 444379.jpg
    444379.jpg
    2.8 KB · Views: 0
  • 443413.jpg
    443413.jpg
    3.1 KB · Views: 0
Thread owner
Interesting progress.
One day, I will sit down with someone who knows how to pre-shade and solve that little mystery.

Hi Dave, pre-shading as opposed to post shading gives you better control of panelling shades. It lets the over lying paint to blend with the shade and if you want it more subtle just coat with another layer. Some prefer to pre-shade with large splashes to demark each panel.

Cheers,
Richard
 
Thanks for the step by step guide there. What is the primer you mentioned?
 
Hi Richard
Thanks for the information on masking with the wet tissue - noted in my 'Little book of Tips' :thumb2: Also painting the prop tip white before the yellow - yellow is horrible to paint.
Great progress and as always very neat and well done.
Jim
 
Hi Richard
Thanks for the information on masking with the wet tissue - noted in my 'Little book of Tips' :thumb2: Also painting the prop tip white before the yellow - yellow is horrible to paint.
Great progress and as always very neat and well done.
Jim
Ha! Yes, yellow is probably THE worst colour to apply with a brush.
Multiple coats...
 
Thread owner
Hi Richard
Thanks for the information on masking with the wet tissue - noted in my 'Little book of Tips' :thumb2: Also painting the prop tip white before the yellow - yellow is horrible to paint.
Great progress and as always very neat and well done.
Jim

You're welcome Jim.

Thanks Dave W.

Ha! Yes, yellow is probably THE worst colour to apply with a brush.
Multiple coats...

Yes Dave S, all it needs is a neutral or white base. The primer I use is Mr Surfacer.

On to the build...Once the Future varnish cured I applied the decals...

View attachment 316399View attachment 316400

Decals were old so quite a lot of decal juice used, also I did not apply enough varnish so the surface was a bit rough. This normally happens when using Humbrol enamels where there is build up of dried paint.

View attachment 316401View attachment 316402

After this layers of varnish and polishing can only remove the rough surface but from a safe distance it looks ok. Purists would shudder at such workmanship.:tongue-out3:

View attachment 316403

Cheers,
Richard
 

Attachments

  • 445908.jpg
    445908.jpg
    3.3 KB · Views: 0
  • 445907.jpg
    445907.jpg
    2.4 KB · Views: 0
  • 445906.jpg
    445906.jpg
    2.4 KB · Views: 0
  • 444889.jpg
    444889.jpg
    3.1 KB · Views: 0
  • 444888.jpg
    444888.jpg
    3 KB · Views: 0
And another bird. Great work again Richard. I'm a fan of preshading as well. Keep up the good work!

Cheers
 
Some great work on display here Richard. You’ve inspired me to start scratch building interior detail on my 1/48 Hampden. I will have to start a build blog.
 
Thread owner
Thanks Dave S.

Wouter, you too. It took a while before I was convinced to do it.

Dave W, at 1/48 it would be a crime not to do an interior. :smiling2: Looking forward to it.

The Hampden is practically done... just showing the bomb bay and the snug fit of the bombs...I think the real bomb bay doors didn;t have those thick attachment strips in the way.

View attachment 316527

The fuselage was so narrow that I think there was a sequence of who goes in first. Botched up the landing lights, glue has fogged up the insides.

View attachment 316528View attachment 316529 Overall quite a nice kit and was happy to have done it. If I had another I would do a Coastal Command scheme.

Cheers,
Richard
 

Attachments

  • 445910.jpg
    445910.jpg
    3.1 KB · Views: 0
  • 445909.jpg
    445909.jpg
    3 KB · Views: 0
  • 445911.jpg
    445911.jpg
    2.3 KB · Views: 0
Just popped in to see how things are going and it was great to see what you have done with the wet stuff. I am far too much of a novice to comment on the issues you have had but it looks awesome to me. Good luck with the finishing touches
 
Thread owner
Thanks for popping in Steve.

Cheers,
Richard
 
Status
Not open for further replies.
Back
Top