Theme editor

Scale Model Shop

Hasegawa 1/32 FW190A-8

Status
Not open for further replies.

Vaughan

Active member
Joined
Apr 1, 2011
Messages
3,246
Reaction score
51
Points
48
1/3
Thread owner
Hi All

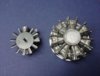
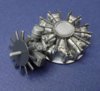
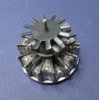
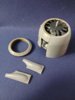
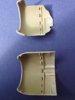
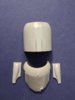
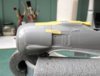
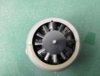
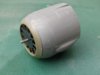
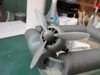
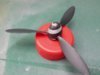
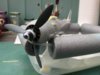
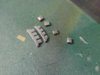
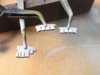
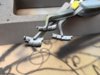
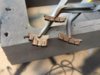
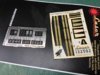
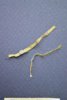
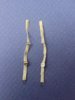
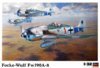
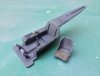
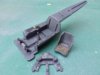
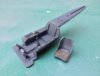
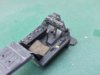
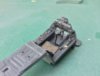
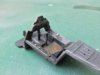
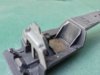
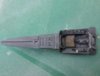
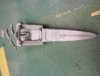
I haven't build a German aircraft for a while and this will be my first FW190. The kits up to Hasegawas' usual standard with a well detailed office which included instrument decals. I sprayed it with RLM66, applied the decals added some weathering and then added a few drops of clear varnish on the instrument dials to simulate the glass. Seat belts are yet to be fitted and will most probably be scratch built as I don't have any PE ones left.

View attachment 62649

View attachment 62650

View attachment 62651

View attachment 62652

View attachment 62653

View attachment 62654

View attachment 62655

View attachment 62656

View attachment 62657

View attachment 62658

View attachment 175675

View attachment 175676

View attachment 175677

View attachment 175678

View attachment 175679

View attachment 175680

View attachment 175681

View attachment 175682

View attachment 175683

View attachment 175684
 

Attachments

  • Screen shot 2012-10-16 at 14.42.41.jpg
    Screen shot 2012-10-16 at 14.42.41.jpg
    6.1 KB · Views: 0
  • 130304_1737.jpg
    130304_1737.jpg
    2 KB · Views: 0
  • 130304_1738.jpg
    130304_1738.jpg
    2.1 KB · Views: 0
  • 130304_1753.jpg
    130304_1753.jpg
    2 KB · Views: 0
  • 130304_1758.jpg
    130304_1758.jpg
    2.1 KB · Views: 0
  • 130304_1759.jpg
    130304_1759.jpg
    1.9 KB · Views: 0
  • 130304_1760.jpg
    130304_1760.jpg
    2.1 KB · Views: 0
  • 130304_1761.jpg
    130304_1761.jpg
    2.2 KB · Views: 0
  • 130304_1763.jpg
    130304_1763.jpg
    1.7 KB · Views: 0
  • 132103_1626.jpg
    132103_1626.jpg
    2 KB · Views: 0
Good stuff Vaughan.

I use the beige harness/belts about two or three down on this page.

RB Productions : RB Productions Store, Scale models and accessories by Radu Brinzan

They are quite fiddly to make but look very convincing in my opinion.

Cheers

Steve
 
Thread owner
Thanks for that Steve, not sure which one I would go for beige(early) or olive green(late) the two versions for this kit are June '44 or Feb '45.
 
I'd go for beige in an A-8. The green one's seem to have appeared very late,I did stick them in a Ta 152 I built,probably wrongly but never mind :) .

Cheers

Steve
 
Thread owner
Thanks guys

Next up has been the BMW 801D radial engine which I completed yesterday this doesn't have many parts but is still well detailed, shame that none of it will be visible once the cowlings on as the cooling fan totally obscures it. Oh well it was worth the effort of making it look nice. I'm still undecided about the seat belts scratch or PE or the ones Steve has recommended.

View attachment 62692

View attachment 62693

View attachment 62694

View attachment 62695

View attachment 62696

View attachment 175718

View attachment 175719

View attachment 175720

View attachment 175721

View attachment 175722
 

Attachments

  • 130404_1765.jpg
    130404_1765.jpg
    2 KB · Views: 0
  • 130404_1766.jpg
    130404_1766.jpg
    2.7 KB · Views: 0
  • 130404_1767.jpg
    130404_1767.jpg
    2.3 KB · Views: 0
  • 130404_1770.jpg
    130404_1770.jpg
    2.8 KB · Views: 0
  • 130304_1771.jpg
    130304_1771.jpg
    2.1 KB · Views: 0
yea but look at the job of the colours and if it looks this good then the job was worth it,a good craftsman always hides his work!!!

mobear
 
Here's the green ones in a Ta 152

And the beige ones fitted to a pilot in a Bf 109 F.

That'll give you an idea of how even someone with three thumbs can get them together :)

Cheers

Steve
 
Those harnesses are amazing. I hope John thinks about stocking them...

A very business like aircraft the 190. One of the two German aircraft I have ever built.

Great detail in this kit and I'll be watching this with interest.

Ian M
 
Those harnesses are amazing.You'd have to be a seriously talented modeller to scratch some as good as those.I'd get the RB productions belts if it was my build.
 
Thread owner
Steve those belts look really good, I have found these belts on the

Hannants

site made from micro-fibre and you get 2 set for £6.60 so I might go for them instead.

I have made some progress over the last few days. The engine cowling is again in 4 parts as was the P47s but this one goes together a lot easier as the engine fits nicely into slots provided and has been sprayed RLM2. As I thought the engine will all but be hidden once the cooling fan is is in place. A dry fit of the cockpit in the fuselage and all looks good, but mating the forward part of the fuselage looks like there might be issues around the wing roots. I will leave closing the fuselage until the wings are together so I can be sure of a perfect fit.

View attachment 63031

View attachment 63032

View attachment 63033

View attachment 63034

View attachment 63035

View attachment 63036

View attachment 63037

View attachment 63038

View attachment 63039

View attachment 63040

View attachment 176057

View attachment 176058

View attachment 176059

View attachment 176060

View attachment 176061

View attachment 176062

View attachment 176063

View attachment 176064

View attachment 176065

View attachment 176066
 

Attachments

  • 130604_1830.jpg
    130604_1830.jpg
    5.3 KB · Views: 0
  • 131104_1846.jpg
    131104_1846.jpg
    1.8 KB · Views: 0
  • 131104_1850.jpg
    131104_1850.jpg
    2 KB · Views: 0
  • 131104_1851.jpg
    131104_1851.jpg
    2.4 KB · Views: 0
  • 130504_1833.jpg
    130504_1833.jpg
    5.2 KB · Views: 0
  • 130504_1831.jpg
    130504_1831.jpg
    5 KB · Views: 0
  • 131004_1837.jpg
    131004_1837.jpg
    2.5 KB · Views: 0
  • 130804_1842.jpg
    130804_1842.jpg
    2.1 KB · Views: 0
  • 130804_1845.jpg
    130804_1845.jpg
    4.9 KB · Views: 0
  • 131004_1834.jpg
    131004_1834.jpg
    5.9 KB · Views: 0
Thread owner
Hi All

Here's my progress over the last 5 days. I've ordered some HGW micro-fibre seat belts from Hannants should be here any day now. The prop is together painted, spiral decal added and weathered.

The exhaust stacks aren't hollowed out so I used the foil from a wine bottle to create my own. The stacks were cut shorter and then the foil was wrapped around and glued in place. Followed up with a coat of primer, black and a mix of OD, black and a drop of metallic rust.

View attachment 63286

View attachment 63287

View attachment 63288

View attachment 63289

View attachment 63290

View attachment 63291

View attachment 63292

View attachment 63293

View attachment 63294

View attachment 176312

View attachment 176313

View attachment 176314

View attachment 176315

View attachment 176316

View attachment 176317

View attachment 176318

View attachment 176319

View attachment 176320
 

Attachments

  • 131504_1876.jpg
    131504_1876.jpg
    2 KB · Views: 0
  • 131504_1879.jpg
    131504_1879.jpg
    2.6 KB · Views: 0
  • 131504_1895.jpg
    131504_1895.jpg
    5 KB · Views: 0
  • 131504_1903.jpg
    131504_1903.jpg
    6 KB · Views: 0
  • 131504_1904.jpg
    131504_1904.jpg
    5.7 KB · Views: 0
  • 131604_1905.jpg
    131604_1905.jpg
    2.2 KB · Views: 0
  • 131604_1906.jpg
    131604_1906.jpg
    2.8 KB · Views: 0
  • 131604_1910.jpg
    131604_1910.jpg
    2.8 KB · Views: 0
  • Screen shot 2013-04-11 at 18.34.15.jpg
    Screen shot 2013-04-11 at 18.34.15.jpg
    5 KB · Views: 0
Just seen this one Vaughan, and what a cracking build so far some great work looking forward to more updates
 
Thread owner
Thanks Guys

I've not tried this method with exhaust stacks before(I used plastic card on the arado exhausts) but the other option would have been to try and drill them out which is possible but can go wrong more easliy. So although the foil was fiddly it paid off in the end.
 
Hi Vaughan, That looks like a very nice kit, I build a lot of Hasegawa, but have never done a 1:32, you're doing a great job on this one. Cheers Derek
 
Thread owner
Cheers Guys

Well at last the HGW belts from Hannants have arrived they have taken 5 days to travel 28 miles!!!.

I made a start on them this evening. The belts are mounted on a backing paper which you have to remove first, then cut the ends to release them. Once cut the instructions tell you to crumple them between your finger a knead them. This all seems a bit odd as you would think they would fall apart but the more you knead them the more realistic they will look. The PE buckles are made by Eduard so you know they will be of good quality. Threading the belts through the buckles is fiddly but as it says in the instruction you can adjust them like the real thing which you certainly can't do with PE belts and this is true you really can adjust them!. I had to refer to HGW website for better instructions because they only give you a photo of the finished belts with corresponding numbers. So far I have completed the shoulder harnesses minus the anchorage points as there is a choice of 2 and I will have to do some research as how to best attach them to the pilots seat. These belts so far are definitely better than PE belts but they still have a mind of their own and are quite springy and will need to be manipulate to lay flat when in situ. Time permitting I will make a start on the lap belts tomorrow.

View attachment 63418

View attachment 63419

View attachment 63420

View attachment 63421

View attachment 63422

View attachment 176444

View attachment 176445

View attachment 176446

View attachment 176447

View attachment 176448
 

Attachments

  • 131704_1911.jpg
    131704_1911.jpg
    3.1 KB · Views: 0
  • 131704_1912.jpg
    131704_1912.jpg
    2 KB · Views: 0
  • 131704_1913.jpg
    131704_1913.jpg
    1.9 KB · Views: 0
  • 131804_1919.jpg
    131804_1919.jpg
    1.7 KB · Views: 0
  • 131804_1953.jpg
    131804_1953.jpg
    1.6 KB · Views: 0
Vaughan this is really coming along nicely,great job on the exhausts !
 
Status
Not open for further replies.
Back
Top