Theme editor

Scale Model Shop

Hasegawa 1/32 FW190A-8

Status
Not open for further replies.
Thread owner
Thanks Guys

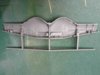
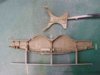
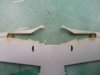
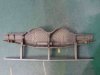
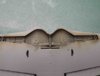
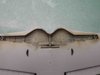
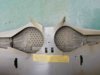
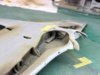
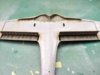
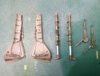
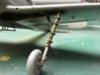
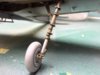
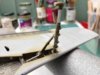
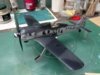
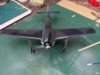
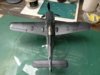
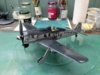
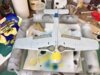
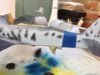
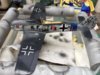
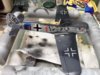
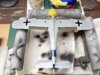
Another small update as I don't seem to be finding much time to do any modelling at the moment my youngest daughters wedding day is fast approaching. So here's where I'm up to, wheel wells are constructed and attached to the lower wings they have been sprayed with RLM 02 weathering and a wash added. Upper wings are also attached. The instructions say to fit the upper wings last after the lower are attached to the fuselage but I'm finding it easier doing it my way as I can see there are going to be some minor fit issues at the wing roots/engine cowling. Next up is closing the fuselage.

View attachment 64408

View attachment 64409

View attachment 64410

View attachment 64411

View attachment 64412

View attachment 177434

View attachment 177435

View attachment 177436

View attachment 177437

View attachment 177438
 

Attachments

  • 131005_2474.jpg
    131005_2474.jpg
    2 KB · Views: 0
  • 131005_2477.jpg
    131005_2477.jpg
    2.1 KB · Views: 0
  • 131005_2478.jpg
    131005_2478.jpg
    1.8 KB · Views: 0
  • 131005_2479.jpg
    131005_2479.jpg
    1.9 KB · Views: 0
  • 131405_2468.jpg
    131405_2468.jpg
    1.8 KB · Views: 0
Hi Vaughan, your attention to detail tells me that you are enjoying this build. Great work. Cheers Derek
 
Nice work Vaughan. Like the very neat masking on the canopy. Those seat belts are something else.

Weddings yes have two daughters myself both wed & they may leave home but so does a lot of money. Hope all goes well.

Laurie
 
Thread owner
Thanks Derek and Laurie

Another small update there a few issues regarding the alinement of the existing spent casing chutes and their ports. I have cut the ports out but as you can see from the photos they don't line up. I'm inclined to leave it as it is, unless someones got any ideas on how to modify it? In hindsight I should have done all the modifications before I put the parts together. I have managed to spray the control flaps with RLM02 and then post shaded with RLM02 and a drop of RLM66.

View attachment 64471

View attachment 64472

View attachment 64473

View attachment 64474

View attachment 64475

View attachment 64476

View attachment 177497

View attachment 177498

View attachment 177499

View attachment 177500

View attachment 177501

View attachment 177502
 

Attachments

  • 131405_2488.jpg
    131405_2488.jpg
    5 KB · Views: 0
  • 131505_2483.jpg
    131505_2483.jpg
    5.3 KB · Views: 0
  • 131505_2485.jpg
    131505_2485.jpg
    5.9 KB · Views: 0
  • 131505_2487.jpg
    131505_2487.jpg
    5.1 KB · Views: 0
  • 131505_2489.jpg
    131505_2489.jpg
    2.2 KB · Views: 0
  • 131505_2491.jpg
    131505_2491.jpg
    5.6 KB · Views: 0
Thread owner

Attachments

  • 132805_3000.jpg
    132805_3000.jpg
    2.3 KB · Views: 0
  • 133005_2994.jpg
    133005_2994.jpg
    5.4 KB · Views: 0
  • 133005_2995.jpg
    133005_2995.jpg
    5.4 KB · Views: 0
  • 133005_2997.jpg
    133005_2997.jpg
    6 KB · Views: 0
  • 130506_3005.jpg
    130506_3005.jpg
    2.2 KB · Views: 0
  • 130506_3004.jpg
    130506_3004.jpg
    2.1 KB · Views: 0
  • 130506_3002.jpg
    130506_3002.jpg
    2 KB · Views: 0
  • 130406_2990.jpg
    130406_2990.jpg
    2.1 KB · Views: 0
  • 130406_2991.jpg
    130406_2991.jpg
    2 KB · Views: 0
Nice detail on the u/carriage. But I can't work out how the mechanism works to fully retract the main strut. (Last two images). Obviously, the main strut rotates about its end, (the end in the wing). For that to happen, the hydraulic cylinder must pull the end of the cylinder to main strut link, at the piston end, away from the main strut. But the piston has a very short stroke, only enough to rotate the main strut by a few degrees, unless in some way the cylinder is forced to rotate about its other (non-link) end, down and away from the wing and round to a position parallel to the wing, pointing in the opposite direction and in the wheel bay.

Also, there is no supporting strut connected to the main strut and lying backwards to resist the backwards component of landing forces, especially since the main strut is at a great angle to the vertical and looks as though it would collapse easily.

(The plane obviously worked, and this is a model, but as a mechanical engineer, this sort of thing tends to bug me!)
 
I'm loving this build. I'm planning to do the same kit but converted to a A8/R8 version. Just waiting for my resin and decals to come through the post. Keep up the great work Vaughan
 
Thread owner
Thanks Allyne, Steve try this link I think it explains it all Focke-Wulf Fw 190 Main Landing Gear by Robert Stephenson and E. Brown Ryle III . For me I just build the model and don't question the Machanical side of things but its still interesting to know.
 
Hi Vaughan

excellent work on the 190. You clearly have modelling no-how, and a definite vision of what you want to accomplish. A great standard of work and excellent modelling skills. Look forward to the finished butcher bird.

Cheers

P
 
What excellent attention to detail, really looking forward to the end result!

Gregg
 
Thanks Vaughan, that explains it. What I thought was a hydraulic cylinder is simply a link with a spring. The circular disk is driven by an electric motor (not shown in the model). An ingenious mechanism.
 
Just caught up with this one Vaughan. It's looking good. Nice job on the U/C, and as Steve said it was a very ingenious system.

Focke-Wulf (well Kurt Tank anyway) thought that an electrical system would be more difficult to damage than the more usual hydraulic system. The Fw 190 was built to be tough and to take punishment and it could. Tank himself used the term "dienstpferd" to describe it. That translates as cavalry horse or charger as opposed to a race horse like the Bf 109 or Spitfire.

Cheers

Steve
 
Thread owner

Attachments

  • 130307_5047.jpg
    130307_5047.jpg
    5.8 KB · Views: 0
  • 130307_5048.jpg
    130307_5048.jpg
    5.6 KB · Views: 0
  • 130307_5050.jpg
    130307_5050.jpg
    5.6 KB · Views: 0
  • 130307_5051.jpg
    130307_5051.jpg
    5.8 KB · Views: 0
  • 130407_5052.jpg
    130407_5052.jpg
    6.5 KB · Views: 0
  • 130407_5053.jpg
    130407_5053.jpg
    6 KB · Views: 0
Hi Vaughan

The acustomed Vaughan & expected now finish. Very neat & tidy & pleasing.

How did you achieve the small camouflage markings ?

Laurie
 
Thread owner

Attachments

  • 131207_5699.jpg
    131207_5699.jpg
    3.3 KB · Views: 0
  • 131207_5700.jpg
    131207_5700.jpg
    3.3 KB · Views: 0
  • 131207_5701.jpg
    131207_5701.jpg
    3.3 KB · Views: 0
Status
Not open for further replies.
Back
Top