Theme editor

Scale Model Shop

Hasegawa 1/48 SBD-3 Dauntless

Status
Not open for further replies.

spanner570

New member
Joined
May 26, 2009
Messages
15,599
Reaction score
613
Points
0
1/3
Thread owner
I have had this model staring at me for a year now since Tony (yakface) told me to buy it at last year's Cosford show, so I thought it's time to build it!

I have been away in the hills for a while but luckily my bouncy nurse said I could take something to occupy my mind so I took this kit, sad or what? Mind you, sat at the little table in the camper, watching the night close in, surrounded by Welsh mountains (and a bit of rain) and building a model can't be bad....

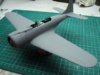
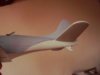
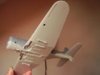
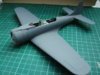
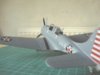
So here it is so far:

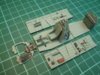
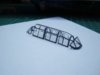
First off, there are so many conflicting versions of the interior paintwork that I gave up and just painted the main interior in the right colour and just got the bits something like, so please don't post that this and that bag/container are the wrong colour, I just enjoy making models. lol!

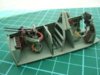
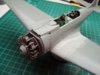
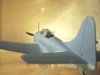
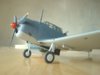
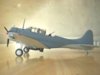
It went together very well, but the main wing roots were a bad fit, requiring lots of filler. I'm not worried 'cos that to me is all part of the modelling game.

The lap straps and M.G. ammo belts are scratch made from a foil yeast packet.

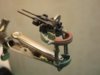
I know I could have put in some scratch made cables and pipework, but such things are beyond my capabilities.

The interior colour appears different in the photos to what it actually is.

The belts too appear to be a different colour, but they are both the same light tan colour in real life...

Still need to tart up the filler on the wing roots.

I hope you like the progress thus far and any suggestions, as long as they are physically possible, are welcome.

Cheers all,

Ron

View attachment 31686

View attachment 31687

View attachment 31688

View attachment 31689

View attachment 144712

View attachment 144713

View attachment 144714

View attachment 144715
 

Attachments

  • 148 SBD-3  Dauntless 001.jpg
    148 SBD-3 Dauntless 001.jpg
    3.2 KB · Views: 0
  • 148 SBD-3  Dauntless 014.jpg
    148 SBD-3 Dauntless 014.jpg
    3.1 KB · Views: 0
  • 148 SBD-3  Dauntless.jpg
    148 SBD-3 Dauntless.jpg
    2.9 KB · Views: 0
  • 148 SBD-3  Dauntless 011.jpg
    148 SBD-3 Dauntless 011.jpg
    2.3 KB · Views: 0
looking good so far ron. been meaning to pick up a dauntless for a while now. will be watching this kit come together.
 
Eyup mate, great to see this one in motion. Lovely job on the cockpit , although im a little surprised at one thing, -- Yeast packet!!! youve got to start buying more expensive red wine mate , so you can get some lovely wine foil or of course theres always bourbon, or is the yeast something to do with some shady homebrewing operation LOL!!!! Cant wait to see what i can persuade you to buy this year!! cheers tony
 
Thread owner
Thanks for the positive comments boys.....

O.K. I'll confess. I made homebrew beer and wine until fairly recently, but now commercial stuff is so cheap, it's hardly worth making anymore. Now I use the quick yeast to make luuurrvly bread, hence the satchets.

I find these are easier to manipulate than the foil on wine bottles.

Saving up my pennies for Cosford Tony, so let's hope you find me summat. I hope the bloke is there again who with half an hour to go shouted. " All the stuff on the floor, half price!"....

Steve, just getting my eye in for a certain Bf109!!!!

Cheers all,

Ron
 
Lovely detail in the cockpit. Obviously the yeast packet was quite a bit thinner than the wine bottle foil so you thought it would be more to scale?
 
Looks like another good one on the way Ron.

Ian M
 
Thread owner
\ said:
Lovely detail in the cockpit. Obviously the yeast packet was quite a bit thinner than the wine bottle foil so you thought it would be more to scale?
Thanks for the comments Richard.

It's not so much the scale side of things, I just find the thinner foil goes where I want it to, being easier to bend and cut than the wine bottle stuff.

Ron
 
Done an excellent place for a gunner. I can see, this will be a great project.
 
Thread owner
Thanks for taking the time to have a look and comment boys, I appreciate it.

Here is a progress report and pictures:-

With the wing root fit problem sorted, I have stuck on a few things to the underside, temporarily shoved on the 'nose' and brushed on a coat of primer.

I then brushed on the underside colour, this took two coats to cover the grey primer successfully....

The demarkation lines on the nose and rear fus., were marked with a soft lead pencil. (You can see my first go was not quite right, lol) then, as usual, painted freehand.

At this stage I am not too fussed about getting the paint dead on to the lines. I do this sort of paint application in one go with a well loaded brush, otherwise runs and drags occure if you start to fiddle. In the past I have tried masking tape but the above method is a lot easier, especially where a tight radius is needed.

The colour is actually a neutral grey, but the light did funny things to it! (Gotta make a photo booth)

A little tip..Always use a pencil to mark your models, anything else is virtually impossible to cover and hide with paint. I found this out the hard way many moons ago!

Next up, the wheel wells ect., and the blue top coat.

Cheers,

Ron

View attachment 31763

View attachment 31764

View attachment 31765

View attachment 144789

View attachment 144790

View attachment 144791
 

Attachments

  • 148 SBD-3  Dauntless 016.jpg
    148 SBD-3 Dauntless 016.jpg
    2.8 KB · Views: 0
  • 148 SBD-3  Dauntless 017.jpg
    148 SBD-3 Dauntless 017.jpg
    1.7 KB · Views: 0
  • 148 SBD-3  Dauntless 015.jpg
    148 SBD-3 Dauntless 015.jpg
    1.9 KB · Views: 0
Thread owner
I have brushed two coats of Humbrol matt blue on the upper surfaces. I thought, as the primer coat was close to the blue, I could get away with one coat, no chance!

The demarcation lines have been tidied up as well.

I wasn't too sure about the wing roots but the painting has come out O.K. in the end.

Apart from a bit of touching up of the grey engine thingy and other bits an' bobs later, I'm happy with the overall finish...

Time to do the undercarriage ect. next....Oh! and paint 23 canopy panel frames!!!!!!!!!!!

Ron

View attachment 31802

View attachment 31803

View attachment 144828

View attachment 144829
 

Attachments

  • 148 SBD-3  Dauntless 018.jpg
    148 SBD-3 Dauntless 018.jpg
    2.8 KB · Views: 0
  • 148 SBD-3  Dauntless 019.jpg
    148 SBD-3 Dauntless 019.jpg
    2.8 KB · Views: 0
MMM! canopy masking, my favourite bit , NOT!!!! good luck mate, maybe you could do what ive done with a tamiya mosquito im doing at the mo, get a set of eduard masks, mine cost me about £3.50 , a price im happy to pay to make the job a bit easier!!! keep up the good work that man! cheers tony
 
Thread owner
\ said:
MMM! canopy masking, my favourite bit , NOT!!!! good luck mate, maybe you could do what ive done with a tamiya mosquito im doing at the mo, get a set of eduard masks, mine cost me about £3.50 , a price im happy to pay to make the job a bit easier!!! keep up the good work that man! cheers tony
Yo Tony, read your post..... Took the dog for a quick charge around in the fields and thought "Stuff it, let's have a go at the canopy!" (The dog agreed)

I have done them free hand, as I am sure I would make a total balls-up of masking the

'Glass'!

So here they are, still wet.lol

Cheers mate,

Ron

View attachment 31809

View attachment 144835
 

Attachments

  • 148 SBD-3  Dauntless 023.jpg
    148 SBD-3 Dauntless 023.jpg
    1.7 KB · Views: 0
Perfect ron, i dont think i could do any better with the pre cut masks! In fact im in the middle of doing a SMER (old heller tool) Amiot 143 and ive been keeping it old school and brush painting it, and i think i might hand paint the canopy frames too . cheers tony
 
Thread owner
The brushed on Humbrol enamels have produced a nice finish so I have stuck on the remaining pieces.

The rear cockpit was a bit awkward, the gunners canopy is in two bits and the instructions showed them glued in line (closed) I wanted them folded back to show the M.G. This meant tucking them under the main central canopy...Bit of a squeeze and alterations but I managed to get them both in!

Ready now for the coat of Klear, decals ect., and weathering.

Ron

View attachment 31922

View attachment 31923

View attachment 31924

View attachment 144948

View attachment 144949

View attachment 144950
 

Attachments

  • 148 SBD-3  Dauntless 025.jpg
    148 SBD-3 Dauntless 025.jpg
    2 KB · Views: 0
  • 148 SBD-3  Dauntless 026.jpg
    148 SBD-3 Dauntless 026.jpg
    2 KB · Views: 0
  • 148 SBD-3  Dauntless 024.jpg
    148 SBD-3 Dauntless 024.jpg
    2 KB · Views: 0
Lovely clean bird ron!The canopy looks fine, youd never know its been altered, looking forward to seeing it in the decals and a bit muckied up, cheers tony
 
Thread owner
Thanks Tony, it was a bit of a pig to do but I got there....

Hows the Amiot free hand painting coming along?

I find that due to the cockpit frames/glass having sunken edges to the mouldings, it makes the freehand painting fairly straight forward, in as much as the paint gathers in the grooves....Sez he, wot can't read anything smaller than 1/2" letters without glasses anyway! lol

Not long to Cossy now mate! Don't tell Scott but I've already bought his Birthday cake...........

Cheers,

Ron
 
The amiot will be making an appearance in the next few days , but i warn you ,its a weird looking beastie!!The hand painting of the frames wasnt as bad as i thought, it being quite easy to rub off any overlap with a cocktail stick as the paint ive used is acrylic (games workshop, brushes beautifully when thinned a bit with water) Like your good self im tackling the decals tonight.Cant wait till cosford to see what assorted stash fodder we can root out this time!! cheers tony
 
Status
Not open for further replies.
Back
Top