Theme editor

Scale Model Shop

Help please with products and items

peter.collins443

New member
Joined
Jun 9, 2023
Messages
15
Reaction score
12
Points
3
1/3
Thread owner
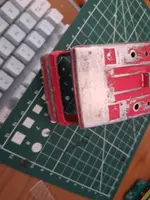
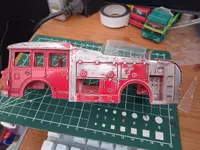
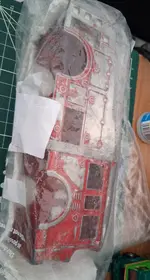
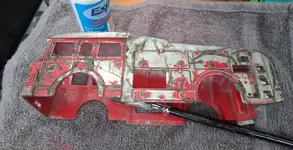
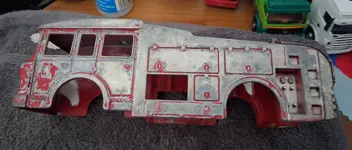
I found a dinky ERF fire tender which needs to be lovingly restored rather than throwing it away.

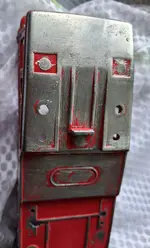
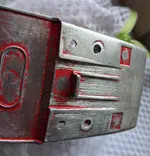
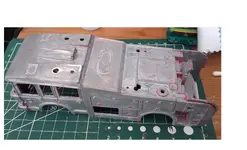
I need to fill in a number of holes on the roof, where in the past would have been, a hose reel, a search light and piece of metal and over the cab section hooks to secure a wheeled escape.

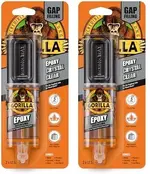
What can I use to fill in the holes on the roof, some one has suggested tamiya putty , or tamiya epoxy putty quick type 87051 or is there something else I could use?

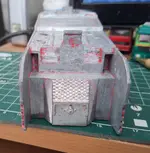
In the front two holes some led lights as part of the flashing beacon. What do I need to purchase for this effect? Does it come in kit form?
Also how easy is it to do?

Rather than replacing the wheeled escape which I have, I wanted just to replace it with a replica 35ft ladder. In the seventies the fire service I was in would remove wheeled escapes and replace it with a different ladder system.

Any help would be gratefull..

Peter Collins

20260421_191009.webp
 
Are you stripping it down to make things easier?

There's a couple of guys on YouTube that do this shirt of thing to diecast

Hope you share your progress with this project
 
Thread owner
Hi

The reason for wanting the stripping the model down is for the following reason. In the mid to late sixties my dad would take me on a united bus to Whitby. Going through Lythe village on the outsiskirts of Whitby every time we passed the fire station their was a yellow fire engine.
I thought one day I would try and create the fire engine concerned.

Peter
 
Thread owner
Ive watched numerous youtube videos on how to most of them show the vehicles being taken into a garage or work area and using a metal grinder to remove the paint. But this would have caused issues as the model concerned slightly raied lockers.
Back to searching the internet for further inspiration to no avail. Some people sweared using dettol (didnt try) would do the job, acetone (nail polish tried some but to no avail.) Some even suggested using white vinegar (10% acidic) also mister cleaner oven spray. One even suggetted jeyes fliud or brake fluid to remove the paint.
I picked up an old nail file on the wifes dresser( guess what it wasnt an old one but a new one in the dog house again lol lol). For fun I just started to use it on the model concerned. Found that the paint on the model wasnt put on evenly from the manufacturer (typical).
After a number of hours of pure delight using the nail file the paint has started to come off. By mistake and in a little pain I picked up a small diamond file I had on the computer table which workd a treat until the paint clogged the file and I was continually having to remove the paint. Due to my arthritis I gave up for a number of days. Only to find out that the wives nail file was a 180/240 grit which was not very rough.
I had some 100 grit boards in my tool box and those did a better job until again the paint clogged the grit file or the file becoming dull.
I then dismantled the model to make it easier to clean remembering to put all the items inluding a screw in a bag in a safe place.

The wife wanted the cupboard underneath the sink cleaning as it was becoming a mess and we needed to throw away anything that was not being used. I found a pack of astonish oven cleaner which dad gone hard. Rather than throwing it out I found an old piece of wire wool and used the these on the model to get reasonable results.
This method is good on parts of the model where the paint has been thinly coated but not other areas.

First image of the model roof.

20260421_191009.webp

new images


Monday 04/05/2026


20260504_095507.webp

Will post 2 more images

I will try and update when I have cleaned a little more of the model
 

Attachments

  • 20260504_095533.webp
    20260504_095533.webp
    924.6 KB · Views: 1
  • 20260504_095552.webp
    20260504_095552.webp
    1.1 MB · Views: 2
I personnaly use a wire brush on my drill press for stripping paint and rust of objects like that. A wirebrush is strong enough for stripping paint but not strong enough for removing raised details. If you can, try it out on an old matchbox car or something.

Example of a wire brush for drill:
810bsNQ2jLL._AC_UF1000,1000_QL80_FMwebp_.webp

Goodluck :coffee:
 
I had 2 mates that did a lot of diecast cars. They'd just dump the cars into a container of standard thinner (aka cellulose or lacquer thinner), after ensuring all plastic parts had been removed.

It stripped the paint off easily.

Life's way too short to remove it mechanically!
 
How about a two-part epoxy for filling the holes? Something like:
 

Attachments

  • B0DX82WV23.webp
    B0DX82WV23.webp
    44.8 KB · Views: 0
I have restored loads of these diecast vehicles and just used standard paint stripper to get them back to bare metal and then prime and repaint. For filling the holes the epoxy putty will do it or you could put some tape on the inside where the holes are and drip some epoxy into the holes. The tape will stop the epoxy running through. Finish off with a fine surface filler if required.

Check out Steve Flowers Model supplies limited on the web for any spare parts that you need. The specialise in vintage models and make reproduction parts etc. Enjoy the restoration.
 
Thread owner
I personnaly use a wire brush on my drill press for stripping paint and rust of objects like that. A wirebrush is strong enough for stripping paint but not strong enough for removing raised details. If you can, try it out on an old matchbox car or something.
I have an old dremel with numorous attachments but the vibration from it hurts my fingers as I have arthritis. the one thing I would have used a drill with some wire brushes If I could control the speed and the vibrations werent so bad.

I had 2 mates that did a lot of diecast cars. They'd just dump the cars into a container of standard thinner (aka cellulose or lacquer thinner), after ensuring all plastic parts had been removed.

It stripped the paint off easily.

Life's way too short to remove it mechanically!
tried acetone and some cellulose to no effect or I might not have left long enough.

I dont know why but the paint in certain parts is thicker than on other areas.

Might try and get some paint stripper at the weekend if I can get to the local joinery store..

How about a two-part epoxy for filling the holes? Something like: gorilla two epoxy filler

my plan was to get the paint off first and then get the epoxy filler. As a first time rebuilder I wasnt sure what to use. Will give it some thought.

Peter
 
Thread owner
Update 05/05/2026

Had a spare hour this morning to try and remove some more paint. Smeared the the cab top area with some astonish cooker and grill cleaner it is a Vegan product, non corrosive does not burn the skin (but still put on some gloves the active ingredient seems to be orange oil. Let it stand for about 15 mins and used some emery nail files it did start to reemove the paint a little easier. Did this about three or four times to remove quite a bit of the paint. Should have read the advise her first. Lol Lol.
Some of the areas are problematic

todays effort.

20260505_113215.webp

Peter
 

Attachments

  • 20260505_113211.webp
    20260505_113211.webp
    1.1 MB · Views: 0
  • 20260505_113228.webp
    20260505_113228.webp
    1.2 MB · Views: 0
Back
Top