By the way. I obtained some black A3 artists foam board that I have laid down in the spray booth as a surface on which to spray and take any overspray. Around it I lay some paper to protect the table. I may get some bigger boards next time and, I have to say, it does the job well. A wipe with i.p.a. after a session gets rid of a lot of the mess ready for another session.

You are using an out of date browser. It may not display this or other websites correctly.
You should upgrade or use an alternative browser.
You should upgrade or use an alternative browser.
HK Models 1/32 scale D. H. Mosquito
- Thread starter BarryW
- Start date
- Status
- Not open for further replies.
A few more pics...
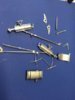
First three pieces from the u/c each done in a different shade of aluminium. I dont think the subtle differences show up well in the photo and may not do so under a wash but it worth a try.
View attachment 260207
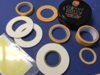
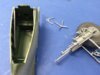
Here are all the alum parts for an u/c leg
View attachment 260204
As you can see the Extreme Metal has laid down a superb metal finish and it is very resiliant.
View attachment 260206
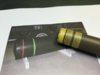
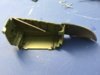
Here is the 'cookie' painted with the late war olive drab shade, Vallejo MA 71.016 which they now call USA Olive Drab in their new paint charts.
Here are the props, all painted up and looking shiny new. I will correct that with some weathering in due course.
One question.. Does anyone know if these were wooden or metal props? The kit, incidentally, come with two types of prop, the others have a broader paddle end.
View attachment 260205
First three pieces from the u/c each done in a different shade of aluminium. I dont think the subtle differences show up well in the photo and may not do so under a wash but it worth a try.
View attachment 260207
Here are all the alum parts for an u/c leg
View attachment 260204
As you can see the Extreme Metal has laid down a superb metal finish and it is very resiliant.
View attachment 260206
Here is the 'cookie' painted with the late war olive drab shade, Vallejo MA 71.016 which they now call USA Olive Drab in their new paint charts.
Here are the props, all painted up and looking shiny new. I will correct that with some weathering in due course.
One question.. Does anyone know if these were wooden or metal props? The kit, incidentally, come with two types of prop, the others have a broader paddle end.
View attachment 260205
Attachments
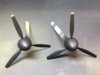
To my knowledge these were De Havilland 3-blade constant-speed full feathering propellers from the American Hamilton Standard hydromatic propeller and were of metal construction.
Not sure on the difference between the two sets in the kit, as far as I am aware though all feathering propellers were of metal construction.
Not sure on the difference between the two sets in the kit, as far as I am aware though all feathering propellers were of metal construction.
Thanks Dave, metal scratches and chips then, not wood, to do...
Thanks Vaughan. I do love the finish they give but its worth noting that different shades lay down slightly differently and its very important to have a low air pressure or you can easily flood the area.
Thanks Vaughan. I do love the finish they give but its worth noting that different shades lay down slightly differently and its very important to have a low air pressure or you can easily flood the area.
Found this hidden in by bookmarks. Thought you might find it helpful. http://www.mossie.org/Mosquito.html
Nice paint work.
Brilliant, thanks Ian. I will take a proper look as soon as I get a chance.
Not sure on the difference between the two sets in the kit, as far as I am aware though all feathering propellers were of metal construction.
The paddle blades were initially fitted to aircraft with two stage Merlins in mid 1944, as they increased high altitude performance. They later found their way onto other variants, including single stage engined night fighters.
Cheers
Steve
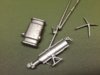
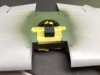
I spent most of last evening masking up parts ready to paint details. The masking is not for overspray as I am using a hairy stick it's just to minimise the touch up work from my inability to paint a straight line.
View attachment 260229
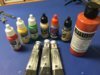
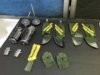
Above my weapons of choice. In the end I only really used the yellow Tammy tape of various widths.
View attachment 260228
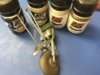
the paints. I prefer the wax metallics for the hairy brush.
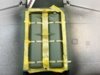
Some masked up parts
View attachment 260230
View attachment 260231
View attachment 260233
View attachment 260232
lifes a lot a lot easier when the width of the tape is the same as what you are masking off as non the case of the straps over the fuel cells.
Tonight I should get some of the painting done.
View attachment 260229
Above my weapons of choice. In the end I only really used the yellow Tammy tape of various widths.
View attachment 260228
the paints. I prefer the wax metallics for the hairy brush.
Some masked up parts
View attachment 260230
View attachment 260231
View attachment 260233
View attachment 260232
lifes a lot a lot easier when the width of the tape is the same as what you are masking off as non the case of the straps over the fuel cells.
Tonight I should get some of the painting done.
Attachments
Done a bit more work on the detail as I have not been in the office this am.
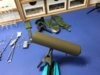
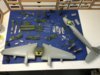
I will post more tomorrow when I have made some more progress but here is a pic showing the whole kit on the bench giving an overview
View attachment 260234
I will post more tomorrow when I have made some more progress but here is a pic showing the whole kit on the bench giving an overview
View attachment 260234
Attachments
More progress...
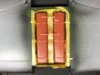
The main colour has been painted onto the fuel cells. Once I remove the masking from the sides and the tapes tonight hopefully I will find I just have a few pipes to paint aluminium and then its ready for weathering.
View attachment 260259
A brass bit done on the u/c parts...
View attachment 260260
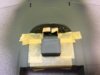
Here is how the last of the cockpit area is now looking, its is fixed to the top of the centre wing and will slide easily enough into place when I fix the wing. Got some drybrushing to do to bring out the detail.
View attachment 260261
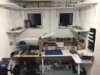
Finally for today, after that thread I did about the development of my man-cave I though I would post a pic of how it looks today... Got some more shelves up to display built models and a rack on the wall for washes and metallisers. Not got any floor covering yet - needs sorting and then I will have to get some insulation up on the garage door and some heating in ready for winter....
View attachment 260262
The main colour has been painted onto the fuel cells. Once I remove the masking from the sides and the tapes tonight hopefully I will find I just have a few pipes to paint aluminium and then its ready for weathering.
View attachment 260259
A brass bit done on the u/c parts...
View attachment 260260
Here is how the last of the cockpit area is now looking, its is fixed to the top of the centre wing and will slide easily enough into place when I fix the wing. Got some drybrushing to do to bring out the detail.
View attachment 260261
Finally for today, after that thread I did about the development of my man-cave I though I would post a pic of how it looks today... Got some more shelves up to display built models and a rack on the wall for washes and metallisers. Not got any floor covering yet - needs sorting and then I will have to get some insulation up on the garage door and some heating in ready for winter....
View attachment 260262
Attachments
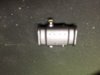
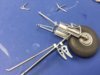
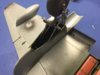
More progress, mostly working on the u/c. This is a complex job, very fiddly' but not difficult. The main problems is how fragile the parts are and I have some real concerns at just how robust the u/c will be to take the weight of this big model. I found that the important thing here is to take your time, test fit everything three times at least, plan ahead and build it up over several sessions. I still have not finished but I do have some pics.
Here is the main u/c legs and wheel just press fitted at this stage. I will not glue until much later as to get the angles I need to be able to move parts.
View attachment 260386
Below some test fitting, still with some weathering to do on these parts, mostly some dry brushing.
View attachment 260387
View attachment 260388
Here is the main u/c legs cemented to the firewall - this does give it some ridgitity. Some touching up is needed here and there and a spot of dry brushing on the firewall to do.
View attachment 260389
I will also have some weathering with AKI Dust effects on the tyre.
Also I have finished the painting of the fuel cells.
View attachment 260385
Attachments
G
Guest
Guest
Excellent work Barry
Bob
Bob
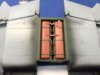
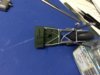
Progress on one u/c, all finished and weathered.
here is a pic with the weathering materials used.
View attachment 260438
I am rather pleased with this. I will get on to getting the other one up to this stage.
here is a pic with the weathering materials used.
View attachment 260438
I am rather pleased with this. I will get on to getting the other one up to this stage.
Attachments
Well I didnt get much done last night...
I had sat down, clipped the u/c into the wing for a test fit and the phone rang.
A man armed with a shotgun walked into my missus solicitors practice.... The receptionist had the presence of mind to set off the fire alarm enabling the offices to be evacuated. The man was a 'distressed' client, nothing to do with my missus as such, she runs the Commercial law side and this was a matrimonial client who had 'issues'. They all ended up in the pub next door and the police did not let them leave for a few hours, what a hardship that was. I had to go and collect her and some of her staff as they were not allowed to get their cars out of the car park. Anyway, no-one was hurt thankfully, the gunman was arrested later in the evening when he walked out having been barracaded in the conference room. He did not threaten anyone with the gun and only pointed it at himself and no hostages were taken despite early news reports to the contrary. My missus is fine and did not realise it was a gunman until she was safely outside. She realised she had seen the man when he called in earlier to see her matrimonial partner and had to turn him away because her partner was in a meeting.
So that was my evening and this is as far as I got, as you can see I did grab a photo and I have to say the fit is superb...
View attachment 260469
Attachments
That does look like a quality fit. The fuel cells look the biz too.
Glad everyone was okay and ended up in the pub. An unpredictable event like that could have ended up in a much worse outcome. It must have been very frightening nonetheless. Many British people have never seen a firearm 'in the flesh', let alone been confronted by someone brandishing one, both of which are very good things.
Cheers
Steve
- Status
- Not open for further replies.
Legal Notice
scalemodelling.co.uk is a privately operated online discussion forum. All content posted by members reflects their own views and opinions and does not necessarily represent those of the forum owners or administrators. While reasonable efforts are made to moderate content, no responsibility is accepted for user-generated material. By using this site, you agree to comply with UK law and the forum rules.