Theme editor

Scale Model Shop

HK Models 1/32 scale D. H. Mosquito

Status
Not open for further replies.
Thread owner
More progress, got working on the second u/c and dry brushing some cockpit detial that sits on top of the wing.  I also fitted the engine and panels.  A small amount of filler is needed for the panels.


View attachment 260524


I love those clamps, they are just so versatile.
 

Attachments

  • IMG_1369.jpg
    IMG_1369.jpg
    2.8 KB · Views: 0
Hi Barry, you say you love the clamps but don't say what they are? Lovely progress on the build by the way.
 
Thread owner
I have been making some very slow progress since my last post.  I have cemented in the engine covers, fixed the fuselage to the wings and I am in the process of some 'pre-painting' fixings and paint preparation.  I have needed to use a smear of filler in the engine covers and between the top fuse/wing join.  Just a smear though.


View attachment 260913


View attachment 260915


The fit on the underside is perfect.  I have some fittings to do to the bomb bay now and when done will finish paint preparation.  I will post when the fittings are done.


View attachment 260914
 

Attachments

  • IMG_1382.jpg
    IMG_1382.jpg
    2.4 KB · Views: 0
  • IMG_1381.jpg
    IMG_1381.jpg
    2.7 KB · Views: 0
  • IMG_1380.jpg
    IMG_1380.jpg
    2.2 KB · Views: 0
Thread owner

Attachments

  • image.jpeg
    image.jpeg
    2.5 KB · Views: 0
  • image.jpeg
    image.jpeg
    3.3 KB · Views: 0
  • image.jpeg
    image.jpeg
    2.5 KB · Views: 0
  • image.jpeg
    image.jpeg
    2.8 KB · Views: 0
  • image.jpeg
    image.jpeg
    2.6 KB · Views: 0
Thread owner
I have just spent three sessions masking up and here is how she is looking now:


View attachment 261125


I used a mix of Tammy tape, kitchen roll, cut stiff paper and lots of liquid mask.  It was one of the more challenging masking tasks I have had and it will be fun removing it all safely!


I now need to do a spot of clean up and then I will spray Stynylrez Black Primer.
 

Attachments

  • IMG_1393.jpg
    IMG_1393.jpg
    2.7 KB · Views: 0
Thread owner
I have applied the primer coat and tomorrow I will check for flaws, deal with them and re-prime.  


I am then off down to Devon for a weeks holiday so this will be my last update until I get back and have made some more progress. 


A pic of the model drying. 


View attachment 261136
 

Attachments

  • image.jpeg
    image.jpeg
    2.9 KB · Views: 0
Oh I see, Barry pops off on his hols and leaves us here to watch paint dry! 


Seriously, good job here and looking forward to the finished article. Why did you use black primer? I know it is supposed to help with bare metal finishes, and that the underside is black so fair enough but will it not make the camouflage look too dark? I guess I will find out when you get back. Enjoy the holiday.
 
Thread owner
Neil - I often use a black primer.  In this case as the sides and underside are black it makes sense to use it and have it as a base coat as well as primer.  When I use a black primer on 'normal' camo I pre-shade with light grey primer (which I will do when it comes to paint the top camo) by spraying it inside panels and onto highlights.   It is simply the more traditional approach reversed and the result is no darker than when you use a grey primer and black pre-shading.  I do tend to find it easier to pre-shade by blowing paint into the centre of panels than along panel lines.


Naturally I will not leave the sides and underside a stark black.  I will be modulating the colour with a touch of white, blending it with a mist spray of black, adding a brownish tinge with another mist coat plus washes etc.  I will demonstrate when I return to the bench. I did take a look at it at 5.30am just before I left home for my Friday breakfast meeting and can report that there are very few flaws in the build so tonight,after a little light sanding, I will apply a last light primer coat ready to get on with it upon return.
 
It looks great - stop right there, slap the decals on and it's a night fighter, with a rather large bomb ! oh errr perhaps for a 'target of opportunity'
 
This is looking awesome Barry. The interior is really well done. Looking forward to how the rest will come out. Certainly need a bit of shelf space for that one. 
 
I really like how youve painted the bomb bays barry. The kit looks the business just primed even.
 
Thread owner
Well I am back from sunny(ish) Devon and managed an hour's bench time.


As the underside and sides are black, I am using the black primer as a base coat.  There is nothing less realistic though than using a 'raw' black so I needed to modulate the colour and tint it as a first stage to making it look like a 'real' aircraft.


Consequently I used my usual process with a base coat and mixed the base colour (the black primer) with white (about 25%) and thinned it about 50% (bear in mind the colour was already 'airbrush ready' before thinning it so using ordinary paints to do this you would need to thin it 50% after thinning to airbrush consistency).


I then sprayed it into the centre of panel lines and in places that would catch the light when looking at it.   I then did a mist coat of black knocking back the contrast to blend the colours and to get the contrast/effect I wanted.  This method is quite fool proof as it is so controllable and is the easiest way I know to modulate any base colour.


I then used Vallejo MA NATO Brown, thinned it with about 75% thinner and then did a mist spray all over the underside and sides.  This provides a subtle brown tinge to the black particularly suitable for the 'wooden wonder' but it works well with any black underside.  If overdone, no worries as it can be toned down with a mist of black...


I consider this to be the first and most important part of the weathering process as well as the easiest and it really makes a difference to the overall appearance.


here are some pics of how the model is now:


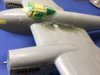
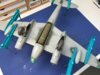
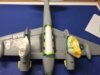
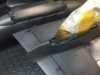
A distance shot of the underside.  I hope it shows that the 'blackness' is toned down and the colour does vary a bit to provide some interest.


View attachment 261903


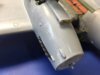
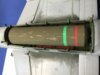
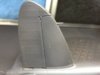
Here is the tail - the light has 'bleached' the photo, its not actually as grey as it appears below, but it does help show up some tonal variety


View attachment 261904


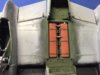
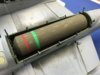
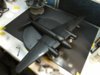
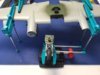
The rear of the aircraft - again the photo looks too bleached due to the light when taking the picture.


View attachment 261905


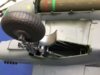
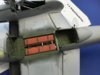
I changed the position of the light for the one below and it has succeeded in giving a better impression of how it really looks.


View attachment 261906


Naturally I will be doing washes and dry brushing later in the process to get a realistic effect.  I plan to show some paint chipping in metal areas and some areas where the black has worn away from the wood.  I will be using AKI products for this.


Tonight I plan to mask it ready for the top camo and if time I may even get to apply it.
 

Attachments

  • IMG_1435.jpg
    IMG_1435.jpg
    2.1 KB · Views: 0
  • IMG_1434.jpg
    IMG_1434.jpg
    1.8 KB · Views: 0
  • IMG_1433.jpg
    IMG_1433.jpg
    2.9 KB · Views: 0
  • IMG_1436.jpg
    IMG_1436.jpg
    2.5 KB · Views: 0
Status
Not open for further replies.
Back
Top