Theme editor

Scale Model Shop

HMS Bluebell

Status
Not open for further replies.

Ian M

Administrator
Staff member
Joined
Dec 14, 2008
Messages
18,331
Reaction score
563
Points
113
1/3
Thread owner
A long time ago in a Galaxy far far away. Op sorry wrong start.

A while ago, almost two years ago infact, I brought Revell's HMCS Snowberry A corvette

in 1/72 scale. Once I found that there was a Bluebell version that was no longer portrayed in the kit I just had to do one.

After a bit of google and general web surfing I found myself the owner of a Book on corvettes and a large pile of PE and white metal detailing sets from Great Little Ships- David Parkins Maritime division, Many know him for his aircraft and vehicle stuff.

To cut to the chase, after a year of building and waiting, fishing and building a bit more, I went cold on it and put it to one side. Some of the parts are crazy small and that's after they have been built up of three or four other parts! This in turn lead me down the path of plastic scale models of military bits and aircraft.

Being between kits, I started to look at Bluebell yesterday and slowly started to pick up the interest again. Most of the photos are of coarse on my dead hard drive, but I have some somewhere.

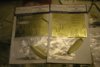
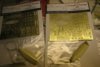
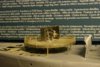
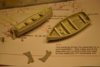
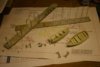
Here is one of the many sheets of PE One of those for the main deck. You can also see the white metal Anchor winch in the top left corner of the photo.

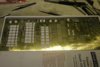
Here is a closer look at it:
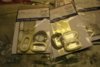
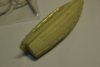
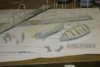
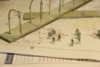
Some of the hatches

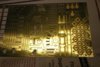
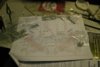
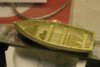
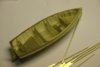
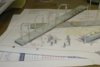
Here is a shot of the new type C bridge under constuction.

A bit more done:

and a bit more:

and almost done!

In the last picture, every thing you can see is made in PE and white metal!!! Took rather a while I might add!

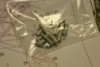
A pair of 20mm AA guns yet to be painted and added to the bridge:

The Funnel house is pretty much from the revelle kit but all the detail, ladders, pipes and whistle tube are either PE or White metal and the funnel its self has a PE wrap:

The main mess building received a new roof and walls in PE and can be seen here with a bit of post shadeing work.

More later. Please feel free to comment.

Ian M
 
Wow , looks superb Ian , nice big bit of PE also , got a floaty thing planned myself so I will be following this one , the guns and deck look fantastic mate , please don`t put this one away its looking a cracker

Richy
 
Thread owner
Thanks chaps!

I have been looking at it for way to long and have kept putting it off, always some thing else on the bench. I have a clear desk now so I will be getting going again. I might have to learn how to solder again though! lol.

Certainly it a big boat and as of yet one of my most ambitious builds. I dare not think of the total cost of this one but its also the most expensive to date too!

Most of the tricky stuff has been done, but I have a few bits that still need doing. The life boats, The Carley floats and the depth-charge racks and throwers.

I will try to take a few photos along the way.

Ian M
 
Thread owner
Well I got a few pictures taken of the bits! There are also loads of pipe rail supports and Shrapnel padding but you will have to wait to see those.

Here are the Depth charges, the DC rails and throwers, smoke generators 16ft dingies ans the carley floats. Should keep me busy for a while.

View attachment 29888

View attachment 29889

View attachment 29890

View attachment 29891

View attachment 29892

View attachment 29893

View attachment 29894

View attachment 142414

View attachment 142415

View attachment 142416

View attachment 142417

View attachment 142418

View attachment 142419

View attachment 142420

View attachment 142914

View attachment 142915

View attachment 142916

View attachment 142917

View attachment 142918

View attachment 142919

View attachment 142920
 

Attachments

  • IMG_2697.jpg
    IMG_2697.jpg
    2.5 KB · Views: 0
  • IMG_2698.jpg
    IMG_2698.jpg
    2.2 KB · Views: 0
  • IMG_2701.jpg
    IMG_2701.jpg
    2.3 KB · Views: 0
  • IMG_2700.jpg
    IMG_2700.jpg
    2.3 KB · Views: 0
  • IMG_2696.jpg
    IMG_2696.jpg
    2.4 KB · Views: 0
  • IMG_2699.jpg
    IMG_2699.jpg
    2.1 KB · Views: 0
  • IMG_2702.jpg
    IMG_2702.jpg
    2.5 KB · Views: 0
  • IMG_2701.jpg
    IMG_2701.jpg
    2.3 KB · Views: 0
  • IMG_2698.jpg
    IMG_2698.jpg
    2.2 KB · Views: 0
  • IMG_2697.jpg
    IMG_2697.jpg
    2.5 KB · Views: 0
  • IMG_2700.jpg
    IMG_2700.jpg
    2.3 KB · Views: 0
  • IMG_2696.jpg
    IMG_2696.jpg
    2.4 KB · Views: 0
  • IMG_2699.jpg
    IMG_2699.jpg
    2.1 KB · Views: 0
  • IMG_2702.jpg
    IMG_2702.jpg
    2.5 KB · Views: 0
WOW ian that is an insane amount of photo etch bits!!!! All absolutely tiny too! This looks like a real labour of love,you must have the patience of a saint, but its going to look truly spectacular when its done. Im just amazed and take off my proverbial hat to you mate! keep the pics coming , cheers tony
 
Thread owner
Thanks Tony. If you or anyone else for that matter want to see the PE in better detail David has an updated website, where you can see them in nice clear pictures. I think I got the lot, EXCEPT the square carley floats, the wooded rafts and the rocket flair launcher as those where not used on HMS Bluebell.

I think you will now understand the rather long pause!

Ian M
 
Thread owner
Well between the oven blowing up and the cable company locking half the channels on my card its been a funny old day. No distractions (apart from those mad-brain kittens).

Finished one of the dinghy's that I started yesterday, Only the davits and cradle to do then its one more for the other side.

I also got the shield fixed to the main gun. One of the things that has been a test!

More later, The misses and I are cooker shopping tomorrow then going to the cable shop and demanding that they open the channels that they have locked!

Ian M

View attachment 29932

View attachment 29933

View attachment 29934

View attachment 29935

View attachment 142458

View attachment 142459

View attachment 142460

View attachment 142461

View attachment 142958

View attachment 142959

View attachment 142960

View attachment 142961
 

Attachments

  • IMG_2714.jpg
    IMG_2714.jpg
    1.4 KB · Views: 0
  • IMG_2704.jpg
    IMG_2704.jpg
    2.2 KB · Views: 0
  • IMG_2708.jpg
    IMG_2708.jpg
    1.9 KB · Views: 0
  • IMG_2713.jpg
    IMG_2713.jpg
    2.7 KB · Views: 0
  • IMG_2714.jpg
    IMG_2714.jpg
    1.4 KB · Views: 0
  • IMG_2704.jpg
    IMG_2704.jpg
    2.2 KB · Views: 0
  • IMG_2708.jpg
    IMG_2708.jpg
    1.9 KB · Views: 0
  • IMG_2713.jpg
    IMG_2713.jpg
    2.7 KB · Views: 0
This is going to look absolutly stunning when it is finished, soo much detail. Keep up the good work Ian.

Andy
 
You can't help but love detail at this level but you must have the patience of a saint to put it all together. My few attempts at PE have made me realise that it is a sometimes necessary thing best avoided if possible!!

I think the boats are amazing though and I have to remind myself that it is 1/72nd scale.
 
I think that one of those dinghies would have been enough for me. What a hell of a project!!!!!
 
Ian that is truly looking awesome,its going to be a show stopper for sure!
 
Thread owner
Right then One week later and the 16' dinghies are sort of done. I say sort of as I think they are going to need yet another coat of paint (WEM; RN White if your interested). I'm trying to dust it on as lightly as I can, but 'cause I'm a plonker, I used grey undercoat and not white as I normally would have done!!!

Also yet to go on is the grab rope. This has to be threaded through all those tiny little eyelets around the outside of the boat. They where fun glueing in place. Still only 10 on each side, so must not grumble....:-/ I wonder how many I will knock off trying to put the rope through them?

Talking of rope, the Dinghy sets also included the Rope reel for the dingies as well as the davits. The Tackles on the Davits are made up of no less than six parts laminated together, The first one I did with CA the other three with Gator grip which, it turns out is perfect for the job as you get time to jiggle things in position. So you have to clamp them while they cure. Big deal.

If a couple of the pictures are a bit creamy/yellow its due to my flash not firing.

SO Bit more paint and then a day off or two for the Normandy Group Build...

Ian M

View attachment 30182

View attachment 30183

View attachment 30184

View attachment 30185

View attachment 30186

View attachment 143208

View attachment 143209

View attachment 143210

View attachment 143211

View attachment 143212
 

Attachments

  • IMG_2724.jpg
    IMG_2724.jpg
    2.1 KB · Views: 0
  • IMG_2720.jpg
    IMG_2720.jpg
    2.1 KB · Views: 0
  • IMG_2718.jpg
    IMG_2718.jpg
    2.1 KB · Views: 0
  • IMG_2723.jpg
    IMG_2723.jpg
    2.1 KB · Views: 0
  • IMG_2721.jpg
    IMG_2721.jpg
    2.2 KB · Views: 0
Hi Ian, Hav'nt been on the Forum for a while, so was gob-smacked when I saw this effort. I hate P.E., so have total admiration for your skill and patience, your work is outstanding. The finished painted Ship should be breath taking. Cheers Derek
 
Thread owner
Cheers Derek. Do you know that phrase Jumping in at the deep end?

This little project was my first venture into the dark arts of PE, White metal and resin. Also it was my re-début to the plastic model world after a considerable break. If I remember correctly it was the first model kit I had purchased since moving to Denmark.

I always did like a challenge.
 
Thread owner
Well just a quick update so you don't all go thinking I have put it aside:

First off sorry I cant find the cable for the camera, so no pictures for this update but never mind its all minor stuff, it just takes a long time, so:

All the cleats, bollards, and fairleads are now cleaned up and painted, as are all the remaining vents and funnels. Cleaned up was a bit harshly said as they really only needed the finest scrap from a knife to remove the hair-line mould seam. Really good castings which is good as I think white metal parts a not the easiest to clean up with out destroying detail or loosing the shape.

I also got the main deck gun painted and made the last of the guardrail stanchions and mounted them on the band stand. That will get a bit of primer in the next day or two. I had a play with the primer from Alclad the other day and apart from the rather pungent pong its rather good stuff and it is also a micro filler so even better! What else? Oh started to put a bit of paint on the hull as I tended to thin out way to much paint. Well it's a pity to waste it !

More later, and with a bit of luck I will have found the cable for my camera so I can upload the pictures to the PC. (Why my wife's PC don't have blue tooth I will never know).

Ian M
 
A stunning project going on here, wow, great constructing and detail here Ian....:xyxthumbs:
 
Status
Not open for further replies.
Back
Top