Hi guys,
I recently responded to a thread by fellow member Slupanter who (for his own reasons) was looking for someone to take over the build of his Hobbyboss Spitfire. I said Yes Please and received the kit from him last week.
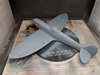
It is mostly built, a couple of small parts to add and a minor repair or two, and painted in what I must say was a lovely smooth finish. This is how it looked before I got my hands on it.")
View attachment 327837View attachment 327838
So my first task was to remove the masking putty/fluid (the shiny green stuff in the pics). Unfortunately things went downhill from here. The putty was a gooey gelatinous mess it some places, and stuck hard as cement in others. There was no other choice but to try and remove it with a fluid. I tried water first, followed by low odour thinners, but neither touched it so I had to go in with IPA.
The IPA of course attacked the paint, no matter how carefully I tried, but I was hoping that I might be able to touch up any damage. Unfortunately the putty/fluid was very tenacious and put up quite a fight, so the paint was damaged more than I hoped for.
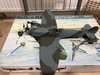
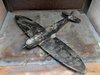
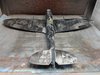
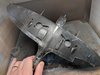
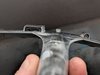
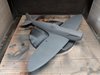
If I was going to do this kit justice there really was no other choice, the whole lot had to be stripped. 300+ cotton buds and many hours later she looks like this (sorry Alexander).
View attachment 327839View attachment 327840View attachment 327841
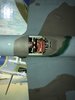
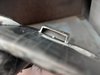
Interestingly I learned that IPA will also dissolve (what I assume was) Tamiya Extra Thin, which resulted in the radiator housing and a few other bits becoming detached, but this actually was an advantage as it meant I could dry brush some of the interior parts silver to add a bit more interest.
View attachment 327842View attachment 327843
The loose parts were re-attached, and after drying I gave the entire exterior a polishing so it is now silky smooth. Will move on to primer shortly.
I recently responded to a thread by fellow member Slupanter who (for his own reasons) was looking for someone to take over the build of his Hobbyboss Spitfire. I said Yes Please and received the kit from him last week.
It is mostly built, a couple of small parts to add and a minor repair or two, and painted in what I must say was a lovely smooth finish. This is how it looked before I got my hands on it.
View attachment 327837View attachment 327838
So my first task was to remove the masking putty/fluid (the shiny green stuff in the pics). Unfortunately things went downhill from here. The putty was a gooey gelatinous mess it some places, and stuck hard as cement in others. There was no other choice but to try and remove it with a fluid. I tried water first, followed by low odour thinners, but neither touched it so I had to go in with IPA.
The IPA of course attacked the paint, no matter how carefully I tried, but I was hoping that I might be able to touch up any damage. Unfortunately the putty/fluid was very tenacious and put up quite a fight, so the paint was damaged more than I hoped for.
If I was going to do this kit justice there really was no other choice, the whole lot had to be stripped. 300+ cotton buds and many hours later she looks like this (sorry Alexander).
View attachment 327839View attachment 327840View attachment 327841
Interestingly I learned that IPA will also dissolve (what I assume was) Tamiya Extra Thin, which resulted in the radiator housing and a few other bits becoming detached, but this actually was an advantage as it meant I could dry brush some of the interior parts silver to add a bit more interest.
View attachment 327842View attachment 327843
The loose parts were re-attached, and after drying I gave the entire exterior a polishing so it is now silky smooth. Will move on to primer shortly.