Theme editor

Scale Model Shop

Ian M's Jaguar Twin stick.

Status
Not open for further replies.

Ian M

Administrator
Staff member
Joined
Dec 14, 2008
Messages
18,334
Reaction score
571
Points
113
Location
Falster, Denmark
1/3
Thread owner
Hi Tony. Quite in here.

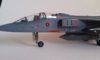
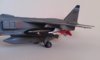
Well You are no longer alone I will be joining in with a conversion of the venerable Jaguar from Airfix, and a heap of resin from NeOmega and hopefully end up with a T2

View attachment 80148

View attachment 80149
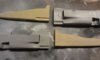
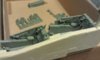
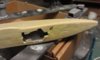
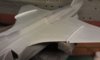
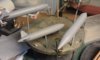
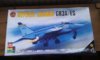
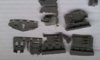
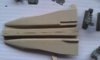
The Kit.
View attachment 80150
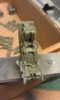
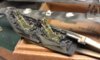
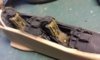
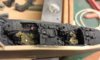
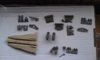
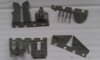
The Resin
View attachment 80151

View attachment 80152

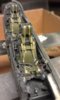
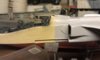
View attachment 80153

View attachment 80154

View attachment 80156

View attachment 80157

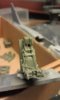
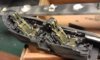
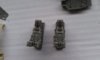
Not sure why there are four seats, One pair needs to be identified and the correct ones used...hopefully
View attachment 80158

View attachment 80159

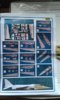
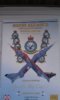
I have these decals, but they are a bit boring, so I might just find some others.
View attachment 80155

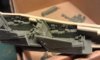
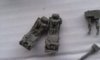
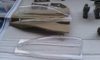
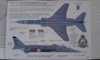
And the "Instructions" for the conversion....Hmmm.
Ian M

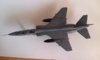
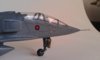
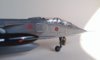
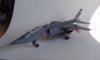
View attachment 193171

View attachment 193172

View attachment 193173

View attachment 193174

View attachment 193175

View attachment 193176

View attachment 193177

View attachment 193178

View attachment 193179

View attachment 193180

View attachment 193181

View attachment 193182
 

Attachments

  • IMAG1562.jpg
    IMAG1562.jpg
    2.2 KB · Views: 0
  • IMAG1563.jpg
    IMAG1563.jpg
    2.5 KB · Views: 0
  • IMAG1564.jpg
    IMAG1564.jpg
    1.9 KB · Views: 0
  • IMAG1565.jpg
    IMAG1565.jpg
    1.5 KB · Views: 0
  • IMAG1566.jpg
    IMAG1566.jpg
    1.6 KB · Views: 0
  • IMAG1567.jpg
    IMAG1567.jpg
    1.9 KB · Views: 0
  • IMAG1568.jpg
    IMAG1568.jpg
    1.9 KB · Views: 0
  • IMAG1569.jpg
    IMAG1569.jpg
    2.8 KB · Views: 0
  • IMAG1570.jpg
    IMAG1570.jpg
    1.9 KB · Views: 0
  • IMAG1571.jpg
    IMAG1571.jpg
    1.9 KB · Views: 0
  • IMAG1572.jpg
    IMAG1572.jpg
    2 KB · Views: 0
  • IMAG1573.jpg
    IMAG1573.jpg
    1.9 KB · Views: 0
NICE! This looks a great watch Ian , those resin bits look very sharply detailed although the "instructions" are a touch vague!!! Looking forward to the chopping!! cheers tony
 
Thread owner
Me too. It would help if It showed where the nose should be cut off!

Ian M
 
Nice one Ian. Where the heck do you find all the time when you have a house move and other things on the go! I think a 'raspberry ripple' ETPS scheme would suit your T2, or maybe, seeing as you liked the Harrier winter camouflage scheme, something along those lines?
 
Thread owner
Been looking at both Joe. Raspberry ripple looks fun. Cant find a photo of a twin stick in winter clothes...

As for the house move, still waiting to off load our house. Its getting to the traditional time for house buying so fingers crossed. So its just keeping it tidy (!?) and cutting the grass!

Ian M
 
Good luck with the house sale, for some reason I thought you'd already sold it :) Make the most of the model time you have left then!
 
There's a Jaguar t-bird at FAST in Farnborough in raspberry ripple colours. Photo mission possible if required...
 
Thread owner
\ said:
There's a Jaguar t-bird at FAST in Farnborough in raspberry ripple colours. Photo mission possible if required...
Thanks for the offer Rick but photos of those all over the net. Now if you know of one in winter camouflage...

Well to late to change my mind now ....

View attachment 80203


I took a good look at the panel lines on the new nose and compared it to the original one. Out came the hack saw and....Quite a good line that just needs a tiny scrub with a sanding stick. I hope.

Ian M

View attachment 193226
 

Attachments

  • IMAG1574.jpg
    IMAG1574.jpg
    1.9 KB · Views: 0
Thread owner
Spent an hour in the company of a bottle of CA and a scalpel. After a bit of a clean up around the Nose wheel bay opening and glueing the rear frame back on that had snapped off in the box I think I figured out where the bits go.

I am sure that this is going to be great fun to paint.... NOT.

Some nice detail that I think will look a lot better once I have blown the dust off!

Wha'da'ya think?

View attachment 80234

View attachment 80235

View attachment 80236


View attachment 80237

View attachment 80238

I even think I figured out what seats are the right ones.
Ian M

View attachment 193257

View attachment 193258

View attachment 193259

View attachment 193260

View attachment 193261
 

Attachments

  • IMAG1581.jpg
    IMAG1581.jpg
    2.2 KB · Views: 0
  • IMAG1580.jpg
    IMAG1580.jpg
    2.2 KB · Views: 0
  • IMAG1577.jpg
    IMAG1577.jpg
    2.3 KB · Views: 0
  • IMAG1578.jpg
    IMAG1578.jpg
    2.4 KB · Views: 0
  • IMAG1579.jpg
    IMAG1579.jpg
    2.1 KB · Views: 0
some nice detail in there Ian , and the seats should look fantastic once painted. The chop job on the nose looks good so far , I reckon youve got the line right despite the instructions!! (or lack of!!) . Hoping to get the razor saw on mine and start butchering at the weekend, cheers tony
 
Nice work Ian. Resin looks messy to work with. It looks good though, and good luck with the painting. Look forward to seeing a completed cockpit area soon.
 
Thread owner
Well I spent Yesterday painting the cock pit up along with the seats. I was going to get the cockpit sorted, and sewn up, so I could have a go at fitting the new nose.

Errr. Bugger the seats don't fit! Nor did the Instrument Panels...

As I said at the start, there are four seats and four IP's. Sooo Painted up the other seats last night only to find that the IP's are the wrong ones as well.

So today I pinged all the cockpit and started again. Including painting the IP's...Waiting for the primer to cure as I write.

Any how After assembling the cock pit again, I found that the seats that I started with DO fit, which is good as they look a lot better than the others.

Next up is the rather bland landing gear. So I'm off to look at the ones I did for the "Spotted paratrooper". In the meantime you can have a look at these photos of the new cockpit!

View attachment 80404

View attachment 80405

View attachment 80406


I have a feeling that the legs are going to bee fun!

Ian M

View attachment 193427

View attachment 193428

View attachment 193429
 

Attachments

  • IMAG1582.jpg
    IMAG1582.jpg
    2.7 KB · Views: 0
  • IMAG1583.jpg
    IMAG1583.jpg
    2.7 KB · Views: 0
  • IMAG1585.jpg
    IMAG1585.jpg
    2.5 KB · Views: 0
Those seats look really detailed Ian, they really make a difference, glad you got them to fit!

Cheers

Patrick
 
Thread owner
Humph!

Spent way to much time trying to get the nose halves together yesterday. I sort of got it together, but there was a big problem with the seats in the last photos. Zero room between seat and IP. In fact, they where almost touching. So no room for the joy stick...So swapped the seats out again and now I think I can just squeeze a stick in there...

The Bottom of the nose fitted where it touched. mostly my own fault, I might of cut it a bit off the Guess Mark. Lick for me I have some miliput in the draw.

Things are now waiting for the stuff to harden so I can sand it. Then the fun of replacing all the lost detail....

View attachment 80523

View attachment 80524

View attachment 80525

View attachment 80526

View attachment 80527


Made a new pair of splitters out of a bit of plastic card and got the tanks and surveillance pod together and primed.

Ian M

View attachment 193546

View attachment 193547

View attachment 193548

View attachment 193549

View attachment 193550
 

Attachments

  • IMAG1589.jpg
    IMAG1589.jpg
    2.3 KB · Views: 0
  • IMAG1590.jpg
    IMAG1590.jpg
    2.7 KB · Views: 0
  • IMAG1591.jpg
    IMAG1591.jpg
    2.4 KB · Views: 0
  • IMAG1592.jpg
    IMAG1592.jpg
    1.8 KB · Views: 0
  • IMAG1593.jpg
    IMAG1593.jpg
    2.4 KB · Views: 0
Thread owner
News flash. Kitty has a new nose.

I took the plunge and stuck the new nose section onto the fuselage this evening...

View attachment 80617


Generally quite a good fit. On this side at least. The other side will need a bit of love from an angle grinder to even things out a bit.

Ian M

View attachment 193640
 

Attachments

  • IMAG1598.jpg
    IMAG1598.jpg
    2.2 KB · Views: 0
Nice job Ian. Love from an angle grinder. A very Viking thing to say; or an Aerosmith song maybe.
 
Thread owner
Well the five minutes here, a half hour there and all of a sudden it was finished!

Sorry for not being a bit more on the game with posting updates.

Any way, this is the finished job.

I'm not that impressed. It's just missing a spark. I dont know.

The Grey on Grey scheme is a bit boring, and the blue on the decals is so dark, it is hard to see it against the black. One of the "flying can openers" markings folded on me. it must of happened when I set it down, as I opny discovered it once it was dry. Not a lot to do with that.

The fit of the very long and very thin vacuum formed canopy was bloody 'orrible. I would have liked to have posed it open, but found it virtually impossible.

Enough excuses. I give you as she looked shortly after the presentation for the demob.

View attachment 81556

View attachment 81557

View attachment 81558

View attachment 81559

View attachment 81560

View attachment 81561

View attachment 81562


The resin conversion went rather well though lol-

Ian M

View attachment 194579

View attachment 194580

View attachment 194581

View attachment 194582

View attachment 194583

View attachment 194584

View attachment 194585
 

Attachments

  • IMAG1625.jpg
    IMAG1625.jpg
    1.3 KB · Views: 0
  • IMAG1626.jpg
    IMAG1626.jpg
    1.5 KB · Views: 0
  • IMAG1627.jpg
    IMAG1627.jpg
    1.5 KB · Views: 0
  • IMAG1628.jpg
    IMAG1628.jpg
    1.6 KB · Views: 0
  • IMAG1629.jpg
    IMAG1629.jpg
    1.6 KB · Views: 0
  • IMAG1630.jpg
    IMAG1630.jpg
    1.5 KB · Views: 0
  • IMAG1631.jpg
    IMAG1631.jpg
    1.5 KB · Views: 0
Status
Not open for further replies.
Back
Top