
You are using an out of date browser. It may not display this or other websites correctly.
You should upgrade or use an alternative browser.
You should upgrade or use an alternative browser.
ICM 1/32 Gloster Gladiator Mk1
- Thread starter BarryW
- Start date


Hi Barry
I'm late coming to your thread, shame about the first, but i am sure you will put what you learned to good use with the second. A nice little jig for holding the plane, not seen it before but it looks really clever and versatile. Imust say, your bench is unnaturally tidy for a modeller!!! :thumb2: I look at it with envy.
Peter
I have progressed the painting
I did the Dark Slate Grey and Extra Dark Sea Grey on the tail and top fuselage after the Sky undersides were masked
View attachment 398965
The I did the top of the lower wing Light Slate Grey and Dark Sea Grey.
View attachment 398966
There is a little bit of touching up to do, not a lot, and some detail painting to get done then it’s on with the decals though I will need to spray the white part of the fin flash first.
Attachments

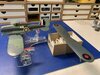
Bought my first pair of reverse tweezers the other day and they are very good, I was only thinking that I could do with a few more pairs now.I have a good feeling about how this is coming together. Rather pleased with it so far.
Parts below primed
airframe ready for masking and priming.
ps- the plane is looking great. How do you fix your little strings to the wings?
Bought my first pair of reverse tweezers the other day and they are very good, I was only thinking that I could do with a few more pairs now.
ps- the plane is looking great. How do you fix your little strings to the wings?
One end is threaded through holes in the lower wing held with c.a. When I attach the other ends I will dip the end in c.a and have some accelerator ready if needed.
I have applied the decals. Not many of them and they went down very well. They are very thin and conform well with only a little risk of tearing. The only problem being a tendency to curl and even the old trick of floating them in water does not ‘uncurl’ them.
I have applied some solvent and they are now left to dry before the next stage. It may be necessary to apply one or two more loads of solvent though.
View attachment 399016
I have applied some solvent and they are now left to dry before the next stage. It may be necessary to apply one or two more loads of solvent though.
View attachment 399016
Attachments
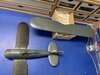
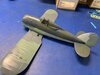
Well, success, the top wing fitted easily and perfectly so the secret was to attach the outer pylons to the top wing first, then top wing to the lower and fit the inner pylons last. I still have the inner pylons to fit later but here she is....


I did the underside fittings while I was at it.

just these to fit, the rigging and some matt varnish in odd places wherever needs.

Note the pylons, I kept them attached to the sprue to identify the part numbers. It is very unusual for me to do this but I did not want to get these mixed up. I will cut them away later and make sure they are kept separate with the part numbers while I attach them one by one. These, the upper wing and rigging will all have been done with c.a.
I did the underside fittings while I was at it.
just these to fit, the rigging and some matt varnish in odd places wherever needs.
Note the pylons, I kept them attached to the sprue to identify the part numbers. It is very unusual for me to do this but I did not want to get these mixed up. I will cut them away later and make sure they are kept separate with the part numbers while I attach them one by one. These, the upper wing and rigging will all have been done with c.a.
Barry,
love the amount of tweezers! I have four, and can never find one!
Dave
You could always add a few to your collection from here Dave:
https://www.ebay.co.uk/itm/2x-Fibre...e=STRK:MEBIDX:IT&_trksid=p2057872.m2749.l2649
Cheap at twice the price!
1/3
That’s looking fantastic Barry. Glad you cracked the upper wing thing...
Hi Barry
Jim
That is so good to hear. Must have been stressful. Paintwork and decals look great. As always fine, skillful modelling.Well, success, the top wing fitted easily and perfectly so the secret was to attach the outer pylons to the top wing first, then top wing to the lower and fit the inner pylons last.
Jim
Legal Notice
scalemodelling.co.uk is a privately operated online discussion forum. All content posted by members reflects their own views and opinions and does not necessarily represent those of the forum owners or administrators. While reasonable efforts are made to moderate content, no responsibility is accepted for user-generated material. By using this site, you agree to comply with UK law and the forum rules.