
You are using an out of date browser. It may not display this or other websites correctly.
You should upgrade or use an alternative browser.
You should upgrade or use an alternative browser.
ICM 1/32 I-16 Type 24
- Thread starter BarryW
- Start date
- Status
- Not open for further replies.
Btw barry , ICM have also just released a 1/32 polikarpov i-153 ‘chaika’ ,the gull winged biplane that was in production at the same time as the i -16 , looks like another one to get cheers tony
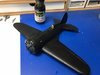
I applied a black primer coat last night. I have found ust a couple of flaws to treat, one requires a swipe of a sanding stick and the other a little filler and sanding.
View attachment 310213
View attachment 310214
This little ugly duckling of a plane is coming along nicely. I should be able to get on with some base coats within a couple of days.
View attachment 310213
View attachment 310214
This little ugly duckling of a plane is coming along nicely. I should be able to get on with some base coats within a couple of days.
Attachments
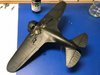
Last night I sorted the few flaws I found then I sprayed the underside colour.
As usual I went all over with an initial light coat and then sprayed areas I wanted lighter followed by a mist coat of the base colour mixed with 50% thinner. The latter helps control the contrast between the areas I want darker or lighter. You just apply the mist coats until you get the contrast you want. Very controllable and the best way to get that first stage towards the final weathered appearance. I find that on the underside the black basing is enough to get the effect while on the top, which is subject to more sun exposure, some white is needed in the base colour to get a proper faded look.
This is how the underside looks now and hopefully I will commence with the top colour tonight.
View attachment 310365
Attachments
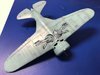
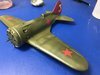
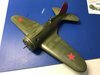
Painting is done except for a little bit of touching up. All markings are sprayed, the only decal on this kit is the instrument panel. Weathering next with a panel line wash before a matt varnish coat followed by pigments and streaking effects.
View attachment 310494View attachment 310495View attachment 310496View attachment 310497View attachment 310498
View attachment 310494View attachment 310495View attachment 310496View attachment 310497View attachment 310498
Attachments

Barry,
the I-16 is looking good - I like the fading on the uppersurfaces. On my 1/48 ICM I-16. I used BareMetal foil for the line around the cowling, I found it easier than masking.
ICM also do the I-153 Chaika, and the Bucker Jungmann in 1/32. The Chaika looks like a similar build ( apart from the fact that it's a biplane! ) - a fair amount of internal detail, that will be invisible when finished!
Dave
Hi Dave. Yes I have seen those two but the subject matter does not attract me.Barry,
the I-16 is looking good - I like the fading on the uppersurfaces. On my 1/48 ICM I-16. I used BareMetal foil for the line around the cowling, I found it easier than masking.
ICM also do the I-153 Chaika, and the Bucker Jungmann in 1/32. The Chaika looks like a similar build ( apart from the fact that it's a biplane! ) - a fair amount of internal detail, that will be invisible when finished!
Dave
But what is exciting is a company not scared to produce less well known subjects in 1/32 as mainstream kits. I think we might look forward to some exciting releases in future.
French and Italian WW2 aircraft maybe and there are some interesting Russian subjects so far only kitted by short run companies.
- Joined
- Apr 27, 2018
- Messages
- 15,043
1/3
Hi Barry,
A great finish so far on the build. It must have been a pig to land and take off the pilot can't have seen much.
A great finish so far on the build. It must have been a pig to land and take off the pilot can't have seen much.
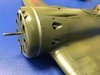
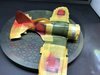
I have applied an AK panel line pin wash and then I applied the first matt coat.
View attachment 310921
View attachment 310922
Now I do a number of treatments before a final matt coat
View attachment 310923
The smoke pigments to brush on strategically for exhaust/gun residues, some earth pigment where mud will get splashed, an exhaust wash and a brown wash for streaking effects underside. As much of the airframe is wood I will want to depict the paint on high travel areas as worn and for that I am going to try the oil dot method using a whole range of different brown/earth shades. I have no idea how that will turn out so it is something of an experiment....
The metal powder pigment has sneaked in the picture but that wont be used until after the final matt coat because I will want the chipped/worn metal to have a metallic gleam, likewise oil and kerosene leaks will be applied after the final matt, again so they have that oily sheen. It all adds depth and texture..
Attachments
A little more progress.
I have applied some pigments, streaking and the oil dot treatment which has left a brownish patina in high travel areas. The latter is a very subtle effect that does not come across well in the photos but it does help give the impression of painted wood, wearing a bit.
I then applied the final matt coat.
View attachment 311023
View attachment 311024
there is still a little weathering work to do and a bit of detail to 'refresh' before I move to final fittings.
Attachments
G
Guest
Guest
Beautifully done so far Barry.
- Status
- Not open for further replies.
Legal Notice
scalemodelling.co.uk is a privately operated online discussion forum. All content posted by members reflects their own views and opinions and does not necessarily represent those of the forum owners or administrators. While reasonable efforts are made to moderate content, no responsibility is accepted for user-generated material. By using this site, you agree to comply with UK law and the forum rules.