Theme editor

Scale Model Shop

ICM Spitfire beer delivery

yak face

Moderator
Staff member
Joined
Jun 13, 2009
Messages
14,404
Reaction score
952
Points
113
Age
60
1/3
Thread owner
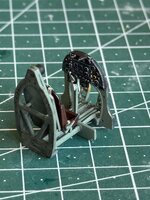
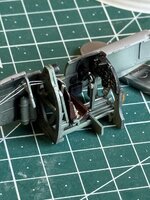
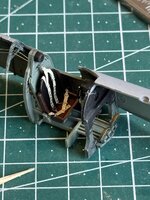
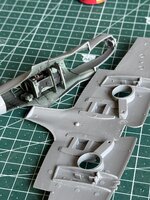
Heres one Ive had in the stash a while and finally plucked up the courage ( beer , geddit ? Ok I’ll get me coat ) to start it. Its the 1/48 Spitfire mk IX from ICM with the addition of some wooden beer barrels for this boxing .Incredibly several Spitfires and later Typhoons were adapted to carry beer to the troops in France just after D Day. Look it up ,its a brilliant story of ingenuity , it caught my attention - spitfire , beer , not surprising really !- so I had to have it. Its a nice looking kit BUT by all accounts can be a pig to get together. Looking at the complete Merlin engine and very fragile, delicate nature of the nose area once the panels have been cut off , I,m going to build it without the engine if I can. It still looks like it will be tricky as the fuselage halves are a little warped and dont feature any locating pegs . That said the cockpit looks very nicely done , just some belts to add so thats where im going to start ( note ,instructions stages 1- 25 skipped straight over ! ) .
Ive a feeling this is going to put up a fight but deep breath , here we go.
249B7C39-A1E8-4035-9A12-A24469EE0998.jpg C77118C5-D7CB-4F2A-97CA-165808ABB740.jpg F0153525-DB5A-4800-A604-D9B5054BA6A9.jpg 4E585A49-8771-470B-B6F3-0F1BE315861B.jpg C54C2C36-98E0-41C6-A784-06B6F317B0F3.jpg E0192206-D4B6-4E09-8DA8-7DBF8D249BAE.jpg 5127843E-524F-40E4-A397-517882B3406A.jpg D1D0D5D5-5B2A-457A-A939-5C4F272473E8.jpg 94295011-7BE1-4BED-806C-A5AAA41C87EE.jpg
 
Nice one Tony 👍

I built an ICM Spitfire a few years ago and left the engine out. It was tricky as I recall but definitely doable.

Geoff.
 
Nice one Tony, I’ve just pulled up my seat, I hope there’s some beer left though.
 
Thread owner
After priming yesterday , I got some colour on . The instrument panel is beautifully tooled but needs careful painting to bring out the best of it . The rest of the cockpit is nicely done, just needing the etched belts which I had in the spares box .These were only plain brass so needed painting. IMG_5527.jpg IMG_5526.jpg IMG_5528.jpg IMG_5529.jpg
 
Thread owner
Got the belts fitted now and assembled the various parts of the cockpit. This has now been glued to the port side fuselage , the cables for the inertia reel of the sutton harness being added with fuse wire . As I mentioned earlier , the fuselage halves are a bit warped . Combined with the lack of locating pins and the fact that forward of the firewall theres nothing that joins together , its going to have to be glued a bit at a time . The first stage of this is the fuselage top in front of the windscreen .
Click image for larger version  Name:	IMG_5531.jpg Views:	6 Size:	330.7 KB ID:	1260366 Click image for larger version  Name:	IMG_5533.jpg Views:	6 Size:	356.2 KB ID:	1260371 Click image for larger version  Name:	IMG_5531.jpg Views:	6 Size:	330.7 KB ID:	1260366 Click image for larger version  Name:	IMG_5533.jpg Views:	6 Size:	356.2 KB ID:	1260371 Click image for larger version  Name:	IMG_5531.jpg Views:	6 Size:	330.7 KB ID:	1260366 Click image for larger version  Name:	IMG_5536.jpg Views:	6 Size:	401.3 KB ID:	1260369 Click image for larger version  Name:	IMG_5537.jpg Views:	6 Size:	428.9 KB ID:	1260370
 

Attachments

  • IMG_5532.jpg
    IMG_5532.jpg
    344.2 KB · Views: 0
  • IMG_5533.jpg
    IMG_5533.jpg
    356.2 KB · Views: 0
  • IMG_5534.jpg
    IMG_5534.jpg
    349.9 KB · Views: 0
Last edited:
Interior looking really nice Tony. Shame about the warping. Am I right in thinking this is one of ICM's earlier offerings?

Nick
 
Thread owner
Interior looking really nice Tony. Shame about the warping. Am I right in thinking this is one of ICM's earlier offerings?

Nick

Cheers nick, yes youre right its an early tooling ( 2001 i believe ) , its got quite a bit of flash and i’m having to fettle a lot of areas to get a good fit , the kits reputation for being a bugger to build is not exaggerated !
 
Thread owner
Dry fitted the wing bottom and found a couple of problems. First the bottom edge of the firewall was too low , stopping the wing from closing up , so about 2mm was sanded off . Next the rear of the moulding for the signal lamp under the wing was coming into contact with an ejector pin on the underside of the cockpit floor, do these were both sanded back so they werent touching. After this the gap closed up but a dry fit showed the wing to be perfectly flat , whereas the spitfire ( up till the mk22/24 ) famously had a pronounced dihedral . To sort this I glued the front edge and rear fillet but left the wing joints unglued and left it to set overnight. Today I applied liquid cement to the wing joints and taped them up tight to set at the correct angle .
IMG_5545.jpg IMG_5546.jpg IMG_5548.jpg IMG_5547.jpg IMG_5549.jpg
 

Attachments

  • IMG_5544.jpg
    IMG_5544.jpg
    364.8 KB · Views: 0
Excellent build so far, mucker....

After your awful attempt at a funny 'Beery' intro ;) I trust you have this.....


P1390892.jpg

Sorry, can't afford to switch on the iron!

Cheers from over the 'Great Divide'
 
Thread owner
After sorting the wings the lower nose section was next . This wasnt a great fit ( surprise !) , needing a clamp to hold the fuselage sides together until the glue set .
Before the top section of the engine cowling is fitted the problem of the exhausts needed to be solved . Because I left out the engine theres nothing to fit them to so plastic card was glued behind the holes allowing me to add them later on . With this done the top cowling was fitted , along with the tailplanes and wingtips , the whole airframe getting a good fettling with a few areas needing some swipes with acrylic putty. Once its had a coat of primer no doubt there will be more to sort but at least its starting to look like a spitfire now . IMG_5566.jpg IMG_5571.jpg IMG_5572.jpg IMG_5573.jpg
 
Thread owner
The underside of the nose wasnt a stellar fit so it was sanded a bit and given a smear of acrylic putty , the fastener details being reinstated with a micro drill bit .After a trial fit of the prop showed that the top cowling was a fraction short , I cut a piece of plastic card and glued it to the front edge. Once set this was sanded to shape and the lost fastener detail again reinstated. The ailerons , rudder and cannons were next and after masking up , the front screen and rear canopy section were fitted with non fogging CA .
The canopy frames have been painted interior grey green and tomorrow I can mask up the cockpit opening , , get some primer on and see if anything needs sorting .
Click image for larger version  Name:	IMG_5575.jpg Views:	0 Size:	314.1 KB ID:	1260766 Click image for larger version  Name:	IMG_5575.jpg Views:	0 Size:	314.1 KB ID:	1260766 Click image for larger version  Name:	IMG_5580.jpg Views:	0 Size:	317.2 KB ID:	1260767 Click image for larger version  Name:	IMG_5579.jpg Views:	0 Size:	408.0 KB ID:	1260768
 
Back
Top