
You are using an out of date browser. It may not display this or other websites correctly.
You should upgrade or use an alternative browser.
You should upgrade or use an alternative browser.
I'm finally back on the bench.
- Thread starter takeslousyphotos
- Start date

Well I've never been known to be particularly fast at this game. But, I've got a bit done.
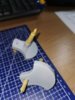
The Piston and Con Rod are together. The two halves of the piston don't quite line up on the top so I've ha to add a sliver of fill on one side. Any way its all in one assembly. Conrod is painted and the piston is in primer.
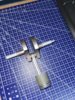
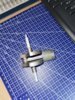
The two haves of the crank case are assembled. Each of the counter weights are in two pieces, assembled there are some nasty gaps which I've filled all the way round. They are smoothed wown and masked up for primer.
Not sure how much of this you'll be able to see when it's together but. I like to know it's as right as I can get it along the way.
Cheers to Everyone and stay safe.
Peter
The Piston and Con Rod are together. The two halves of the piston don't quite line up on the top so I've ha to add a sliver of fill on one side. Any way its all in one assembly. Conrod is painted and the piston is in primer.
The two haves of the crank case are assembled. Each of the counter weights are in two pieces, assembled there are some nasty gaps which I've filled all the way round. They are smoothed wown and masked up for primer.
Not sure how much of this you'll be able to see when it's together but. I like to know it's as right as I can get it along the way.
Cheers to Everyone and stay safe.
Peter
Attachments
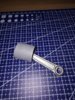
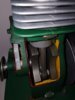
Crankshaft and piston assembly are done. Not sure how well it shows but I've managed some discolouration on the piston skirt, evevery engine I've had apart its always there. Seeing as this is probably a classroom instruction model and has sat on a self you some time, a little surface rust on the ferrous parts................Onward with Camshafts and followers.
Stay safe everyone and be lucky.
Peter
Stay safe everyone and be lucky.
Peter
Attachments
- Joined
- Apr 27, 2018
- Messages
- 14,901
1/3
Good to see you building again and an interesting subject.
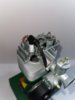
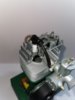
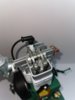
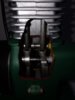
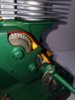
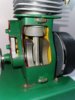
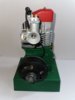
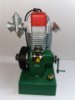
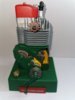
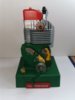
All done. Straight out of the box............ The only thing I changed was cutting away the bottom of the cylinder skirt to profile with the window so the piston skirt was visible at "bottom Dead Centre". The kit goes together well. But, you need to be careful with what you paint and what you don't if you want it to turn (mine does:smiling5") and if you build one. don't bother fitting parts 9 & 10. I found they bind on the Crankcase sides so I ended up filing them flush.
and if you build one. don't bother fitting parts 9 & 10. I found they bind on the Crankcase sides so I ended up filing them flush.
Take care everyone and stay safe.
and if you build one. don't bother fitting parts 9 & 10. I found they bind on the Crankcase sides so I ended up filing them flush.Take care everyone and stay safe.
Attachments
-
 IMG_20200421_184110.jpg2.1 KB · Views: 0
 -
 IMG_20200421_184105.jpg2.1 KB · Views: 0
 -
 IMG_20200421_184057.jpg2.2 KB · Views: 0
 -
 IMG_20200421_184041.jpg2 KB · Views: 0
 -
 IMG_20200421_184031.jpg2.5 KB · Views: 0
 -
 IMG_20200421_184010.jpg2.9 KB · Views: 0
 -
 IMG_20200421_183947.jpg2.3 KB · Views: 0
 -
 IMG_20200421_183931.jpg2.1 KB · Views: 0
 -
 IMG_20200421_183913.jpg2.2 KB · Views: 0
 -
 IMG_20200421_183859.jpg2.2 KB · Views: 0
 -
 IMG_20200421_183824.jpg2.1 KB · Views: 0
 -
 engine.jpg2.6 KB · Views: 0
 -
 IMG_20200421_184140.jpg2.5 KB · Views: 0
1/3
Great result...it looks real!
- Joined
- Apr 27, 2018
- Messages
- 14,901
1/3
Nice Job
Superb build Peter , I love it . It’s so different and fantastically made. Love the thoughtful little details like the paint chipped off the screw heads and the oil stains on the filler cap and grease nipple. I think I’m being possessed by the spirit of Fred Dibnah ! Cheers tony
1/3
Great work Peter. It does looked real.
Legal Notice
scalemodelling.co.uk is a privately operated online discussion forum. All content posted by members reflects their own views and opinions and does not necessarily represent those of the forum owners or administrators. While reasonable efforts are made to moderate content, no responsibility is accepted for user-generated material. By using this site, you agree to comply with UK law and the forum rules.