
You are using an out of date browser. It may not display this or other websites correctly.
You should upgrade or use an alternative browser.
You should upgrade or use an alternative browser.
Italari 1/32 Panavia Tornado GR1
- Thread starter BarryW
- Start date
Looking great barry , I’ll bet the kits world decals weren't cheap either , very disappointing but they look better now youve fettled them
1/3
Fantastic progress Barry.
A dry fit of the seats

engine intakes and wing fillets fitted with just a smear or two of filler needed.


Below you can see that the swing wing mechanism is still working well. it seems quite strong and well engineered. Much better than the Revell 1/32 Tonka.


engine intakes and wing fillets fitted with just a smear or two of filler needed.
Below you can see that the swing wing mechanism is still working well. it seems quite strong and well engineered. Much better than the Revell 1/32 Tonka.
Well I have been spraying primer and now this lady is in her sexy black undies...

i have been getting organised for my first painting round, a dozen different colour needed.

Once this round is done i will put to one side the parts that just need weathering. Then any that need some hand painting and then those that need some masking for the second airbrushing round.
i have been getting organised for my first painting round, a dozen different colour needed.
Once this round is done i will put to one side the parts that just need weathering. Then any that need some hand painting and then those that need some masking for the second airbrushing round.
Round 1 of airbrushing done. I will now sort everything into parts that are ready for weathering and those that need another airbrushed colour. I will then mask up for round 2 of airbrushing.

Desert Pink above

Bombs in bronze green and the undercarraige in a very light grey

Some metallic areas on the fuselage. I prefer to mask over the metallic areas before painting the camo as I treat and weather them very differently to the camo. This is because i want to retain that metallic look.
Desert Pink above
Bombs in bronze green and the undercarraige in a very light grey
Some metallic areas on the fuselage. I prefer to mask over the metallic areas before painting the camo as I treat and weather them very differently to the camo. This is because i want to retain that metallic look.

Round three - the desert pink but before that Dark Sea Grey around the inner swing wing with the wings spread.

Then with the wings swept, the desert pink

Nice smooth finish as usual with MRP. Nose cone tomorrow and a few other odds and ends before removing masking.
Then with the wings swept, the desert pink
Nice smooth finish as usual with MRP. Nose cone tomorrow and a few other odds and ends before removing masking.
Next spraying phase done, 5 colours in all. All masked and ready


Spraying all done. Some minor touching up to do, just left the masks over the transparencies and most metalised areas. I don't want any varnish on most of the metal areas.

Detail spraying done


Spraying all done. Some minor touching up to do, just left the masks over the transparencies and most metalised areas. I don't want any varnish on most of the metal areas.
Detail spraying done
Attachments
Touching up done and I decided to go ahead with decals before applying a semi-gloss coat.
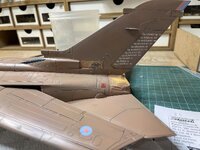
Unfortunately the decals are a little over scale. Here is a page from the instructions, look at the fit of the tail decal.

Now look at the fit in practise. Make no mistake, this is exemplified by the tail, I made multiple adjustments and in the end this is where I got to


The sharks mouth is also a little too large, I just have to make the best of this.
Unfortunately the decals are a little over scale. Here is a page from the instructions, look at the fit of the tail decal.
Now look at the fit in practise. Make no mistake, this is exemplified by the tail, I made multiple adjustments and in the end this is where I got to
The sharks mouth is also a little too large, I just have to make the best of this.
As always, Barry, your work is very neat and well organised. The detail certainly looks nice and sharp. I hope the aftermarket stuff comes soon.
yes Barry very well done IF i get this kit im gonna go to town lightin it up
chrisb
- Joined
- Apr 27, 2018
- Messages
- 15,119
1/3
Those decals are really not good. But your doing a good job of getting them to fit.
You've made a good job of adjusting the decal positions but really that's a bad c***-*p by Italeri.
the kit decals are actually very good. It’s the aftermarket decals that are the problem.
In trying to fit the over large tail decal into the best possible position I was not happy with how it looked and, on reflection, I concluded that the one I did fit on the other side just did not look right at all. I then decided not to use those decals at all so this is how the fin looks.

So beware of the XtraDecal brand and avoid if possible.
So beware of the XtraDecal brand and avoid if possible.
Attachments
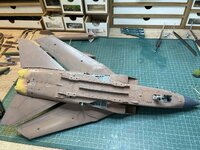
Decals are on. I decided not to apply a panel line wash as the black basing, combined with the over sized panel lines have done the job. I also want this to be fairly lightly weathered as this was a celebratory scheme. I will spray the very distinctive exhaust stains on the fin though.
I therefore applied a semi-matt coat to seal and provide the finish I want. A couple of pics.


Tomorrow its time for the exhaust stains on the fin. Then some streaking and final fittings. I will remove the masking over the metal areas too.
I therefore applied a semi-matt coat to seal and provide the finish I want. A couple of pics.
Tomorrow its time for the exhaust stains on the fin. Then some streaking and final fittings. I will remove the masking over the metal areas too.
Legal Notice
scalemodelling.co.uk is a privately operated online discussion forum. All content posted by members reflects their own views and opinions and does not necessarily represent those of the forum owners or administrators. While reasonable efforts are made to moderate content, no responsibility is accepted for user-generated material. By using this site, you agree to comply with UK law and the forum rules.
Currently on our website
Threads
37,633
Messages
710,253
Members
2,678
Latest member
sprues_and_spitfires