
You are using an out of date browser. It may not display this or other websites correctly.
You should upgrade or use an alternative browser.
You should upgrade or use an alternative browser.
Italeri Kfz 305 Opel Blitz with Tamiya 20mm Flak 38 MIT Sd.Ah.51
- Thread starter Steve Jones
- Start date
Hi Everyone
Scottie - Cheers mate. I was amazed at how well it came out
Peter - Bit like yourself beautiful:smiling2:
Ross - Glad you like it mate
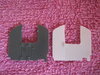
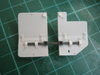
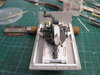
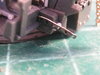
Well it was back to the scratch building of the shields. First the detailing on the back of the back shield was done. The latch was a pain but needed to be done
View attachment 304470View attachment 304471
The kit part shows a long bar to attach the shield. In fact on the real thing there are brackets. So these were made from etch out of the spares box. These will be all straightened out and fixed properly during the weathering and dusting stages. However there is a pic to give you a rough idea of how it will look.
View attachment 304472View attachment 304473
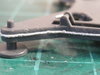
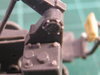
On the front side of the rear shield I needed to add four hinges. I could not find any in the PE spares box so I eneded up making my own. Micro detailing at it's worse:smiling2:
View attachment 304474View attachment 304475
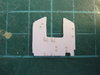
I added a few more rivets and called it done. It is nowhere near as good as the kit part but it was great fun and my first attempt at "large scale" scratch work.
View attachment 304476
The front of the two front shields were completed with their side panels and rivets. This just leaves the reverse to do and that will be all the shields done
ThView attachment 304477View attachment 304478
Thanks for watching
Steve
Scottie - Cheers mate. I was amazed at how well it came out
Peter - Bit like yourself beautiful:smiling2:
Ross - Glad you like it mate
Well it was back to the scratch building of the shields. First the detailing on the back of the back shield was done. The latch was a pain but needed to be done
View attachment 304470View attachment 304471
The kit part shows a long bar to attach the shield. In fact on the real thing there are brackets. So these were made from etch out of the spares box. These will be all straightened out and fixed properly during the weathering and dusting stages. However there is a pic to give you a rough idea of how it will look.
View attachment 304472View attachment 304473
On the front side of the rear shield I needed to add four hinges. I could not find any in the PE spares box so I eneded up making my own. Micro detailing at it's worse:smiling2:
View attachment 304474View attachment 304475
I added a few more rivets and called it done. It is nowhere near as good as the kit part but it was great fun and my first attempt at "large scale" scratch work.
View attachment 304476
The front of the two front shields were completed with their side panels and rivets. This just leaves the reverse to do and that will be all the shields done
ThView attachment 304477View attachment 304478
Thanks for watching
Steve
Attachments

- Joined
- Apr 27, 2018
- Messages
- 14,958
1/3
Steve,
great work on the shields.
great work on the shields.
Hi Everyone
Scottie - Cheers mate. All finished now (See below)
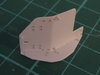
The rear of the front shields have been done. Although time consuming they were fairly straight forward. I have kept the original kit bar as they have connectors on to make sure the shields fit centrally and tightly
View attachment 304594
The dry fit was a good one. These will be left off now for ease of painting
View attachment 304595View attachment 304596
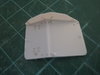
This has been the largest scratch build that I have ever done from all the extra detailing, to the sledge, to the shields. I am certainly no Ron Lebert or Steve Bellerby and for that reason I will probably not be doing any large replacement of kit parts again. I do however enjoy adding detail so I will hone my skills on this part of modelling.
View attachment 304597View attachment 304598View attachment 304599View attachment 304600View attachment 304602View attachment 304603View attachment 304604
There is still some detailing to be done but I have had enough of it and I may get on with doing the paintwork. I will see how I feel next week
View attachment 304605
Steve
Scottie - Cheers mate. All finished now (See below)
The rear of the front shields have been done. Although time consuming they were fairly straight forward. I have kept the original kit bar as they have connectors on to make sure the shields fit centrally and tightly
View attachment 304594
The dry fit was a good one. These will be left off now for ease of painting
View attachment 304595View attachment 304596
This has been the largest scratch build that I have ever done from all the extra detailing, to the sledge, to the shields. I am certainly no Ron Lebert or Steve Bellerby and for that reason I will probably not be doing any large replacement of kit parts again. I do however enjoy adding detail so I will hone my skills on this part of modelling.
View attachment 304597View attachment 304598View attachment 304599View attachment 304600View attachment 304602View attachment 304603View attachment 304604
There is still some detailing to be done but I have had enough of it and I may get on with doing the paintwork. I will see how I feel next week
View attachment 304605
Steve
Attachments
-
 IMG_0134.JPG3 KB · Views: 0
 -
 IMG_0135.JPG3.4 KB · Views: 0
 -
 IMG_0133.JPG3.4 KB · Views: 0
 -
 IMG_0132.JPG3.6 KB · Views: 0
 -
 IMG_0131.JPG3.3 KB · Views: 0
 -
 IMG_0126.JPG2.6 KB · Views: 0
 -
 IMG_0096.JPG2.6 KB · Views: 0
 -
 IMG_0097.JPG2.5 KB · Views: 0
 -
 IMG_0128.JPG3.4 KB · Views: 0
 -
 IMG_0129.JPG3.4 KB · Views: 0
 -
 IMG_0130.JPG3.3 KB · Views: 0
Hi Steve, just had a good read trough from where I'd last checked in and my some truly fine work has been accomplished.:thumb2:
Great looking base and love the use of the old PAK for it but the details added to the truck and Flak are really cool.
Looking forward to see the paint hitting them.
Fernando
Great looking base and love the use of the old PAK for it but the details added to the truck and Flak are really cool.
Looking forward to see the paint hitting them.
Fernando
Hi Everyone
Fernando - Thanks for the support. Glad you like what I have done to the kits
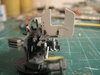
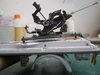
Sorry to disappoint the artists but I still haven't done any wet stuff yet. Due to work, World Cup and the US Open I have done precious little. However I am happy to say the build is complete and everything is ready for painting now
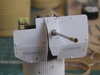
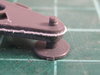
There was no final detailing on the Opel as I have lost the will to live on the chassis. As for the Flak the first task was to put a seam line around the base. Have I ever told you I hate doing seam lines? I haven't? Okay then - I HATE DOING SEAM LINES!!:smiling3:
After two burnt fingers, five super glued together fingers, ten sore fingers and a dodgy toe (Dont ask!), I finally managed to get them done. The final look is a good one after all the grief.
View attachment 305177View attachment 305178
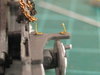
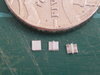
Screw thread detailing was added to the ends of the feet
View attachment 305179
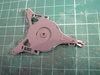
Using bits and bobs from the spares box I made the ratchet system for the foot rest
View attachment 305180
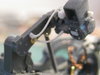
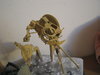
Finally detailing was added to the sight with wires, screws and rivets
View attachment 305181View attachment 305182
The whole build has been washed and dried. Also a coat of Mr Hobby Metal Primer has been applied to all the metal work. Tomorrow the primer will be added.
Thanks for watching
Steve
Fernando - Thanks for the support. Glad you like what I have done to the kits
Sorry to disappoint the artists but I still haven't done any wet stuff yet. Due to work, World Cup and the US Open I have done precious little. However I am happy to say the build is complete and everything is ready for painting now
There was no final detailing on the Opel as I have lost the will to live on the chassis. As for the Flak the first task was to put a seam line around the base. Have I ever told you I hate doing seam lines? I haven't? Okay then - I HATE DOING SEAM LINES!!:smiling3:
After two burnt fingers, five super glued together fingers, ten sore fingers and a dodgy toe (Dont ask!), I finally managed to get them done. The final look is a good one after all the grief.
View attachment 305177View attachment 305178
Screw thread detailing was added to the ends of the feet
View attachment 305179
Using bits and bobs from the spares box I made the ratchet system for the foot rest
View attachment 305180
Finally detailing was added to the sight with wires, screws and rivets
View attachment 305181View attachment 305182
The whole build has been washed and dried. Also a coat of Mr Hobby Metal Primer has been applied to all the metal work. Tomorrow the primer will be added.
Thanks for watching
Steve
Attachments
1/3
Going great guns on this....paint will tie it all together and lift the effect even higher.
Nice one
Tim
Nice one
Tim
- Joined
- Apr 27, 2018
- Messages
- 14,958
1/3
Steve,
Top work Sir.
Top work Sir.
Hi Steve
I seem to have missed a load but just had a great catch up. Your attention to detail is amazing. A lot of patience and skill to recreate what your reference photos show. The base is looking superb. This is mogglin at it's very best.
Jim
I seem to have missed a load but just had a great catch up. Your attention to detail is amazing. A lot of patience and skill to recreate what your reference photos show. The base is looking superb. This is mogglin at it's very best.
Jim
Hey Steve,
I’m really sorry....Seems I’m in the same boat as Jimbo as I’ve missed loads of your super detailing!
You’ve certainly pulled out all the stops on this little beauty mate...I’m very impressed in what you did :thumb2:
This is gonna be a gem when you get to work with your weathering technique:smiling4: ....now stop with all that sport and get back to the bench:tongue-out:
Si
I’m really sorry....Seems I’m in the same boat as Jimbo as I’ve missed loads of your super detailing!
You’ve certainly pulled out all the stops on this little beauty mate...I’m very impressed in what you did :thumb2:
This is gonna be a gem when you get to work with your weathering technique:smiling4: ....now stop with all that sport
and get back to the bench:tongue-out:Si
G
Guest
Guest
Fwoar!
Allen Dewire
New member
1/3
Stevie,
This is really great scratchy going on here Buddy. but there are a few points worth mentioning. First, why did you photograph the gun shield on your pink bathrobe??? Also, this is a modelling site, so why do we need to see your attempts of making Oreo cookies in the shape of a Flak gun base. You are a man of fantastic talent and I think it's time to stick to the subject at hand Sir...A flak 38 on a 3 ton Opel Blitz!!!
As Jack Webb used to say in the old TV series 'Dragnet', "Just the facts"...………..
Prost
Allen
PS. we still love ya though!!!
G
Guest
Guest
Steve .
At first I thought that was early pink camo net !! Then as Allen pointed out your bathrobe . What was the idea of using it for a ground base clour ?
Apart from the above a worrying thought that you had taken up kintting.
The gun detail is suberb a joy to see, full of admiration in the way you manage to work with such small parts with out great amounts of CA on display . I myself empoly the large blob method. Sticking every together including my fingers and twezzers.
John .
Hi Everyone
Terrific feedback on this build guys. I am very humbled
Tim - The paint is finally on and looking good so far:thumb2:
Scottie - Cheers mate
Jim - It certainly pushed me to the limit on this one. By the end I just wanted to get on and paint her. However I did enjoy and learn a lot during the build
Si - Managed to do some painting during the half time intervals:smiling2:
Peter - Nearly as beautiful as you dear:smiling3:
Allen - Luv you too beautiful:blow-kiss:
JR - Not knitting mate. Just gluing my fingers together like you:smiling3:
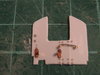
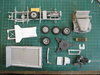
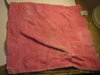
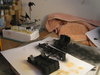
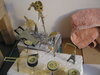
Before I get under way with the wet stuff I need to address the issue of Bathrobe Gate. Not being a dressing gown man myself I was disappointed to hear that certain members of the fraternity would imagine me in a bathrobe let alone a pink one. If anything I would be more of a Kimono guy. Any way I will just stick to my sack cloth and ashes:smiling5:.
The pink cloth was in fact a flannel used to protect detailing on the other side of the piece I was working on
View attachment 305231
Sorry to disappoint. Maybe the pink bathrobe was a better alternative:smiling:
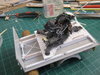
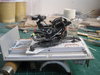
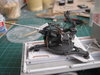
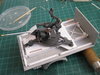
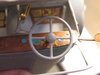
So before the primer went on the dials on the dash had blue mask applied to prevent paint going on them
View attachment 305232View attachment 305233
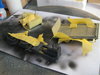
Then the airbrushed base coats were added (All Vallejo acrylics). Dark Brown on the underside of the flatbed and light brown on top. The cab, wheels, boxes and wheel arches were done in Buff. The Flak unit was coloured in Tan Yellow. The chassis was done in Panzer grey.
View attachment 305234View attachment 305235View attachment 305236
Next will be the brushed on base coats along with highlights and lowlights
Thanks for watching and now its back to the golf. Come on Justin Rose!!
Steve
Terrific feedback on this build guys. I am very humbled
Tim - The paint is finally on and looking good so far:thumb2:
Scottie - Cheers mate
Jim - It certainly pushed me to the limit on this one. By the end I just wanted to get on and paint her. However I did enjoy and learn a lot during the build
Si - Managed to do some painting during the half time intervals:smiling2:
Peter - Nearly as beautiful as you dear:smiling3:
Allen - Luv you too beautiful:blow-kiss:
JR - Not knitting mate. Just gluing my fingers together like you:smiling3:
Before I get under way with the wet stuff I need to address the issue of Bathrobe Gate. Not being a dressing gown man myself I was disappointed to hear that certain members of the fraternity would imagine me in a bathrobe let alone a pink one. If anything I would be more of a Kimono guy. Any way I will just stick to my sack cloth and ashes:smiling5:.
The pink cloth was in fact a flannel used to protect detailing on the other side of the piece I was working on
View attachment 305231
Sorry to disappoint. Maybe the pink bathrobe was a better alternative:smiling:
So before the primer went on the dials on the dash had blue mask applied to prevent paint going on them
View attachment 305232View attachment 305233
Then the airbrushed base coats were added (All Vallejo acrylics). Dark Brown on the underside of the flatbed and light brown on top. The cab, wheels, boxes and wheel arches were done in Buff. The Flak unit was coloured in Tan Yellow. The chassis was done in Panzer grey.
View attachment 305234View attachment 305235View attachment 305236
Next will be the brushed on base coats along with highlights and lowlights
Thanks for watching and now its back to the golf. Come on Justin Rose!!
Steve
Attachments
G
Guest
Guest
Well Steve, that's one helluva good looking gun you got there !
1/3
Looking great under the paint....
G
Guest
Guest
Now before we go any further it's quite evident from the amount of shots showing bits of pink dressing gowns that you are indeed a wearer of such items
View attachment 305316
Our lens snapper has been out again and took this shot of you opening the door to the gentlemen from ward 3
Moving on , some super work, always a great feeling when the painting starts.
JR
View attachment 305316
Our lens snapper has been out again and took this shot of you opening the door to the gentlemen from ward 3
Moving on , some super work, always a great feeling when the painting starts.
JR
Attachments

And now that I am catching up I figured that a picture of Dr Jones in a pink bathrobe might have shown up from the rabble crowd here Thanks to JR.... and of course some more of your masterpiece detailing updates and the start of the next phase. Bravo Steve...always worth waiting for updates!!!! Fantastic work
Legal Notice
scalemodelling.co.uk is a privately operated online discussion forum. All content posted by members reflects their own views and opinions and does not necessarily represent those of the forum owners or administrators. While reasonable efforts are made to moderate content, no responsibility is accepted for user-generated material. By using this site, you agree to comply with UK law and the forum rules.