
You are using an out of date browser. It may not display this or other websites correctly.
You should upgrade or use an alternative browser.
You should upgrade or use an alternative browser.
Italeri Kfz 305 Opel Blitz with Tamiya 20mm Flak 38 MIT Sd.Ah.51
- Thread starter Steve Jones
- Start date
G
Guest
Guest
Joe.And now that I am catching up I figured that a picture of Dr Jones in a pink bathrobe might have shown up from the rabble crowd here Thanks to JR.... and of course some more of your masterpiece detailing updates and the start of the next phase. Bravo Steve...always worth waiting for updates!!!! Fantastic work
We have standards to keep ! :smiling2:
John .
Fernando - Cheers mate. It's gone well this week also:thumb2:
Guy - You cant beat a good gun can you!:smiling2:
Tim - Many thanks. More to come later.
JR - Ah ! The secret is out. Hopefully no one will notice. We had better keep it to ourselves. I will send you the usual thick white envelope of money:smiling2:
Joe - I appreciate the support. Good on Brooks for his win at the weekend:thumb2:
Paul - I cant believe how well its gone. I am very pleased so far
Andy - Good of you to have looked in on the build. Hopefully life will deal you a better set of cards soon
JR - I have standards! They are not just as high as other peoples:smiling5:
In between all the sport I have done most of the base colours. Hopefully I will have a chance to do an update sometime this weekend. Happy modelling everyone
Steve
Guy - You cant beat a good gun can you!:smiling2:
Tim - Many thanks. More to come later.
JR - Ah
! The secret is out. Hopefully no one will notice. We had better keep it to ourselves. I will send you the usual thick white envelope of money:smiling2:Joe - I appreciate the support. Good on Brooks for his win at the weekend:thumb2:
Paul - I cant believe how well its gone. I am very pleased so far
Andy - Good of you to have looked in on the build. Hopefully life will deal you a better set of cards soon
JR - I have standards! They are not just as high as other peoples:smiling5:
In between all the sport I have done most of the base colours. Hopefully I will have a chance to do an update sometime this weekend. Happy modelling everyone
Steve
G
Guest
Guest
Nice one mate , I shall be wearing my rubber suit as normal so nothing to worry about, the only worry is Allen in that Father Christmas Outfit.Fernando - Cheers mate. It's gone well this week also:thumb2:
Guy - You cant beat a good gun can you!:smiling2:
Tim - Many thanks. More to come later.
JR - Ah
Joe - I appreciate the support. Good on Brooks for his win at the weekend:thumb2:
Paul - I cant believe how well its gone. I am very pleased so far
Andy - Good of you to have looked in on the build. Hopefully life will deal you a better set of cards soon
JR - I have standards! They are not just as high as other peoples:smiling5:
In between all the sport I have done most of the base colours. Hopefully I will have a chance to do an update sometime this weekend. Happy modelling everyone
Steve
JR
Allen Dewire
New member
1/3
Nice one mate , I shall be wearing my rubber suit as normal so nothing to worry about, the only worry is Allen in that Father Christmas Outfit.
JR
Well, While we are off subject here, Santa always said I was a "Ho, Ho, Ho"...……...But don't worry, be happy!!!
Stevie, You are really doing a super job here and it looks even better with some color on it. It won't be long now and it will all come together. Really good stuff Buddy!!!
Prost
Allen
Hi Everyone
John/Allen - Santa in a rubber suit! Now some people would pay good money for that:smiling5:. As for the wet stuff steady progress is being made:thumb2:
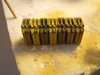
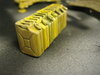
As a reminder the stage we are at is doing the base coats and the high and low lights. The jerry cans have been done with a selection of sand and brown colours
View attachment 305725
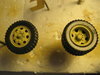
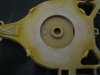
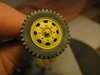
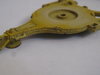
The wheels were done with Dark Rubber
View attachment 305726
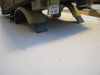
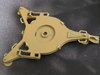
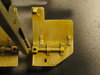
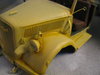
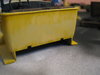
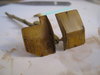
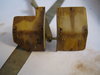
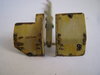
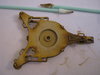
Oops forgot the padlocks? Anyhow the rest of the underside of the flatbed was done with red on the rear reflectors. The grey coming through the yellow will be a key part of the build and this has been achieved at an early stage in some instances. The mud guards were done in metallic black.
View attachment 305727View attachment 305728
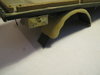
Very little is done on the chassis as this will be taken care of with the oils. So the whole lot was covered in German Grey and then the usual rust effects were added to the exhaust
View attachment 305729
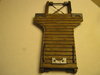
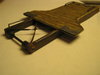
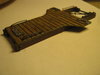
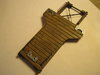
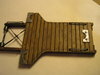
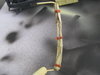
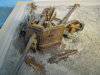
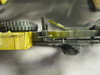
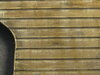
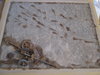
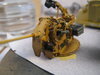
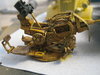
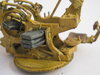
The sledge has come out well. The frame has a rusty look and the Flak feet retainers are Steel washed with Black. The rest of the process will be explained in an SBS (What does that mean by the way???) on how to paint a flat bed later in the blog. This is now ready for the oil and dust work
View attachment 305730View attachment 305731View attachment 305732View attachment 305733View attachment 305734
So things left to do are the cab and the highlights on the Flak which should all be done before kick off tomorrow. Happy moggelling everyone
Steve
John/Allen - Santa in a rubber suit! Now some people would pay good money for that:smiling5:. As for the wet stuff steady progress is being made:thumb2:
As a reminder the stage we are at is doing the base coats and the high and low lights. The jerry cans have been done with a selection of sand and brown colours
View attachment 305725
The wheels were done with Dark Rubber
View attachment 305726
Oops forgot the padlocks? Anyhow the rest of the underside of the flatbed was done with red on the rear reflectors. The grey coming through the yellow will be a key part of the build and this has been achieved at an early stage in some instances. The mud guards were done in metallic black.
View attachment 305727View attachment 305728
Very little is done on the chassis as this will be taken care of with the oils. So the whole lot was covered in German Grey and then the usual rust effects were added to the exhaust
View attachment 305729
The sledge has come out well. The frame has a rusty look and the Flak feet retainers are Steel washed with Black. The rest of the process will be explained in an SBS (What does that mean by the way???) on how to paint a flat bed later in the blog. This is now ready for the oil and dust work
View attachment 305730View attachment 305731View attachment 305732View attachment 305733View attachment 305734
So things left to do are the cab and the highlights on the Flak which should all be done before kick off tomorrow. Happy moggelling everyone
Steve
Attachments
-
 IMG_0145.JPG2.2 KB · Views: 0
 -
 IMG_0144.JPG2.3 KB · Views: 0
 -
 IMG_0143.JPG2.2 KB · Views: 0
 -
 IMG_0142.JPG2.2 KB · Views: 0
 -
 IMG_0141.JPG2.5 KB · Views: 0
 -
 IMG_0140.JPG3.3 KB · Views: 0
 -
 IMG_0168.JPG2 KB · Views: 0
 -
 IMG_0146.JPG2.1 KB · Views: 0
 -
 IMG_0165.JPG3.3 KB · Views: 0
 -
 IMG_0166.JPG2.9 KB · Views: 0
Allen Dewire
New member
1/3
Stevie,
Super work buddy!!! Step By Step = SBS. Keep it coming Bro!!!
Super work buddy!!! Step By Step = SBS. Keep it coming Bro!!!
- Joined
- Apr 27, 2018
- Messages
- 14,958
1/3
Steve,
The paint is making all your hardwork stand out, in particular the sledge.
The paint is making all your hardwork stand out, in particular the sledge.
G
Guest
Guest
Amazing paint job on the wood Steve. Marvellous work all round.
Hi Everyone
Allen - DOH!! It's so obvious when you know. Cheers mate:thumb2:
Thanks Jim. However my pile of "Detailing fallen off and needs to be stuck back on" is growing:smiling:
Cheers Si:thumb2:
Scottie - It was better than expected and the oils on it should set it off a treat
Thanks Ross:thumb2:
Peter - Once you get a system going with the wood it works well. On my next builds I will try and improve the look until I am satisfied
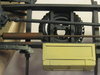
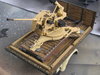
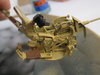
Well I am happy to say all the acrylic work is now complete. The Flak base and Flak unit was highlighted with Sand Yellow
View attachment 305782View attachment 305783
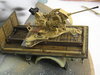
The seat was painted in Brown Leather and then given a Red Leather wash which was sponge dried
View attachment 305784View attachment 305785
This gives you an idea on how all the contrasting colours will look
View attachment 305786View attachment 305787
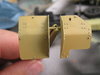
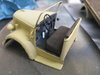
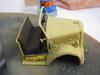
Finally the cab. The cab roll was Buff highlighted with Dark Sand. The straps were Red Leather and Steel buckles
View attachment 305788
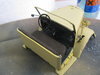
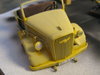
The cab was highlighted with Sand Yellow and the interior was left German Gray. The seats were Dark Leather and then other various bits and bobs
View attachment 305789View attachment 305790View attachment 305791
The whole build has now been fully covered in Matt varnish in preparation for the oil work. For those of you who follow my work you will remember I have had enough of Vallajo varnish as it cannot stand up to the rigours of oils. After all your input and other research I decided to try Winsor and Newton. There was an instant improvement with a better coverage and I look forward to seeing how it reacts to the oil work
View attachment 305792
Off to the pub to watch the football so have a great afternoon everyone
Steve
Allen - DOH!! It's so obvious when you know. Cheers mate:thumb2:
Thanks Jim. However my pile of "Detailing fallen off and needs to be stuck back on" is growing:smiling:
Cheers Si:thumb2:
Scottie - It was better than expected and the oils on it should set it off a treat
Thanks Ross:thumb2:
Peter - Once you get a system going with the wood it works well. On my next builds I will try and improve the look until I am satisfied
Well I am happy to say all the acrylic work is now complete. The Flak base and Flak unit was highlighted with Sand Yellow
View attachment 305782View attachment 305783
The seat was painted in Brown Leather and then given a Red Leather wash which was sponge dried
View attachment 305784View attachment 305785
This gives you an idea on how all the contrasting colours will look
View attachment 305786View attachment 305787
Finally the cab. The cab roll was Buff highlighted with Dark Sand. The straps were Red Leather and Steel buckles
View attachment 305788
The cab was highlighted with Sand Yellow and the interior was left German Gray. The seats were Dark Leather and then other various bits and bobs
View attachment 305789View attachment 305790View attachment 305791
The whole build has now been fully covered in Matt varnish in preparation for the oil work. For those of you who follow my work you will remember I have had enough of Vallajo varnish as it cannot stand up to the rigours of oils. After all your input and other research I decided to try Winsor and Newton. There was an instant improvement with a better coverage and I look forward to seeing how it reacts to the oil work
View attachment 305792
Off to the pub to watch the football so have a great afternoon everyone
Steve
Attachments
-
 IMG_0170.JPG2.7 KB · Views: 0
 -
 IMG_0169.JPG2.6 KB · Views: 0
 -
 IMG_0179.JPG2.8 KB · Views: 0
 -
 IMG_0178.JPG3.1 KB · Views: 0
 -
 IMG_0177.JPG3 KB · Views: 0
 -
 IMG_0176.JPG2.8 KB · Views: 0
 -
 IMG_0168.JPG2.2 KB · Views: 0
 -
 IMG_0175.JPG3.4 KB · Views: 0
 -
 IMG_0174.JPG3.3 KB · Views: 0
 -
 IMG_0172.JPG2.8 KB · Views: 0
 -
 IMG_0171.JPG3 KB · Views: 0
G
Guest
Guest
OH Boy this is perfection, nothing more nothing less.
The timber on the bed is exceptional.
JR
The timber on the bed is exceptional.
JR
G
Guest
Guest
More gorgeousness!
Steve, shiver me timbers...the wood grain effect on the sledge is amazingly natural. The extra detail added is paying off under paint as well. :thumb2:
Regarding matt varnishes, I just had a session with coating my marine figures and it stinks to high heaven. I used Humbrol Mattcoat...works ok with the acrylics I painted the figures with.
Cheers,
Richard
Regarding matt varnishes, I just had a session with coating my marine figures and it stinks to high heaven. I used Humbrol Mattcoat...works ok with the acrylics I painted the figures with.
Cheers,
Richard
Hi Everyone
Fernando - Thanks for the support mate. More weathering to follow:thumb2:
Joe - Many thanks. Its received some oils now as well to help it on its way
JR - It's going well - at the moment:smiling5:
Peter - Thank you gorgeous:smiling3:
Richard - So far so good. The varnish is doing its job:thumb2:
Incredibly the first stage of the oil work has gone well. Unfortunately the photos dont give it justice as oil work is quite subtle, but any how here we go.
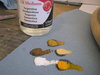
Firstly I like to apply shading and tone. Some people like to use the dot method. I prefer a little more control and paint on each colour individually. Saying that I did use the dot method on the PAK 40:smiling5:
These are my colours which are applied with a moist brush dipped in artists turps.
View attachment 306157
For the recess's my go too colour is Cadmium Yellow Hue. Then I blend that in with Naples Yellow Hue and finally on the raised areas White. Also along the way I have started doing a bit of dry brushing. Here are a few pictures to give you an idea
View attachment 306145View attachment 306146View attachment 306147
The woodwork received a dry brush of Naples Yellow to help lighten them a little
View attachment 306148
The rest of the build received similar oil work
View attachment 306150View attachment 306151View attachment 306152View attachment 306153View attachment 306154
This was all left for a day (purely as I didnt have time to finish off) and blended in further using foam cotton buds. This will all be left for 7 to 10 days to dry fully before the oil washes are applied and there maybe a few surprises here as I am trying a new system:anguished:
While the oils were out I did some work on the base also
View attachment 306155View attachment 306156
Thank you all for your continued support
Steve
Fernando - Thanks for the support mate. More weathering to follow:thumb2:
Joe - Many thanks. Its received some oils now as well to help it on its way
JR - It's going well - at the moment:smiling5:
Peter - Thank you gorgeous:smiling3:
Richard - So far so good. The varnish is doing its job:thumb2:
Incredibly the first stage of the oil work has gone well. Unfortunately the photos dont give it justice as oil work is quite subtle, but any how here we go.
Firstly I like to apply shading and tone. Some people like to use the dot method. I prefer a little more control and paint on each colour individually. Saying that I did use the dot method on the PAK 40:smiling5:
These are my colours which are applied with a moist brush dipped in artists turps.
View attachment 306157
For the recess's my go too colour is Cadmium Yellow Hue. Then I blend that in with Naples Yellow Hue and finally on the raised areas White. Also along the way I have started doing a bit of dry brushing. Here are a few pictures to give you an idea
View attachment 306145View attachment 306146View attachment 306147
The woodwork received a dry brush of Naples Yellow to help lighten them a little
View attachment 306148
The rest of the build received similar oil work
View attachment 306150View attachment 306151View attachment 306152View attachment 306153View attachment 306154
This was all left for a day (purely as I didnt have time to finish off) and blended in further using foam cotton buds. This will all be left for 7 to 10 days to dry fully before the oil washes are applied and there maybe a few surprises here as I am trying a new system:anguished:
While the oils were out I did some work on the base also
View attachment 306155View attachment 306156
Thank you all for your continued support
Steve
Attachments
-
 IMG_0167.JPG2.7 KB · Views: 0
 -
 IMG_0181.JPG3.1 KB · Views: 0
 -
 IMG_0180.JPG3.4 KB · Views: 0
 -
 IMG_0179.JPG2.8 KB · Views: 0
 -
 IMG_0178.JPG2.8 KB · Views: 0
 -
 IMG_0177.JPG2.4 KB · Views: 0
 -
 IMG_0175.JPG2.5 KB · Views: 0
 -
 IMG_0174.JPG2.8 KB · Views: 0
 -
 IMG_0171.JPG2.7 KB · Views: 0
 -
 IMG_0170.JPG2.8 KB · Views: 0
 -
 IMG_0169.JPG2.4 KB · Views: 0
 -
 IMG_0168.JPG2.9 KB · Views: 0
Hi Everyone
A quick update before the footy starts
After a week or so of drying I started on the pin washes. I like to do the chipping before I start however the Opel will be receiving a Panzergrau wash, then chipping followed by an Umber wash.
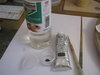
The next part shows you how to confuse a stupid person. A while back I spent some time in the craft shop deciding on which shade of Winsor Newton Grey OIL I should use for the OIL washes. I ended up with Graphite Grey. So today I got everything prepared ready to make my wash and to show you how I do them
View attachment 307535
Spot the mistake??:smiling5: Even worse, it wasnt until I added the turps to thin it down and nothing happened, did I realise it was acrylic - DOH!!
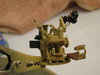
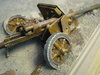
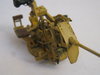
So I was only able to do the Flak today. So the chipping was done in the usual way with brush and sponge.
View attachment 307536View attachment 307537View attachment 307538
Next a Vandyke Brown Oil wash was made and added to the Flak and base. Then using a brush this was blended in after about half an hour of drying. Then a further half hour later I used a moist foam bud to clean up the raised areas and a dry foam bud to finish off the blending
View attachment 307539
The Flak and base are now done and over the coming days further blending will be done to pick up on the bits I have missed or not happy with. Once fully dry this will be enhanced with a dry brush before the dusting process begins
View attachment 307545View attachment 307546View attachment 307547
I like to try and add some streaks as I go. So with the shields a more liberal wash is done. Then this is blended in with downward strokes of a brush. Then after some more drying time the process is repeated. This will be finalised over the coming days as I repeat the process some more until I am happy with the look
View attachment 307548View attachment 307549View attachment 307550
I also finished off the tarp and jerry cans. Also some colour was added to the base. A long way to go yet with this
View attachment 307551
Thanks for watching
Steve
A quick update before the footy starts
After a week or so of drying I started on the pin washes. I like to do the chipping before I start however the Opel will be receiving a Panzergrau wash, then chipping followed by an Umber wash.
The next part shows you how to confuse a stupid person. A while back I spent some time in the craft shop deciding on which shade of Winsor Newton Grey OIL I should use for the OIL washes. I ended up with Graphite Grey. So today I got everything prepared ready to make my wash and to show you how I do them
View attachment 307535
Spot the mistake??:smiling5: Even worse, it wasnt until I added the turps to thin it down and nothing happened, did I realise it was acrylic - DOH!!
So I was only able to do the Flak today. So the chipping was done in the usual way with brush and sponge.
View attachment 307536View attachment 307537View attachment 307538
Next a Vandyke Brown Oil wash was made and added to the Flak and base. Then using a brush this was blended in after about half an hour of drying. Then a further half hour later I used a moist foam bud to clean up the raised areas and a dry foam bud to finish off the blending
View attachment 307539
The Flak and base are now done and over the coming days further blending will be done to pick up on the bits I have missed or not happy with. Once fully dry this will be enhanced with a dry brush before the dusting process begins
View attachment 307545View attachment 307546View attachment 307547
I like to try and add some streaks as I go. So with the shields a more liberal wash is done. Then this is blended in with downward strokes of a brush. Then after some more drying time the process is repeated. This will be finalised over the coming days as I repeat the process some more until I am happy with the look
View attachment 307548View attachment 307549View attachment 307550
I also finished off the tarp and jerry cans. Also some colour was added to the base. A long way to go yet with this
View attachment 307551
Thanks for watching
Steve
Attachments
-
 IMG_0019.JPG2.7 KB · Views: 0
 -
 IMG_0017.JPG2.6 KB · Views: 0
 -
 IMG_0014.JPG2.4 KB · Views: 0
 -
 IMG_0026.JPG2.5 KB · Views: 0
 -
 IMG_0020.JPG2.5 KB · Views: 0
 -
 IMG_0018.JPG2.2 KB · Views: 0
 -
 IMG_0024.JPG3.3 KB · Views: 0
 -
 IMG_0023.JPG3.1 KB · Views: 0
 -
 IMG_0022.JPG3.4 KB · Views: 0
 -
 IMG_0021.JPG2.4 KB · Views: 0
 -
 IMG_0016.JPG1.8 KB · Views: 0
 -
 IMG_0015.JPG3.5 KB · Views: 0
Legal Notice
scalemodelling.co.uk is a privately operated online discussion forum. All content posted by members reflects their own views and opinions and does not necessarily represent those of the forum owners or administrators. While reasonable efforts are made to moderate content, no responsibility is accepted for user-generated material. By using this site, you agree to comply with UK law and the forum rules.