
You are using an out of date browser. It may not display this or other websites correctly.
You should upgrade or use an alternative browser.
You should upgrade or use an alternative browser.
Italeri Kfz 305 Opel Blitz with Tamiya 20mm Flak 38 MIT Sd.Ah.51
- Thread starter Steve Jones
- Start date
- Joined
- Apr 27, 2018
- Messages
- 14,958
1/3
Steve,
A cracking job so far, nicely done.
Scottie
A cracking job so far, nicely done.
Scottie
G
Guest
Guest
Hi Steve great scratch work on the sledge, I like it a lot, well done sir :thumb2: keep it coming.
Pete.
Pete.
Allen Dewire
New member
1/3
Evening Stevie Wonder,
Wow Buddy, it looks like you're leaving no stone unturned here. Don't you love the scratching business to death!!! It appears that you get it right only on the second try. I really like the worn wood work on the back of the bed. It adds character to the whole scheme of things. A good fix on the length hiccup too. Keep it coming Sir!!!
Prost
Allen
Hi Steve,
are those door steps on upside down?
Pics I have seen show them t'other way up like this one I saw a few years back at Elvington vehicle rally
View attachment 301239
I have the Dragon 3t truck with 20mm flak - looks like it includes the sledge so if you need any measurements for a redo let me know
are those door steps on upside down?
Pics I have seen show them t'other way up like this one I saw a few years back at Elvington vehicle rally
View attachment 301239
I have the Dragon 3t truck with 20mm flak - looks like it includes the sledge so if you need any measurements for a redo let me know
Attachments

Hi Everyone
JR - Is the scratchery so cunning you could stick a tail on it and call it weasel?:smiling3:
Barry - Thanks for the support:thumb2:
Scottie - Glad you like it mate
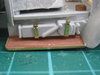
Pete - The sledge was fun to do and it came out well
Allen - It is surprisingly going well No issues with the sledge now (see below). Looking forward to painting up the timbers:thumb2:
Paul - The foil work is because of you my friend. If you remember we had a chat a while back about using milliput on tarps and you convinced me of the merits of using foil. No turning back now. Many thanks:thumb2:
Mr T - A good point well made. They are not upside down but they are not the popular version of the Opel Blitz step. They look more like the ones used on a Ford. So either Eduard have designed the piece wrong or they found a variant when they designed their PE parts
View attachment 301279
Thanks for the offer on the sledge but looking at other sledge photos the change I made is not that different from what they actually looked like
View attachment 301280
(For information purposes only)
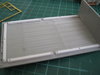
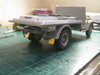
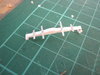
I have put the support planks around the sledge. They were heavily scarred with the heaviest file I had to reflect a wooden look. Then a few bolts were added. These will come to life once painted
View attachment 301281View attachment 301282
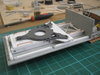
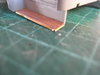
So the build is now starting to take shape
View attachment 301283View attachment 301284
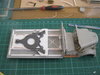
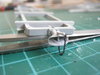
I spent some time going over the instructions to see if I had missed anything. This was one of the items that needed to be done
View attachment 301285
I now need to finish off the tow hitch and then its the final job of doing the springs and under carriage.
Thanks for all your interest and continued support
Steve
JR - Is the scratchery so cunning you could stick a tail on it and call it weasel?:smiling3:
Barry - Thanks for the support:thumb2:
Scottie - Glad you like it mate
Pete - The sledge was fun to do and it came out well
Allen - It is surprisingly going well No issues with the sledge now (see below). Looking forward to painting up the timbers:thumb2:
Paul - The foil work is because of you my friend. If you remember we had a chat a while back about using milliput on tarps and you convinced me of the merits of using foil. No turning back now. Many thanks:thumb2:
Mr T - A good point well made. They are not upside down but they are not the popular version of the Opel Blitz step. They look more like the ones used on a Ford. So either Eduard have designed the piece wrong or they found a variant when they designed their PE parts
View attachment 301279
Thanks for the offer on the sledge but looking at other sledge photos the change I made is not that different from what they actually looked like
View attachment 301280
(For information purposes only)
I have put the support planks around the sledge. They were heavily scarred with the heaviest file I had to reflect a wooden look. Then a few bolts were added. These will come to life once painted
View attachment 301281View attachment 301282
So the build is now starting to take shape
View attachment 301283View attachment 301284
I spent some time going over the instructions to see if I had missed anything. This was one of the items that needed to be done
View attachment 301285
I now need to finish off the tow hitch and then its the final job of doing the springs and under carriage.
Thanks for all your interest and continued support
Steve
Attachments
G
Guest
Guest
I was a bit late coming to Steve's wonderful build. Your doing a great job of it Steve, don't know how you can use the PE details as I usually get angry & toss them @ the wall!
I think I know Steve well enough that he won't mind if I post my drawing of the sled & a few comments about it's design.
At the time I built my example there wasn't much info out there on the sled itself, only a few fuzzy photos. I misinterpreted the photos to include three sets of rollers but with the newer photos it looks that there was only one forward set. Now there is a possibility that there could have been more than one set of rollers as the sleds looked to be built by the divisions maintenance shops. Careful study of photos show differences between sleds. Since my build some ten years ago, I have found a few more very detailed photos.
View attachment 301727
A very nice shot of the sled waiting for the gun to be placed on board. You can see why the platform is shaped as it is allowing the wheels to place the gun in proper location.
Well my Grand kids just showed up so no rest for Grapa Ronnie!
More to follow shortly.
Ron
G
Guest
Guest
View attachment 301768
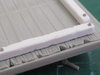
Here is a nice overhead shot of the sled. As modelers we tend to get a bit overzealous about a photo.
We try to copy the photo to the exact detail. such as the board size & spacing. Remember that I mentioned that the sled was built by the work shop so they used the materials that they had laying around. What they did follow was the print, as the sled must fit the gun's footprint. Steve mentioned that my drawing was a bit too long to fit his style of cargo bed.
My drawing follows the layout for the sled seen in the photos fitted to a full size floor. Steve's floor has sections of wood blocks added thus reducing the area, making the sled slightly too long.
So you need to determine the open area of the bed & adjust your sled to fit.
View attachment 301772
In this photo we see a lever located to the right rear corner of the bed. This is part of the sled loading/locking system. The lever is pulled to raise a set of rollers.
Then the lever is lowered to lock the sled into position. No idea what that round disc does it may be part of the locking setup.
View attachment 301773
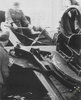
Here we see the hidden details, I didn't have this photo when I first built my sled.
The poor fellows have to man handle the sled up & into the back of the truck bed. They must be very strong men.
The sled's frame rails roll on the two rollers as the sled is pushed/slid into the cargo bed.
The front rollers help to keep everything moving forward., this is why you don't need the other rollers.
Now if the cargo bed doesn't have the loading setup you may need the other rollers to move the sled forward into position.
I don't know if the work shops installed this setup or the trucks came purpose built from the factory as it looks a bit complicated to ask a busy shope to modify the truck beds..
View attachment 301774
What a job it must be to lift the sled & gun.
View attachment 301775
Hee you see the heave-ho, looks like a real nut cracker of a job. Nice detail shot of the sled frame sliding on the rollers..
View attachment 301772
The same image from earlier but showing the end result of the sled in location. You can see that the sled extends to the very rear of the bed.
This would help keep everything secure when traveling over bumpy roads.
I have to go out for a bit & will load my drawing when I return.
Ron
.
Here is a nice overhead shot of the sled. As modelers we tend to get a bit overzealous about a photo.
We try to copy the photo to the exact detail. such as the board size & spacing. Remember that I mentioned that the sled was built by the work shop so they used the materials that they had laying around. What they did follow was the print, as the sled must fit the gun's footprint. Steve mentioned that my drawing was a bit too long to fit his style of cargo bed.
My drawing follows the layout for the sled seen in the photos fitted to a full size floor. Steve's floor has sections of wood blocks added thus reducing the area, making the sled slightly too long.
So you need to determine the open area of the bed & adjust your sled to fit.
View attachment 301772
In this photo we see a lever located to the right rear corner of the bed. This is part of the sled loading/locking system. The lever is pulled to raise a set of rollers.
Then the lever is lowered to lock the sled into position. No idea what that round disc does it may be part of the locking setup.
View attachment 301773
Here we see the hidden details, I didn't have this photo when I first built my sled.
The poor fellows have to man handle the sled up & into the back of the truck bed. They must be very strong men.
The sled's frame rails roll on the two rollers as the sled is pushed/slid into the cargo bed.
The front rollers help to keep everything moving forward., this is why you don't need the other rollers.
Now if the cargo bed doesn't have the loading setup you may need the other rollers to move the sled forward into position.
I don't know if the work shops installed this setup or the trucks came purpose built from the factory as it looks a bit complicated to ask a busy shope to modify the truck beds..
View attachment 301774
What a job it must be to lift the sled & gun.
View attachment 301775
Hee you see the heave-ho, looks like a real nut cracker of a job. Nice detail shot of the sled frame sliding on the rollers..
View attachment 301772
The same image from earlier but showing the end result of the sled in location. You can see that the sled extends to the very rear of the bed.
This would help keep everything secure when traveling over bumpy roads.
I have to go out for a bit & will load my drawing when I return.
Ron
.
G
Guest
Guest
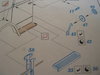
View attachment 301776
The bench drawing. The drawing is sized for the Italeri Opel bed & the Tamiya gun. So it may need a bit of tweaking for the newer kits but probably not much.
View attachment 301777
My rendition @ the time of the sled loaded into my Maultier.
View attachment 301778
The sled dismounted. If you look @ the photos there are a few small details to be added such as the angle iron along the top of the sleds upper rear sides & a few more bolts.
Hope you don't mind Steve for the addition to your blog as it fit in so nice with your great build.
Ron
Mr J
So glad that I found this thread. The master detailer is at work again I see. SUPER impressive work my friend. The interior cab is just striking!! Micropore...would have never thought of that...and now catching up with the rest of the build that you are creating..my oh my... simply FANTASTIC. Can’t wait to see the next phases and will watch to the end for sure.
Mr S
G
Guest
Guest
Brilliant works, I like every bit'n bob of it.
Hi Steve, fantastic work on the additions and sledge. Might I add something although Simon has a point there, I think Eduard has got their drawing wrong, it's not upside down. Judging by Simon's picture the three lips facing up should be bent down just like the one that is facing front. You will need to remove the plastic step cutting flush against the body and mudguard. Attach the PE step to the two sides that were cut flush. Steps on real trucks are stamped steel with the edges bent down to add strength. The bent edges made it appear as if it's thick steeI but it's just sheet metal solded on. I know you've added the jack but I think its still doable.
Cheers,
Richard
Cheers,
Richard
Hi Steve
So much great stuff going on. Love the detail of the PE. The axle alterations are excellent and so glad the sledge has worked out OK. A fine example of mogglin' at its best.
Jim
So much great stuff going on. Love the detail of the PE. The axle alterations are excellent and so glad the sledge has worked out OK. A fine example of mogglin' at its best.
Jim
Hi Everyone
Ron - The wood changes went well. Glad you like em:thumb2:
Marcello - Cheers mate
RonL - Great to have you here and many thanks for sharing all the details on the sledge. Great stuff
Joe - Glad you made it mate. I hope you like the next updates
Guy - Many thanks
Richard - I didnt quite do it your way but the adjustments were made and it looks a lot better. So many thanks to you and Mr T for all your help with the steps
View attachment 302234
Jim - I appreciate the support. It's been good fun
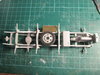
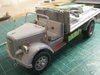
Not much of an update as time has not been on my side this week. Firstly the tow hitch was added along with some chain on the tow pin
View attachment 302236
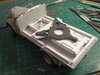
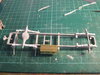
I finally got round to doing the suspension. This is the first time I have ever done them so they aint that great. However I have had great fun doing them and learnt a lot which I can take forward to the next time I do them. Firstly the bands were added using foil strips and rivets
View attachment 302237
These were then bent over and styrene rods added for the bars along with rivets at each end
View attachment 302238
These were then added to the vehicle. I have yet to add the final wire banding's around the attachment areas but these will be done later
View attachment 302240
All the under carriage items were added with no issues
View attachment 302241
So we are nearly there now. Just a couple more bits to add. I am still undecided on how much detailing I will do on the chassis if any at all. I will see how I feel when I sit at the bench next
View attachment 302242
View attachment 302243View attachment 302244View attachment 302245
Thanks for watching
Steve
Ron - The wood changes went well. Glad you like em:thumb2:
Marcello - Cheers mate
RonL - Great to have you here and many thanks for sharing all the details on the sledge. Great stuff
Joe - Glad you made it mate. I hope you like the next updates
Guy - Many thanks
Richard - I didnt quite do it your way but the adjustments were made and it looks a lot better. So many thanks to you and Mr T for all your help with the steps
View attachment 302234
Jim - I appreciate the support. It's been good fun
Not much of an update as time has not been on my side this week. Firstly the tow hitch was added along with some chain on the tow pin
View attachment 302236
I finally got round to doing the suspension. This is the first time I have ever done them so they aint that great. However I have had great fun doing them and learnt a lot which I can take forward to the next time I do them. Firstly the bands were added using foil strips and rivets
View attachment 302237
These were then bent over and styrene rods added for the bars along with rivets at each end
View attachment 302238
These were then added to the vehicle. I have yet to add the final wire banding's around the attachment areas but these will be done later
View attachment 302240
All the under carriage items were added with no issues
View attachment 302241
So we are nearly there now. Just a couple more bits to add. I am still undecided on how much detailing I will do on the chassis if any at all. I will see how I feel when I sit at the bench next
View attachment 302242
View attachment 302243View attachment 302244View attachment 302245
Thanks for watching
Steve
Attachments
-
 IMG_0134.JPG3.3 KB · Views: 0
 -
 IMG_0133.JPG3 KB · Views: 0
 -
 IMG_0132.JPG3.4 KB · Views: 0
 -
 IMG_0131.JPG3.2 KB · Views: 0
 -
 IMG_0129.JPG3.3 KB · Views: 0
 -
 IMG_0127.JPG2.8 KB · Views: 0
 -
 IMG_0126.JPG2.8 KB · Views: 0
 -
 IMG_0103.JPG2.9 KB · Views: 0
 -
 IMG_0125.JPG2.4 KB · Views: 0
 -
 IMG_0135.JPG3.2 KB · Views: 0
- Joined
- Apr 27, 2018
- Messages
- 14,958
1/3
Those springs look the nuts mate I have done these a few times but yours look very good indeed.
Scottie
Scottie
G
Guest
Guest
Hi Steve great work on the spring's and it's really coming together now, the doom rivets are punch out or are they the moulded type?
Pete :thumb2:
Pete :thumb2:
G
Guest
Guest
Cpl Jones.
Your undecided !! We of the under chassis detailing society expect a man of your calibre to add evey rivet, bolt head and more .
Yours .
Dzhon .
Your undecided !! We of the under chassis detailing society expect a man of your calibre to add evey rivet, bolt head and more .
Yours .
Dzhon .
Legal Notice
scalemodelling.co.uk is a privately operated online discussion forum. All content posted by members reflects their own views and opinions and does not necessarily represent those of the forum owners or administrators. While reasonable efforts are made to moderate content, no responsibility is accepted for user-generated material. By using this site, you agree to comply with UK law and the forum rules.