Some positive responses there Jakko.You don’t know how close you are :smiling3:
The REME museum’s archivist, Celia Cassingham, replied to tell me they’ve had that question before and helpfully provided that scan and a link to a page on their web site that also includes the scan above.
This, I think, also explains the oval ring at the front of the left catwalk (that is still missing from my model): that must be a guide for the cable going to the 6-pounder recoil mechanism.
Bovington also got back to me, saying they think they know what bit I mean but asking me to send a photo to make sure, which of course I did. With a bit of luck they will be able to confirm or even explain some more about it.

You are using an out of date browser. It may not display this or other websites correctly.
You should upgrade or use an alternative browser.
You should upgrade or use an alternative browser.
Tim Marlow
SMF Supporters
1/3
I was closer than you think….i read their page on the BARV but never found the page with the explanation…..
So it was used to take the “jerk” out of a light tow then…..makes absolute sense when you know…..
So it was used to take the “jerk” out of a light tow then…..makes absolute sense when you know…..
G
Guest
Guest
It’s one of those things that make sense once you know, but working it out has proved … difficult ")
G
Guest
Guest
With thanks to another modeller, I now have a 6-pounder recoil cylinder from a built Italeri kit that he was happy to take apart:
View attachment 516032
However, something is off somewhere. Compare these two photos:
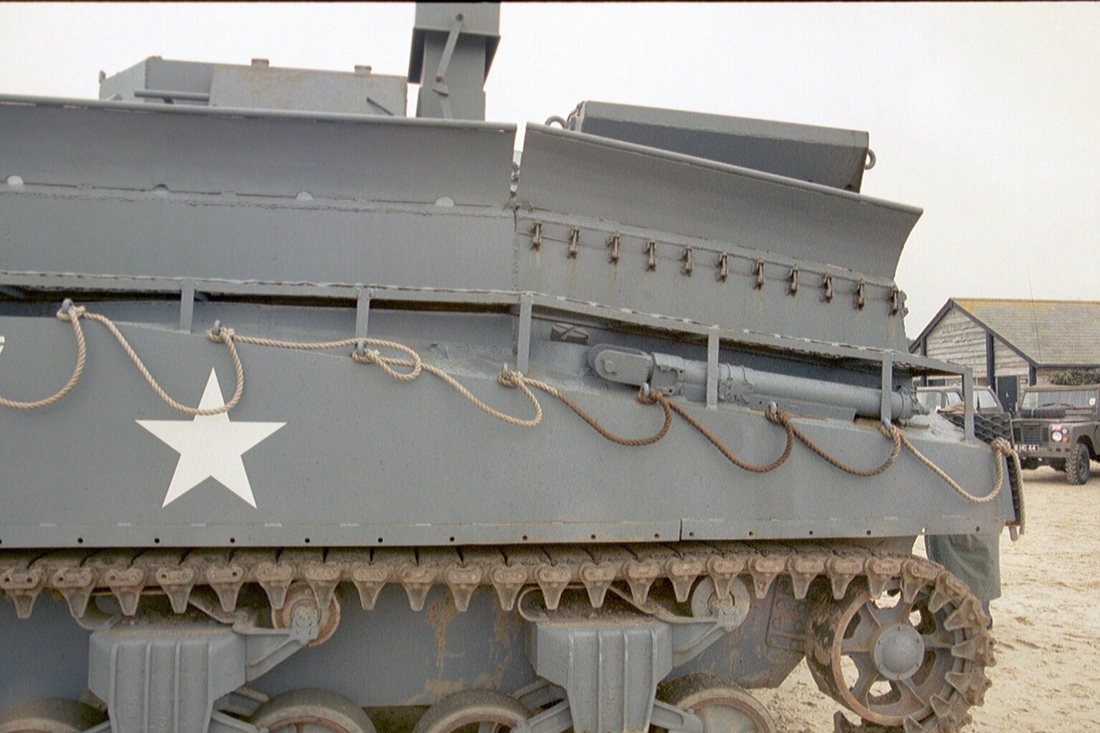
View attachment 516033
That’s an Italeri part with the end cut off where the one on the real vehicle is too, placed in position on the hull side so that its front is approximately where it was on the real one. But the real one ends at the lid you can see on the deck under the catwalk, which is about 25 mm on the model. The Italeri part, though, is 39 mm long … What’s more, you can see that the Italeri part is thick enough that it only just fits under the catwalk, while the real one has plenty of room.
I don’t know what is off here, but it doesn’t seem to be the height of the catwalk (the supports for it are, though, compared to the real one). Did later 6-pounder guns have longer and thicker recoil cylinders than the early ones? Or did Italeri make the part something like 50% oversize?
View attachment 516032
However, something is off somewhere. Compare these two photos:
View attachment 516033
That’s an Italeri part with the end cut off where the one on the real vehicle is too, placed in position on the hull side so that its front is approximately where it was on the real one. But the real one ends at the lid you can see on the deck under the catwalk, which is about 25 mm on the model. The Italeri part, though, is 39 mm long … What’s more, you can see that the Italeri part is thick enough that it only just fits under the catwalk, while the real one has plenty of room.
I don’t know what is off here, but it doesn’t seem to be the height of the catwalk (the supports for it are, though, compared to the real one). Did later 6-pounder guns have longer and thicker recoil cylinders than the early ones? Or did Italeri make the part something like 50% oversize?
Tim Marlow
SMF Supporters
1/3
The catwalk on your kit is certainly shorter than the photo above, the part bay, that goes out over the hull top, is missing and the vertical Stanton spacing appears wrong. However, I’d say the Italeri part also looks well oversized. Perhaps it’s closer to 1/32 than 1/35……
G
Guest
Guest
I figured out what the problem is. It’s not a 6-pounder recoil cylinder, but:—
View attachment 516035View attachment 516036
(source)
… from a 2-pounder The 6-pounder one looks like they simply enlarged the design. I was wrong-footed by someone on Missing-Lynx calling it a 6-pounder one, and then the REME museum’s report extract does too. Or maybe they did test it with a 6-pounder one, but used 2-pounder parts for the production vehicles because those entire guns were surplus to requirements?
View attachment 516035View attachment 516036
(source)
… from a 2-pounder
The 6-pounder one looks like they simply enlarged the design. I was wrong-footed by someone on Missing-Lynx calling it a 6-pounder one, and then the REME museum’s report extract does too. Or maybe they did test it with a 6-pounder one, but used 2-pounder parts for the production vehicles because those entire guns were surplus to requirements?
G
Guest
Guest
Finally made a start on this tonight Here is my current effort in grey and white, together with the previous one in green and white:
View attachment 516349
The reason they look rather different is because the original one’s dimensions were estimated from some of the BARV photos, while the second attempt is based on dimensions kindly taken for me from a real 2-pounder gun by Graeme Stephens.
The base is a length of 3 mm diameter sprue, 31.5 mm long including the domed end (I found a piece with that, so I didn’t have to file it myself), to which I glued a 24 mm length of 3.2 × 1 mm strip. The gap between the strip and sprue was then filled with some 1.5 × 0.25 mm strip, while the left band is 0.25 mm card, 4.5 mm wide and glued against the edge, and the other band is 0.13 mm card, 3.5 mm wide, glued 8 mm in from the edge. I glued 0.25 × 0.5 mm strip around the end to form the edge of the end cap, and also two pieces of that over the second band. Oh, and a 2 mm punched disc on the flat end.
It still needs the smaller detail added, as well as the lugs that the cable could be attached to, but I’ll let this dry first. For now, here it is temporarily in place on the model, because I wanted to see how it looks there:
View attachment 516350
Here is my current effort in grey and white, together with the previous one in green and white:View attachment 516349
The reason they look rather different is because the original one’s dimensions were estimated from some of the BARV photos, while the second attempt is based on dimensions kindly taken for me from a real 2-pounder gun by Graeme Stephens.
The base is a length of 3 mm diameter sprue, 31.5 mm long including the domed end (I found a piece with that, so I didn’t have to file it myself), to which I glued a 24 mm length of 3.2 × 1 mm strip. The gap between the strip and sprue was then filled with some 1.5 × 0.25 mm strip, while the left band is 0.25 mm card, 4.5 mm wide and glued against the edge, and the other band is 0.13 mm card, 3.5 mm wide, glued 8 mm in from the edge. I glued 0.25 × 0.5 mm strip around the end to form the edge of the end cap, and also two pieces of that over the second band. Oh, and a 2 mm punched disc on the flat end.
It still needs the smaller detail added, as well as the lugs that the cable could be attached to, but I’ll let this dry first. For now, here it is temporarily in place on the model, because I wanted to see how it looks there:
View attachment 516350
Hi Jakko
Excellent detective work on the 2 pounder recoil part. A really interesting detail which you’ve replicated well.
The BARV is progressing nicely. I’m looking forward to the finished model
ATB
Paul
Excellent detective work on the 2 pounder recoil part. A really interesting detail which you’ve replicated well.
The BARV is progressing nicely. I’m looking forward to the finished model
ATB
Paul
G
Guest
Guest
Thanks. I suddenly had the inspiration to ask on a forum for people who own and restore the real thing rather than build models of it, and it looks like I was lucky that someone there actually has a 2-pounder stripped apart at the moment
G
Guest
Guest
It’s finished (finally ) after I put in some effort tonight:
View attachment 516386View attachment 516387
The thingies on the rounded cap are plastic strip and rod plus punched discs and hexagons of various sizes, the clasp-type thing on the other end is 0.5 mm plastic card with0.88 mm rod for the pin, and I made the scars where the trunnions were cut off with a torch by applying some putty that I textured with a pointed tool.
) after I put in some effort tonight:View attachment 516386View attachment 516387
The thingies on the rounded cap are plastic strip and rod plus punched discs and hexagons of various sizes, the clasp-type thing on the other end is 0.5 mm plastic card with0.88 mm rod for the pin, and I made the scars where the trunnions were cut off with a torch by applying some putty that I textured with a pointed tool.
G
Guest
Guest
Thanks, guys And to think I thought I wouldn’t need to do much research on this vehicle, just build it straight from the box and we’re good …
And to think I thought I wouldn’t need to do much research on this vehicle, just build it straight from the box and we’re good …
G
Guest
Guest
Last addition before continuing with the paintwork:
View attachment 516441
Simply bent from copper wire and glued in place, then painted grey to match the rest of the model. After that, I got out the airbrush and first sprayed Tamiya XF-81 on the new additions (the mesh behind the bumper and the recoil cylinder, which is still separate), and then lighter grey made by mixing XF-1 flat white into it, on all of the panels etc. No picture of that, though, because I doubt it will show up well in a photo.
G
Guest
Guest
Thanks I would have preferred to take it from a kit to save myself a lot of effort, but the only real choice is the Vulcan one that’s hard to find, expensive, and unbuildable if you take these bits out. So scratchbuilding it had to be …
I would have preferred to take it from a kit to save myself a lot of effort, but the only real choice is the Vulcan one that’s hard to find, expensive, and unbuildable if you take these bits out. So scratchbuilding it had to be …Legal Notice
scalemodelling.co.uk is a privately operated online discussion forum. All content posted by members reflects their own views and opinions and does not necessarily represent those of the forum owners or administrators. While reasonable efforts are made to moderate content, no responsibility is accepted for user-generated material. By using this site, you agree to comply with UK law and the forum rules.