Theme editor

Scale Model Shop

Jim R's AT45 Soviet Artillery Tractor. 1/72 scale TP Model,

Jim
Cracking along nicely there sir 👍. Russians did seem to like ugly vehicles (nothing to do with your modelling though mate). But she ain't the prettiest :eek:. Never built a Russian vehicle Jim, will this be in that Green colour that seems to cause some debate in the matching ?
 
Thread owner
If I get it to the painting stage it will be green. If there's debate I'll just say the green was experimental, as was the vehicle!
 
Starting to beat this into submission now Jim. I would say it’s coming together well, but I think in this case that’s one word too many ;) Still, at least you know why it was only a tenner……
 
Thread owner
A little bit more progress. I've sorted the wheels as best as I can. The fixing of the road wheels looked very iffy so I inserted short lengths of stiff wire.
P1070773.jpg
I cut off the fixing "blobs" and added small pieces of styrene tube to the body and also drilled through the tube into the body to accept the wires.
P1070770.jpg
The bubbles and bad casting will be covered by the road wheels so I'm not too bothered about that.
P1070771.jpg
Next I needed to look at the tracks. The kit provides a few straight resin lengths. Top and bottom, across the 5 road wheels, is a nice straight run. It's the bending round the drive and idler wheels that presents problems.
P1070738.jpg

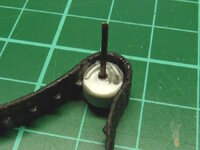
I made a couple of simple jigs and heated a track length with a hair dryer and bent the track around the wheels. I glued the track to the wheels , just at the end of the curve, with 2 part epoxy. I figured that CA would not be secure enough.


P1070784.jpg

So I ended up with these.


The plan is to fit the wheels with their lengths of track in place and cut the track at the top and bottom of the adjacent road wheel and glue the cut ends to the road wheel, again with epoxy. The front to back gap will be a cut to size straight length.

So we will see haw the idea works. I'll do a bit of painting first.

I'm finding it quite a challenge but strangely satisfying.
 
Jim,
I take my hat off to you for A. Taking this all in your stride 👍.
B. Your tenacity and your ingenuity with the wheels and now the tracks. Great modelling skill on show mate 👏 .
 
Thread owner
Thanks for your support. This is the kind of kit that needs positive vibes!

Firstly the good progress. After a fair bit of sanding the canvas top fits onto the load bed.
P1070775.jpg

The load bed actually has a bit of detail and somewhere I've got some 1/72 crates which I can fit in.
P1070777.jpg
It looks as if the canvas had a roll up panel.
P1070776.jpg
P1070781.jpg
Using a wet wipe type tissue, masking tape and some PE buckles I made the rolled up canvas.
P1070782.jpg

Cut out the 'door' and now it should be possible to see a bit inside. I'll have to fill the air bubble.
P1070792.jpg

Next post far less good :rolleyes:
 
Thread owner
Now the bodge/c***-*p

The drive and idler wheels were no good. There was just not enough contact area to fasten to the tracks. I tried to soften the track for a better fit around the idler but only succeeded in ruining the wheel!! I scavenged some Sherman wheels, drilled holes, (only 6 not the correct 10) and fitted the outer rim to a section of styrene tube.
Top right, the ruined wheel, with a replacement below.
P1070789.jpg

Because the replacement wheel is solid I cut off some of the track teeth. This gave a far bigger contact for glue.
P1070795.jpg
P1070788.jpg
Put a wire in the back to give strength when fitting to the body.
P1070794.jpg
P1070793.jpg

I did similar for the drive wheels. I rescued the kit outer parts, cut a section of tube and used a styrene collar to correct the diameter, filled the centre with a bit of wooden knitting needle and stuck in a bit of wire.
P1070790.jpg
P1070791.jpg
P1070796.jpg

Certainly not accurate as the wheels are solid with no gap for the track teeth but at this scale it may not be too obvious - hopefully. Looks a mess in these large photos but with a bit of clean up and some paint it should pass.

Thanks for your kind posts. It's been close to the bin a few times but it's still got a chance :)
 

Attachments

  • P1070794.jpg
    P1070794.jpg
    127.7 KB · Views: 0
Jim,
I take my hat off to you for A. Taking this all in your stride 👍.
B. Your tenacity and your ingenuity with the wheels and now the tracks. Great modelling skill on show mate 👏 .

Seconded emphatically!
I take back what I said at the beginning of this thread about the 'bogeyman' fear of resin models...
This is a card-carrying horror and you are seriously licking it into shape.
Much respect sir!
 
Thread owner
Once again I really appreciate your posts - helps me to carry on with this $%£"& of a kit.
I now have the idler and the drive wheels fitted, also the adjacent road wheel. Plus a short length of track . Stuck solid , I hope, with two part epoxy and CA. Could be awkward to paint but it had to be.
P1070800.jpg
Three road wheels to fit each side and a top and a bottom straight length of track.

I also made the grab handles for each side of the cab. Nothing in the kit but clearly shown in the picture.
P1070738.jpg
P1070801.jpg

Thanks again.
 
Second that, your patience will turn this kit into a fine model Jim 👍 looking forward to the next update. Goodluck
 
Back
Top