Theme editor

Scale Model Shop

Joe's 1/72 Hasegawa Panavia Tornado GR.1

Status
Not open for further replies.

flyjoe180

SMF Supporters
Joined
Jan 18, 2012
Messages
13,283
Reaction score
1,081
Points
113
1/3
Thread owner
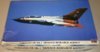
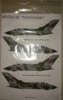
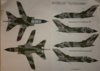
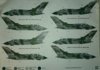
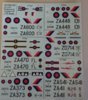
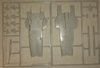
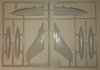
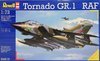
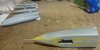
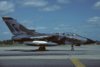
The second Tornado I'll build for this GB. Again just a box top shot for this one, sprue shots etc to come later. The decals are off-white and old so the DERA scheme is out. I conveniently have to hand Airdecal sheet 7225 and would like to complete this as ZA541 in No.617 Squadron markings as seen in 1982.
View attachment 288773

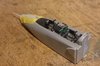
View attachment 288774
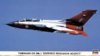
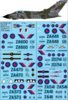
View attachment 288775
 

Attachments

  • boxtop.jpg
    boxtop.jpg
    2.1 KB · Views: 0
  • decal 7225.jpg
    decal 7225.jpg
    3.8 KB · Views: 0
  • Panavia_Tornado_GR1,_UK_-_Air_Force_AN1096659.jpg
    Panavia_Tornado_GR1,_UK_-_Air_Force_AN1096659.jpg
    2 KB · Views: 0
Nice choice Joe. I intend doing my 1/32 in this RAF wrap around camo.I remember when the Tornado was under developement it was called the MRCA . Multi Role Combat Aircraft. Or as the RAF called it at the time 'More Refurbished Canberras Again'.
 
The 17sqn markings are quite eye catching though, eh?

I will probably do a 617 jet - it's an act of penance in a way. Our fast junk flying neighbours at Lossiemouth unwisely left their mother beautiful lightning bolt flag fluttering in the, not so gentle, breeze that blasts the Moray Firth coast over the weekend. Perhaps they forgot or just assumed that because those other Tonka driving rascals from the other side of the runway don't work at weekends their pride and joy would be safe from being snaffled - wrong!
One of those naughty riggers (and an easily led (aren't they all) sooty) from the tireless and dutiful squadron of Mallard adorned yellow whirly birds across the road from the HAS site rescued it from breezy oblivion and secured it in the warmth of our bosom (the Sqn tea bar) on one Sunday afternoon.
617 Sqn were lucky, on a previous detachment to Lossiemouth the crew of the Puma I was with seriously wanted to steal the upkeep mine (bouncing bomb), that acted as their HAS site gate guardian. After the loadmaster crunched some numbers on the back of a butty box lid he concluded that it was probably too heavy to fly it back to Northern Ireland as an underslung load. Given that the IRA had recently called a ceasefire the vision of the RAF flying a bouncing bomb over Ulster dangling from a helicopter was also a discouragement....and the fact that we didn't have a sling anyway.

Oh, how we laughed.
 
Thread owner
The 17sqn markings are quite eye catching though, eh?
Didn't think they were that flash to be honest Rick, some sort of affiliation there for you?

I'm doing 617 because it'll sit beside my Dams Raid Lancaster later.

Great tale by the way, love those sorts of stories.
 
Thread owner
My box (same as representative shot at start of the build thread but beaten up a little):
View attachment 290007

Inside you get a Hasegawa Tornado IDS/GR Mk.1 instruction sheet, with all the paints and markings referred to being that of the wrap-around Tornado and not the DERA version.
View attachment 290008

View attachment 290009

The kit has a separate sheet for the DERA scheme. Here also are the kit decals (yellower than they appear in the photo)
View attachment 290010

View attachment 290011

As mentioned previously, I'm replacing the kit markings (cockpit and stencils can be ustilised) with Airdecal sheet 7225, specifically the wrap around No.617 SQN version
View attachment 290012

View attachment 290013

View attachment 290014

View attachment 290015
 

Attachments

  • DSC_0002.JPG
    DSC_0002.JPG
    1.9 KB · Views: 0
  • DSC_0003.JPG
    DSC_0003.JPG
    2 KB · Views: 0
  • DSC_0004.jpg
    DSC_0004.jpg
    2.3 KB · Views: 0
  • DSC_0005.JPG
    DSC_0005.JPG
    2.4 KB · Views: 0
  • DSC_0006.JPG
    DSC_0006.JPG
    2.4 KB · Views: 0
  • DSC_0007.JPG
    DSC_0007.JPG
    2.2 KB · Views: 0
  • DSC_0008.JPG
    DSC_0008.JPG
    2.4 KB · Views: 0
  • DSC_0009.JPG
    DSC_0009.JPG
    2.5 KB · Views: 0
  • DSC_0010.JPG
    DSC_0010.JPG
    3.9 KB · Views: 0
Thread owner

Attachments

  • DSC_0014.JPG
    DSC_0014.JPG
    1.4 KB · Views: 0
  • DSC_0015.JPG
    DSC_0015.JPG
    2.2 KB · Views: 0
  • DSC_0016.JPG
    DSC_0016.JPG
    1.3 KB · Views: 0
  • DSC_0013.JPG
    DSC_0013.JPG
    1.7 KB · Views: 0
  • DSC_0012.JPG
    DSC_0012.JPG
    1.8 KB · Views: 0
  • DSC_0011.JPG
    DSC_0011.JPG
    1.8 KB · Views: 0
Thread owner
Off topic briefly; I scored this:
View attachment 293772
Rick, I'll get a 17 SQN ride done at a later date ;)

Onwards to the Hasegawa Tornado GR1.

Not much to report so far. The start was pretty much getting the interior ready for gull grey spray at the same time as the Italian IDS. I will say however from a kit perspective, the Hasegawa has much, much finer detail and looks to be a good fit. Hasegawa split the forward fuselage vertically and the main fuselage horizontally.

View attachment 293773

The ejection seat outer parts have been sprayed. The instrument panels are dry fitted in the picture above, for convenience of spraying. Hasegawa kindly provided nice looking decals for the instruments and screens. The detail on the panels is raised, so we'll see how that works out, otherwise it'll be a hairy brush bonanza.
 

Attachments

  • 04619 boxtop.jpg
    04619 boxtop.jpg
    3.2 KB · Views: 0
  • DSC_0017.JPG
    DSC_0017.JPG
    2.1 KB · Views: 0
Thread owner
No pics again but to update the build progress, the cockpit tub is assembled, the instrument panel decals applied, and now painting/detailing the seats. Unlike the Italeri offering this Hasegawa is very refined and nice to build. Will update pics when opportunity allows.
 
Thread owner
Thanks Ian. It looks better in reality. Now having issues getting the front cockpit fuselage halves to mate with the cockpit inserted. Seems this is a common issue for the Hasegawa 1/72 Tornado...
 
Thread owner
The cockpit saga continued:

View attachment 297649

This is the big pitfall of this kit. If you line up the tub and fix it in place on one side first, remove the guides on the other side, you get a reasonable, but not perfect, fit. Filler will be required, but care will be needed to ensure the nose section mates with the rear fuselage without too much of a step.
 

Attachments

  • DSC_0020.JPG
    DSC_0020.JPG
    1.7 KB · Views: 0
Thread owner
Some filler was required around the nose and nose wheel landing gear areas:

View attachment 300327

View attachment 300328

Happily the nose fits nicely onto the aft fuselage. The wings fit nicely (they are movable but seeing as there is no way of swinging the pylons they'll be presented fully forward on this one, but with the ability to sweep the wings for storage on the shelf.
View attachment 300329
 

Attachments

  • DSC_0021.JPG
    DSC_0021.JPG
    1.9 KB · Views: 0
  • DSC_0022.JPG
    DSC_0022.JPG
    2.4 KB · Views: 0
  • DSC_0023.JPG
    DSC_0023.JPG
    2.3 KB · Views: 0
Thread owner
I caught the dropping your build onto the floor yesterday, this a victim of the box episode explained in my Italeri Tornado thread. The wing roots and some other, more minor repairs completed. It came off suprisingly well considering the state of another kit I had resting there.

Primed and ready for painting once I sand back the wing root repairs. The weapons are also ready for paint.
View attachment 303194
 

Attachments

  • DSC_0024.JPG
    DSC_0024.JPG
    1.9 KB · Views: 0
Joe

Just found your build and had a very interesting read through. Looks like you are back on track now so I wish you all the best with the wet stuff

Steve
 
Thread owner
Black areas masked off. I've also dealt with e exhausts and rear metallic areas since this was taken. Like a few others here, I'm struggling with aspects of the two Tornado builds I've got going on.

View attachment 308914
 

Attachments

  • DSC_0026.JPG
    DSC_0026.JPG
    1.7 KB · Views: 0
Status
Not open for further replies.
Back
Top