Theme editor

Scale Model Shop

Joe's 1/72 Lightning F2A Airfix 1/72

Status
Not open for further replies.

flyjoe180

SMF Supporters
Joined
Jan 18, 2012
Messages
13,275
Reaction score
1,081
Points
113
1/3
Thread owner
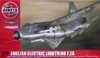
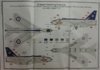
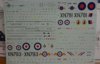
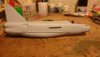
This is my Lightning entry for the GB next year. Looking to complete it in the natural metal finish with the blue tail. Will post sprue shots etc later.


View attachment 264217
 

Attachments

  • EE Lightning boxtop.jpg
    EE Lightning boxtop.jpg
    2.5 KB · Views: 0
Thread owner

Attachments

  • DSC_0034.JPG
    DSC_0034.JPG
    1.9 KB · Views: 0
  • DSC_0035.JPG
    DSC_0035.JPG
    2.2 KB · Views: 0
  • DSC_0036.JPG
    DSC_0036.JPG
    2.1 KB · Views: 0
Thread owner
Looking forward to 1st July and starting the Lightning. It seems from my Phantom GB that I'm a month ahead of myself!
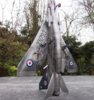
 
I built one of those. It was a great kit. Here it is doing a space ship impression. Everyone who builds a Lightning has to do this pic, it's the law.
View attachment 282258
 

Attachments

  • underside.JPG
    underside.JPG
    3.5 KB · Views: 0
Thread owner
I'll be starting my Lightning soon! After this week I'll have some time to model again. Back to the fluorescent sky next few days...
 
Thread owner
I've made a start, no pics as yet. I've assembled the basic cockpit and intake trunking and have found the same fuselage fit issues that others have discovered. I filed the trunking down and sanded the rear of the trunking so it fits flush with the nose ring. However with the cockpit base in position it pushes the underside of the nose area apart. I've tried trimming the cockpit tub sides and the ejector pin marks as Patrick did, but the issue remains. Any ideas? Keep sanding and trimming? I've read Rick's link here http://www.scale-models.co.uk/threads/ricks-airfix-1-72-english-electric-lightning-f6.24710/
 
Try painting the inside of the fuselage and with the paint still wet join the two halves together then carefully take apart again (no glue), if there are high spots the paint will transfer to the intake trunk and guide you where to concentrate on any sanding or material removal. Repeat as neccessary.

HTH
 
Thread owner
Keep at it Joe , Im sure youll sort it , nothing good ever came easy eh?:(

Reckon I've got it sorted now, sanded and filed all afternoon until I had as Colin described, a tight dry fit.

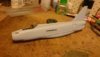
That sounds familiar. It fits eventually, but it is still quite tight.

Think I've achieved a fit which can best be described as tight.

Try painting the inside of the fuselage and with the paint still wet join the two halves together then carefully take apart again (no glue), if there are high spots the paint will transfer to the intake trunk and guide you where to concentrate on any sanding or material removal. Repeat as neccessary.

Cheers Rick. As above, I've thinned the trunking and cockpit tub to a point where I get a tight dry fit. Great method though, I'll use it prior to joining the halves.

Thanks guys, now I feel confident I can priceed worth some detail painting and get the fuselage assembled soon.
 
Im surprised this newish kit has fit issues. The older Airfix 1/48 kit I built a few years ago went together very well.
 
Thread owner
Im surprised this newish kit has fit issues. The older Airfix 1/48 kit I built a few years ago went together very well.
The kit's issues are well documented. Nothing that can't be solved but undesirable in a new-gen kit.
 
Thread owner
I bashed and sanded and filed and filled. With not a little cursing, I've got the fuselage buttoned up, the nose ring flush and the belly inserts sorted.

View attachment 285427

View attachment 285428

Next mission will be the cockpit IP coaming. Dry fitting shows a large gap and it doesn't sit flush with the cockpit sides. Careful dry fitting of the canopy will be required to ensure no further issues.

The wings will require some packing at the roots. One wing wants to droop and the other won't sit flush with the fuselage side.

Apart from those items it looks a good or so far!
 

Attachments

  • DSC_0019.JPG
    DSC_0019.JPG
    2.2 KB · Views: 0
  • DSC_0021.JPG
    DSC_0021.JPG
    2.2 KB · Views: 0
Thread owner
Cheers Ian. The IP coaming fits okay after testing with the canopy. It seems to sit atop the IP panel rather than aside it.

I've since installed the air brake panels and the gun nose gun panels. The air brakes required a very small thin base (I used tape) to elevate them flush with the fuselage. Wings next.
 
Status
Not open for further replies.
Back
Top