
You are using an out of date browser. It may not display this or other websites correctly.
You should upgrade or use an alternative browser.
You should upgrade or use an alternative browser.
Joe's 1/72 Revell Sea Hurricane IIC
- Thread starter flyjoe180
- Start date
- Status
- Not open for further replies.
Great choice Joe , this one is in my stash too and is on a list of contenders , its a great little kit . I still havent decided what to do for this one , although I'm still waiting for the postie to bring 2 kits that will be on the list .cheers tony
Thanks Tony. Apologies for the delay, our internet went down yesterday and still isn't quite right.
I have two of these, so I am going to do the FAA camouflage (760 SQN) version now and the white one later (I have an Xtradecal D-Day sheet which has another white Hurricane from the same unit on it with invasion stripe options).
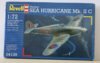
Box: End-opening type (boo). I really like this art work, it has since been superseded by new art and a new set of markings but is the same kit:
View attachment 95656
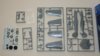
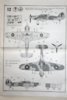
The Parts: Date stamped 1998 inside, not bad with recessed lines and fine detail. Landing gear wheel wells look to be very nicely done. A little flash around the edges of smaller pieces. Canopy and propeller are probably the let downs for this otherwise good looking kit, but are good enough to pass I reckon. Decals are nicely printed with the roundels having individual centres. The red looks a little too dark, otherwise all good.
View attachment 95657
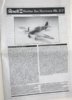
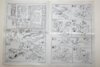
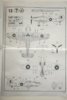
Instructions: Printed on '1980s-style comic book paper'. Folded into A5 size, there are only two pages of actual building and two pages of decal placement and painting guides. Some of those build steps are going to be altered I feel.
View attachment 95658
View attachment 95659
View attachment 95660
View attachment 95661
Will make a start soon and report back. Thanks for looking in")
View attachment 208679
View attachment 208680
View attachment 208681
View attachment 208682
View attachment 208683
View attachment 208684
I have two of these, so I am going to do the FAA camouflage (760 SQN) version now and the white one later (I have an Xtradecal D-Day sheet which has another white Hurricane from the same unit on it with invasion stripe options).
Box: End-opening type (boo). I really like this art work, it has since been superseded by new art and a new set of markings but is the same kit:
View attachment 95656
The Parts: Date stamped 1998 inside, not bad with recessed lines and fine detail. Landing gear wheel wells look to be very nicely done. A little flash around the edges of smaller pieces. Canopy and propeller are probably the let downs for this otherwise good looking kit, but are good enough to pass I reckon. Decals are nicely printed with the roundels having individual centres. The red looks a little too dark, otherwise all good.
View attachment 95657
Instructions: Printed on '1980s-style comic book paper'. Folded into A5 size, there are only two pages of actual building and two pages of decal placement and painting guides. Some of those build steps are going to be altered I feel.
View attachment 95658
View attachment 95659
View attachment 95660
View attachment 95661
Will make a start soon and report back. Thanks for looking in
View attachment 208679
View attachment 208680
View attachment 208681
View attachment 208682
View attachment 208683
View attachment 208684
Attachments
")
A few notes for anyone building this kit.
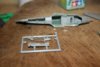
1. The wing construction: Revell provide the wings in five parts. Two lower halves, two upper halves and a centre section that mates to the fuselage (see sprue shots). It turns out the best way to fit these is to disregard the instructions. Fit the centre section first, then glue the upper halves to the fuselage and centre section. Then fit the lower halves. This will remove the ugly step that I found myself facing. I will definitely do things differently on the second kit of this model I have.
2. Catapult spools: The Sea Hurricane IIC variant was a navalised version of the land based Hurricane IIC. They were intended for use of aircraft carriers and as a result have a hook system but lack any catapult spools, despite what other builds you may discover online may tell you. This is from the Fleet Air Arm website:
Mk I One Hurricane Mk I conversion; Catapult spools and arrester hooks
Mk IA 50 Hurricane conversion; catapult spools only; specially produced for CAM fighter scheme - launched from CAM ships
Mk IB 300 Mk I (merlin III) and 25 Mk IIA series 2 conversions; Catapult spools and arrester hook (MAC-ship service)
Mk IC Hurricane Mk I conversion with four-cannon wings; catapult spools and arrester hook
Mk IIC Arrester hook and naval radio equipment
Mk XIIA Canadian built navalised Mk XII, with Packard Merlin XXIX engine
3. Fuselage: Lacks the area forward of the fuselage that fits under the rear of the canopy section. I haven't bothered to correct it but if you wanted accuracy then you will need to scratch build this area.
4. Canopy: Revell, in their infinite wisdom, have moulded the framing of the main canopy inside the part. This will make for interesting painting. Masking may be out of the question unless you want to buy a mask set. I think I may either experiment with painted decal paper or hand paint using tape strips, one painful frame at a time.
5. Filling: The fuselage fits nicely and only a small amount of filler is required. However the wings require much filling and sanding due to me following Revell's instructions (see above). The radiator and oil cooler will require some filling. The fit of the main radiator to the fuselage underside is poor; I have cut the tab off and got more of a flush fit from it but some filling is required. The rear lower fuselage which contains the hook mechanism fits okay but requires some touch ups. Other builds note that the fit of this part is poor, but I don't think it's that bad. Ironic considering the mess I made of the wing fit.
I have a basic airframe assembled. Once filling and sanding is complete I will post some pictures. Hopefully these brief notes might help someone who intends to build one of Revell's Mk II Hurricanes.
I've ordered some clear decal paper and have decided to use painted decal strips for the canopy. That way the painted decal can be varnished to the same finish as the airframe, something that would be very difficult with brush painted application. I also don't fancy masking on a smooth surface and having any missed framing underneath showing through. It will also come in useful in the future. At least that, and the other various items I purchased at the same time, is my excuse for a quick online splurge
Been rather slow updating this build as our internet connection has been playing up, and work commitments saw me out of town for a while.
I decided to build the second of these kits alongside this GB entry. I'll update photos and progress tomorrow.
Regarding the wing construction, I can confirm that the method of fitting the centre section first, then the upper halves followed by the lower wing halves, definitely works. Disregard Revell's instructions when you build this, it saves an awful lot of filler and time. You also get the correct dihedral using this method.
The GB build is painted and almost ready for a gloss varnish coat. The second build is in a similar state but I'll cover it in a general build thread later.
G
Guest
Guest
Looking forward to seeing this build Joe!
Update time! As I said I am also building the second of these kits in the white scheme alongside this, but it'll appear in a general build thread of it's own.
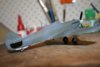
The cockpit was completed and painted using only the kit parts. It's basic but adequate and there won't be much seen in the end anyway. Fuselage zipped up:
View attachment 100528
View attachment 100529
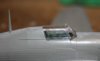
The rear fuselage plug which contains the hook mechanism.
View attachment 100530
As already stated I followed the instructions for this build and the result was an ugly step requiring surgery, filling and sanding. If you happen to check out the second build when I get it up you'll see the big difference:
View attachment 100531
View attachment 100532
View attachment 100533
All fixed and arrestor hook mechanism panel fitted:
View attachment 100534
View attachment 100535
View attachment 213551
View attachment 213552
View attachment 213553
View attachment 213554
View attachment 213555
View attachment 213556
View attachment 213557
View attachment 213558
The cockpit was completed and painted using only the kit parts. It's basic but adequate and there won't be much seen in the end anyway. Fuselage zipped up:
View attachment 100528
View attachment 100529
The rear fuselage plug which contains the hook mechanism.
View attachment 100530
As already stated I followed the instructions for this build and the result was an ugly step requiring surgery, filling and sanding. If you happen to check out the second build when I get it up you'll see the big difference:
View attachment 100531
View attachment 100532
View attachment 100533
All fixed and arrestor hook mechanism panel fitted:
View attachment 100534
View attachment 100535
View attachment 213551
View attachment 213552
View attachment 213553
View attachment 213554
View attachment 213555
View attachment 213556
View attachment 213557
View attachment 213558
Attachments

Revell's nice canopy with a rear view mirror fitted, but unfortunately the framing is moulded inside the cockpit:
View attachment 100536
Masked and primed. As I'll be using printed decal paper later the canopy was covered:
View attachment 100537
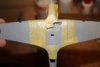
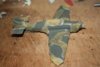
After Sky (Humbrol 90) was applied to the undersides, the first coat of Dark Sea Grey (Humbrol 27):
View attachment 100538
Masked up with Bluetac and tape, and Dark Slate Grey sprayed on (Humbrol 224):
View attachment 100539
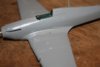
The result. A bit of tidying up to do and cannons to be fitted:
View attachment 100540
View attachment 213559
View attachment 213560
View attachment 213561
View attachment 213562
View attachment 213563
View attachment 100536
Masked and primed. As I'll be using printed decal paper later the canopy was covered:
View attachment 100537
After Sky (Humbrol 90) was applied to the undersides, the first coat of Dark Sea Grey (Humbrol 27):
View attachment 100538
Masked up with Bluetac and tape, and Dark Slate Grey sprayed on (Humbrol 224):
View attachment 100539
The result. A bit of tidying up to do and cannons to be fitted:
View attachment 100540
View attachment 213559
View attachment 213560
View attachment 213561
View attachment 213562
View attachment 213563
Attachments
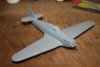
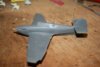
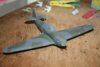
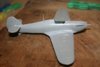
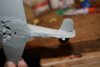
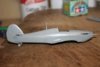
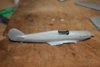
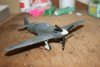
Jump forward a week or so later and wheels, propeller, cannons, exhausts fitted and some small touch ups completed:
View attachment 100541
View attachment 100543
Waiting for the paint to dry then it's off to the gloss coat stage.
View attachment 213564
View attachment 213566
View attachment 100541
View attachment 100543
Waiting for the paint to dry then it's off to the gloss coat stage.
View attachment 213564
View attachment 213566
Attachments
- Status
- Not open for further replies.
Legal Notice
scalemodelling.co.uk is a privately operated online discussion forum. All content posted by members reflects their own views and opinions and does not necessarily represent those of the forum owners or administrators. While reasonable efforts are made to moderate content, no responsibility is accepted for user-generated material. By using this site, you agree to comply with UK law and the forum rules.