Theme editor

Scale Model Shop

Kursk. II S.S. Panzer corps slowly claw their way toward Obayan

Status
Not open for further replies.
Paul your figure painting skills are of the highest order my friend most beautiful you have a talent there and if the rest turns out this well iam very keen to ses this develop further, very well done indeed my hat is off to you sir.

scott
 
Thread owner
Thanks guys for the comments it means a helluva lot.

Graham: I know you don't need any help with your figure painting, although you do seem to have quite a few to complete! How many is it exactly?!

I've got 9 altogether and the one I've nearly finished took me a week and a half! 4 months doesn't seem that long a time period now does it!!!

Ron, Tony, Martin - thanks again for the support. The encouragement here helps to maintain the enthusiasm levels! I hope that my comments do the same for you.

Paul

Ps. For the next part of the build I'm concentrating on the diorama base!!!? as I need this in place for parts of the build later on.
 
Thread owner
Cheers Scott

I was writing my previous reply when you made the last post. Thank you too and I do hope that when you've finished your masterpiece Dora you'll have time to join us.

All the best

Paul
 
I dare not count them at this stage Paul but it is around 16 I think. I am getting the vehicles done up to the weathering stage first as I need to shuffle them around on a base board to get my positions right before I plan out the landscape. At that point I will decide which if not all to use.
 
\ said:
OK Paul, I have posted all my figures to you to paint and I have included a couple of quid to buy yourself a pint for doing them. Don't tell anyone else on the forum so that when they see them they will all think I am a genius.Just superb mate, really good.
Yes, Yes what Graham just said. I'll pay you in oil........... Just kidding, Jeff (in USA)
 
wow paul!! that figure sure turned out great! you've got alot of fine detail in there. i really like your camo smock and helmet. can't believe you've got 9 to do! and graham too, 16! thats heavy backbreaking work. i've almost finished the 4 of mine and i think my spine's gone funny.

well paul, if they all turn out like that wee bad-boy then this is gonna be a dio to see. can't wait.
 
That figure is simply amazing. Great job. Cant wait to see the rest now. Great work.

Kresten.
 
Thread owner
Thanks guys for the kind comments. I'm really glad you like the figure I'll try my best with the others and hopefully the dio will come together ok.

I am glad I'm only doing the 9 though and not 16 as Graham is! (although he may omit a few). Having said that, I do think figures add a great deal to a diorama and add a lot to 'the story' of the piece.

Cheers

Paul
 
Thread owner
Hi everyone

I've got some updates on the Kursk dio...

After completing the first figure I turned my attention back to the base as I need the terrain complete before I can complete the tank.

First I stuck the layers of foam board on to the MDF base using PVA glue. At this stage I also shaped the foam a bit using a hot wire.

View attachment 17181View attachment 17182

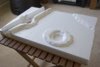
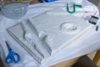
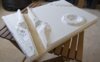
After this dried I covered the base with a layer of plaster bandages - this will provide a firm base for the rest of the layers. I was careful to make sure that the bandages closely followed the contours of the trench as I didn't want the shape 'softened' too much. The contraption on the right of the photo is the hot wire.

View attachment 17183

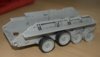
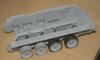
With this drying I continued with the T-34 suspension I started last night. Now the AFV Club kit has 'working' suspension and I intend to use this to full effect in the dio. This is the reason I need the base first so that I can conform the suspension to the terrain. The build went together without too much bother, the only amend I made to the suspension was to shorten one suspension rod to enable the arm to fully depress right up to the suspension stop. The reason for this will become clearer later in the build but is to do with 'knocked-out' portion of the tank. I built up the wheels so that I could position the tank on the base once dry. You may notice that some of the tyres are missing, this is again part of the 'knocked-out' build as I wanted some of the tyres burnt off the rims (it is fantastic luck that this kit actually has separate tyres!)

View attachment 17184View attachment 17185

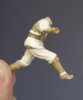
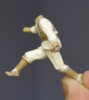
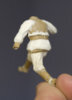
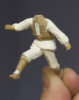
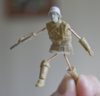
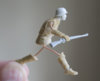
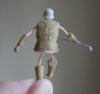
I decided I didn't like figure 1 - it just didn't seem animated enough, so I decided to turn him into the soldier leaping the trench. This obviously involves a lot more alts to the figure than the NCO but I was encouraged by the previous effort so, what the hell!!!

I cut his limbs through the joints and drilled into them inserting copper wire. I had to fill the body once I'd cut into it because the torso was hollow at the top of the legs. Once this was dry I was able to drill it and insert the legs. Further details will be added but this is the basic structure. Obviously he's looking a bit skinny at the mo and really needs to hit the gym but I'll bulk him out once I've ensured the pose looks right on the base.

View attachment 17186View attachment 17187View attachment 17188

...one last thing...

I built up 1 of the tracks from the working set last night - what a dull task that was. Built this in front of the telly watching Uruguay v Holland to relieve the boredom!!!

I have to say they do look good though and are necessary for what I have in mind for the dio.

...and that's about it for now...

Cheers

Paul

View attachment 25148

View attachment 25149

View attachment 25150

View attachment 25151

View attachment 25152

View attachment 25153

View attachment 25154

View attachment 25155

View attachment 137674

View attachment 137675

View attachment 137676

View attachment 137677

View attachment 137678

View attachment 137679

View attachment 137680

View attachment 137681
 

Attachments

  • Foam Base01.jpg
    Foam Base01.jpg
    2.3 KB · Views: 0
  • Figure01alt01.jpg
    Figure01alt01.jpg
    2.9 KB · Views: 0
  • Figure01alt02.jpg
    Figure01alt02.jpg
    2.5 KB · Views: 0
  • Figure01alt03.jpg
    Figure01alt03.jpg
    2.6 KB · Views: 0
  • T34 Suspension02.jpg
    T34 Suspension02.jpg
    1.8 KB · Views: 0
  • T34 Suspension01.jpg
    T34 Suspension01.jpg
    1.9 KB · Views: 0
  • Plaster Base01.jpg
    Plaster Base01.jpg
    2.5 KB · Views: 0
  • Foam Base03.jpg
    Foam Base03.jpg
    2.1 KB · Views: 0
Paul, blinking awsome stuff again matey, that fig is ganna look brill when complete bud. Loving the start of the dio as well. All the best mate, Martin :-)
 
thats some insane work there paul! your completely re-making that figure. thats fantastic stuff.
 
Thread owner
Thanks for the comments guys

Bobby - I'm blaming the individual link tracks for my insanity (thankfully both sides are done now!):lala:

Martin - if all goes well I'm going to try and make this year's Euromilitaire, I know you mentioned you we're going.

Cheers

Paul
 
Brilliant stuff paul, the reworking of the figure is really admirable, pushing yourself to see what can be done, i cant applaud your attitude enough! Cant wait to see him when hes put on a bit of weight! cheers tony:terrific:
 
\ said:
Thanks for the comments guysBobby - I'm blaming the individual link tracks for my insanity (thankfully both sides are done now!):lala:

Martin - if all goes well I'm going to try and make this year's Euromilitaire, I know you mentioned you we're going.

Cheers

Paul
Will be brilliant if you can make it bud, dont know if you have visited their website, well worth it. There will be a beer waiting for ya at the show mate...all the best Martin :-)
 
Hiya Paul, those figures are top class, love the oakleaf camo looks so real. See the T34 coming along nicely as well they are absolutely great kits.

This is gonner be a fantastic!

Cheers

Ade
 
Thread owner
Thanks Ade, I'll be following your build of the AFV club T-34 with interest - you've made a great start.

Tony - thanks for the support. If 'skinny' turns out ok then I think I'll have the confidence to tackle most figure mods but I don't want to get in front of myself - I'll just see how this goes first.

Martin - If I manage to get to Euromilitaire we should definitely meet for a drink. I have been once before, it's a great event with some breathtaking models. Be warned though your credit card may take a bit of a hammering when you get to the retail stalls!!!

Cheers

Paul
 
Im already popping me spare money in a jar for this show bud. Ive paid for me accomidation x2 nights...its ganna be a blast :-)
 
Ita always a pleasure taking delivery of goodies like these from the postie :-)
 
Thread owner
After a busy week not much progress I'm afraid...

'Skinny' (Figure 1 from the original line-up) has put on some weight though.

This is a list of the modifications to the figure:-

Removed his head and hands these have been pinned and will be added later

Hollowed out the sleeves

Given the smock cinched sleeves

Added smock over tunic

Enhanced the collar

Added tie placket on front of smock

Altered feet to better reflect movement

... and obviously the positioning of the limbs...

Here he is so far..

View attachment 17357View attachment 17358View attachment 17359View attachment 17360

There's still quite a bit of work to do on him yet - tidying up the putty work, repairing the hole in the sleeve (went a bit crazy when hollowing the sleeves out!) and adding the straps (from lead foil) and the equipment.

And then it's time for a splosh of paint...

I'm not going to bother posting all the mods on the figures (unless someone desperately want's me to) as i think it will be a bit monotonous. I'll just post all the German figures when finished. I may post the Russian soldiers as these again will require a bit of work to get natural deceased poses that fit into the diorama well.

The only other thing I've done on the dio is edge the base just to make it look 'nice' as it will get a wood veneer toward the end to finish it off.

...and that's about it for now...

Cheers

P

View attachment 25283

View attachment 25284

View attachment 25285

View attachment 25286

View attachment 137809

View attachment 137810

View attachment 137811

View attachment 137812
 

Attachments

  • Figure01 alt01.jpg
    Figure01 alt01.jpg
    2.5 KB · Views: 0
  • Figure01 alt03.jpg
    Figure01 alt03.jpg
    2.8 KB · Views: 0
  • Figure01 alt04.jpg
    Figure01 alt04.jpg
    2.5 KB · Views: 0
  • Figure01 alt02..jpg
    Figure01 alt02..jpg
    2.9 KB · Views: 0
Status
Not open for further replies.
Back
Top