Theme editor

Scale Model Shop

Liberation, Italy 1944

Top notch diorama WIP Tim,:thumb2: it's always a pleasure to see a well planned dio in the making. The end execution has been just amazing with textures and detail well thought of. You're going to give Telford some eye candy.

Your dio reminds me of one done by a famouse Japanese dio builder I met at Shizuoka. It's also set in Italy...but obviously not the same buildings and scenario.
View attachment 302461 I have always been avoiding Italian campaign dios...so afraid without the right ambelishments it might look like a spaghetti western setting. I think the key is to get the right trees and hedges of the Italian landscape right.

Looking forward to the ground work phase.

Cheers,
Richard
 

Attachments

  • Ital.jpg
    Ital.jpg
    3.8 KB · Views: 0
Thread owner
Thanks, gentlemen.

One of my sources of inspiration was this wonderful diorama Jerry Got His by Radek Pituch.

View attachment 302462

Although his is set around Monte Casino and so further south where the landscape has more of a desert-like appearance.

There's also a useful Italian build in the book Landscapes of War. Vol.III. In fact I would recommend the whole series very highly indeed.

View attachment 302477

Talking of the ground work...

There's going to be at least one small olive tree hanging over the ravine and sunflowers in the foreground. I even brought back a pot of Tuscan soil to make sure I got the colour right!
 

Attachments

  • landscapes-of-war-voliii-rural-enviroments-english.jpg
    landscapes-of-war-voliii-rural-enviroments-english.jpg
    3.8 KB · Views: 0
  • Jerry Got His StuG final.jpg
    Jerry Got His StuG final.jpg
    2.7 KB · Views: 0
Yes olive tree and sunflowers will definitely set the scene...rubbing my palms with anticipation. Mr Radek has some really inspiring dios.

Thanks for the reference Tim. The one I refer to for my dios is Diorama Perfection 2...unfortunately its all in Japanese but picture heavy.
View attachment 302478

Cheers,
Richard
 

Attachments

  • Ital2.jpg
    Ital2.jpg
    4.9 KB · Views: 0
Thread owner
Thanks for the tip Richard - just ordered a copy of Diorama Perfection 2!
 
Thread owner
Bringing alive the Verlinden street facade

After I had dropped the right-hand third of the street buildings I was left with a rather oddly truncated corner. It was odd for two reasons: firstly, the corner didn't actually meet the edge of the diorama, secondly, the windows were too close to the edge to appear realistic.

View attachment 302619

The answer was to add a corner.

This I accomplished with a fillet of balsa wood covered with Das clay (applied, as always, over copious amounts of PVA). Once dry, this was then scribed (using a metal rule to ensure that everything was straight) with my dental tools so that, as far as possible, it blended with the original facade. To help give a three-dimensional effect, once the brick or stone course was marked out a relatively blunt scalpel blade was used to 'round off' each horizontal and vertical line.

In the image below you can see the finished courses at the bottom and work in progress above.

View attachment 302620

Eventually (I hoped) you would not be able to tell where the Verlinden facade stopped and the extension began...

View attachment 302621

Further Das was later added on top where I wanted the plaster render to remain intact.

View attachment 302622

View attachment 302625
Even though there was an odd angle created by the edge of the diorama, I decided to carry on the illusion of the corner a little around the right-hand side so that anyone looking at it from this direction wouldn't have their view interrupted by a blank, black wall.
 

Attachments

  • 20161021_152253.jpg
    20161021_152253.jpg
    2.2 KB · Views: 0
  • 1526944587112.png
    1526944587112.png
    13.1 KB · Views: 0
  • 1526944509874.png
    1526944509874.png
    9.5 KB · Views: 0
  • 1526944101753.png
    1526944101753.png
    13.5 KB · Views: 0
  • Church in place after scribing DAS.jpg
    Church in place after scribing DAS.jpg
    2.7 KB · Views: 0
Thread owner
The Verlinden set comes with a substantial amount of resin bits and pieces, including a balcony, windows, doors, shutters and even some small roof sections.

View attachment 302701

However, in the end the only parts I used were the balcony and the window frames.

Here is a shot early on in the build with the balcony in place and the windows (which haven't yet been sanded down to remove the excess resin) temporarily installed.

View attachment 302702

The balcony is going to be especially important because one of the little vignettes I have planned for this diorama will be bella donna leaning over the balustrade to welcome the liberating Tommies. The figure I will be using is one of the excellent resin castings from that French manufacturer MK35. I am going to adapt her pose a little and I will probably replace the bunch of grapes with a bottle of vino.

View attachment 302703

One of the rooms for which I planned an interior was the one on the lower right-hand side. Before I closed up the end of the buildings I added a simple staircase which I hoped would be visible in the gloom.

This a very simple, cheap but effective kit from RB Model. Because it is made from real wood I used wood stain to colour it before installation.

View attachment 302704
View attachment 302705


View attachment 302706

The flight was actually too tall for my room, so I cut off the top three steps and used them in my bell tower.

In due course I was to add more details to the interior so that it currently looks like this:

View attachment 302707
 

Attachments

  • 1526996980719.png
    1526996980719.png
    10 KB · Views: 0
  • 1526997103380.png
    1526997103380.png
    13.8 KB · Views: 0
  • 1526997272719.png
    1526997272719.png
    17.1 KB · Views: 0
  • 1526997568167.png
    1526997568167.png
    14.5 KB · Views: 0
  • Interior 1.jpg
    Interior 1.jpg
    2.1 KB · Views: 0
  • 1526997618983.png
    1526997618983.png
    11.6 KB · Views: 0
  • 1526997589292.png
    1526997589292.png
    11.8 KB · Views: 0
Thread owner
The next part of turning my Verlinden Italian street facade into something more three dimensional involved adding stone texture to the other side where the houses adjoin the church. I was getting the hang of working with Das clay. The trick when making larger sections of wall is to press the clay as flat as possible onto a metal baking tray and then transfer it piece by piece to the wall (using PVA glue first to make sure it sticks).

As before, once the clay had dried I scribed it with my metal 'dental' tools and a scalpel blade.

The small window was almost an afterthought - but it adds interest to an otherwise rather plain section of wall. Who knows, I may have a somewhat frightened German peering out as the Allies swamp the town! The surround was made from Magicsculp...

View attachment 302708
View attachment 302709
View attachment 302710
 

Attachments

  • 1526999776468.png
    1526999776468.png
    12.6 KB · Views: 0
  • 1526999761900.png
    1526999761900.png
    13.1 KB · Views: 0
  • 1526999721925.png
    1526999721925.png
    10.2 KB · Views: 0
Thread owner
Less boring doors

The resin doors which came with the Verlinden Italian street are fine as far as they go - but a little 'old school' in their wood texture. Plus, they look too crude and, to be honest, a bit boring. The doors I photographed in Tuscany were often time-worn, but always interesting...

View attachment 302711
View attachment 302712

Like everything else in this build, I am revisiting skills I last practised as a teenager. In those days I made doors like these out of thin balsa wood. These days you can also use thin basswood. However, although this has a great texture (it is wood after all), it is difficult to cut precisely - and it has a tendency to split along the vertical.

So, I turned to my trusty friend plastic card. Using a single piece for both sets of doors, I built up the reinforcing wood pieces from thinner card cut to size. Texture was added using a compass point and the edges rounded a little with a knife.

Here are the first pair:

View attachment 302713

View attachment 302714

The spy hole is from an old Verlinden PE set (I later recessed it into the door). I also added some nail holes and a rough keyhole.

View attachment 302715

I had also sanded away the plaster cast detail above the doors and replaced it with a grill from photo etch. There was also a cherub face moulded into the facade, but the detail was poor so I replaced it with a lion's face carved off an old Italeri fountain. This was textured with Mr Surfacer.

View attachment 302716

Once everything was painted I was happy that they looked the part.

View attachment 302719

The second set of doors were made in a similar manner, but this time I decided to add some circular 'peepholes'. These were made using a large hole punch and then detailed with some etch taken from the middle of an old Verlinden railing set:

View attachment 302717
View attachment 302718

These doors will be shown opening inwards and so they were eventually separated. And after a little paint...

View attachment 302766
 

Attachments

  • 20180522_183951.jpg
    20180522_183951.jpg
    2.1 KB · Views: 0
  • Church door in 2.jpg
    Church door in 2.jpg
    2.3 KB · Views: 0
  • 1527001550855.png
    1527001550855.png
    12.1 KB · Views: 0
  • 1527001532709.png
    1527001532709.png
    13.5 KB · Views: 0
  • 1527001358511.png
    1527001358511.png
    15.7 KB · Views: 0
  • 1527001317646.png
    1527001317646.png
    15.7 KB · Views: 0
  • 1527001280035.png
    1527001280035.png
    14.9 KB · Views: 0
  • Doors 1.jpg
    Doors 1.jpg
    3 KB · Views: 0
  • 1527000262504.png
    1527000262504.png
    12.1 KB · Views: 0
  • 1527000246988.png
    1527000246988.png
    11.4 KB · Views: 0
Thread owner
I've been able to do quite a bit of work over the half term...

Here's a couple shots of where I am in 'real time'.

With all of the groundwork now covered in terracotta Das clay, it's good to see the back of the yellow insulation board at last...

View attachment 303622

Although it's a bit early, I decided to give the edge a coat of black acrylic to see how the colours would look with the contrast. But please note, the ground work has NOT yet been painted.

View attachment 303621
 

Attachments

  • IMG_1721 corected.JPG
    IMG_1721 corected.JPG
    3.5 KB · Views: 0
  • Edges painted 1.jpg
    Edges painted 1.jpg
    2.9 KB · Views: 0
Tim,
this is a fantastic duo. Being Italian and having spent vast majority of my youth between Tuscany and Umbira, I really appreciate how accurate your buildings are.I f I have to find a minimal mistake (relatively speaking and easily forgettable), the civic number of the house is not very accurate of the era. But it will go perfectly un-noticed. Excellent job
 
Thread owner
Thanks Marcello!

I particularly appreciate any praise (or criticism) from those who are more familiar than I with the Italian landscape.

Like the overly elaborate church doorway I will just have to put the number plaques down to 'artistic licence'..!
 
Thread owner
The roof tiles

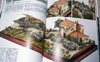
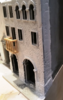
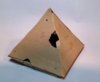
Soon after I started this project I came to realise that one of the biggest challenges that lay ahead was going to be the roof tiles. Many Mediterranean houses - and certainly, from what I could see from photographs, almost all Italian ones of the WWII era - had a distinctive style of terracotta roof tile with a curved profile slightly tapering to their bottom end.

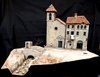
View attachment 304400

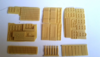
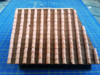
At first I could find no source for these tiles in 1/35, but then I came across these moulds sold by Diorama Debris:

1:35 Scale Spanish Barrel Roof Tiles Mould (1350047) from http://www.dioramadebris.co.uk/135-scale-spanish-barrel-roof-tiles-mould-1350047-50-p.asp

To my knowledge, this is the only way to make these tiles in the authentic manner out of real terracotta plaster. I tried one of these moulds and, after a bit of practice, it worked very well. But it was very time-consuming. By a stroke of luck I happened to mention my dilemma to someone at a model show and - hey presto! - he came up with a supply of ready-cast tiles (I believe made from the same moulds) at a very reasonable price. I'm not sure he is still making them, so I won't name him for now. Let's just say that I was a very lucky guy because - as you will already have seen - I needed hundreds of the things..!

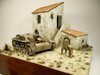
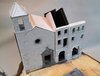
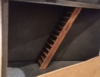
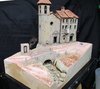
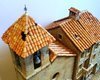
Making the actual roof structures themselves was hardly easy either. Because I had plans to add interior lighting and other details, I needed to ensure that each roof was removable - and strong enough not to warp once in place. The answer was to make a false internal structure out of foam board that slotted into each of the buildings. To this I then added the roof from thick card before starting to lay the tiles.

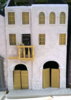
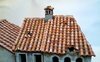
Here is the one for the main church roof...

View attachment 304401

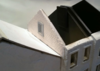
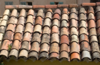
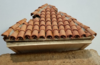
For this roof and that of the houses I used a style which I had seen in Tuscany where the half-round tiles are interspersed with flat tiles of roughly equal width. This way I would be using half as many tiles for the same area of roof.

To give the impression of the flat tiles laid between the others I used strips of brown card laid from the bottom up with a slight overlap. The half-round tiles were then laid in rows on top of them over a ribbon of Bostick glue. This sets pretty quickly - but not so fast that you don't have time to adjust the rows if needed.

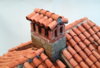
View attachment 304402
View attachment 304403

Last of all I added the ridge tiles and bedded these in with Magic Sculp to represent the render which would be used in real life.

View attachment 304404

View attachment 304405

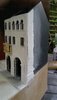
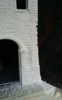
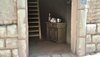
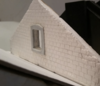
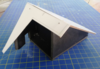
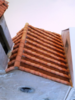
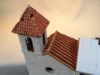
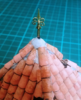
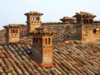
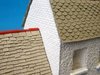
The steeple roof, which was actually the first that I tackled, was made slightly differently.

I began by building a triangular inner frame from foam board, mounted this on a square balsa wood base and then covered the structure with thin basswood. This was glued and tacked in place to give it a slightly concave profile - a little 'sag' - and then some suitable holes for damage added. This belfry would have been an observation post for the defending Germans and thus a prime target for the Allied guns.

View attachment 304406

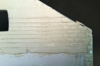
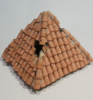
The tiles were laid more closely together than on the other roofs (see the reference picture above) because this crowded look seemed to suit the smaller structure better then the more widely spaced variety. For this style there are no flat tiles - only more barrel tiles laid beneath the others, but upside down (so the curve faces up).

View attachment 304412

However, rather than do this the authentic way (and thus use twice as many of my precious tiles), I cheated by adding the upside-down tiles only at the very bottom of the roof.

View attachment 304413

It's a bit messy, I admit, but - hey - this church had already stood for quite a long time before the Allies started taking pot-shots at it.

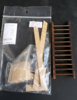
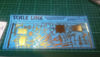
Finally, I added cement render from Magicsculp and - as a piece de resistance - a little finiale from a photo etch set called 'WEATHER VANES & PUB SIGNS' (SLOF07) made for model railways by Scale Link.

View attachment 304414
View attachment 304415

All in all, these roofs were a lot of work. But to my mind they were at least as important as the buildings that they sit above. There's just something so Italian about them! At least I hope so...

View attachment 304416
 

Attachments

  • 1528498143873.png
    1528498143873.png
    16.6 KB · Views: 0
  • 1528497882411.png
    1528497882411.png
    13.5 KB · Views: 0
  • 1528497255923.png
    1528497255923.png
    17.8 KB · Views: 0
  • 1528498179293.png
    1528498179293.png
    17.1 KB · Views: 0
  • 1528498207538.png
    1528498207538.png
    15.8 KB · Views: 0
  • 1528498348315.png
    1528498348315.png
    13.7 KB · Views: 0
  • Bells installed 3.jpg
    Bells installed 3.jpg
    3.8 KB · Views: 0
  • 1528499947226.png
    1528499947226.png
    17 KB · Views: 0
  • 1528499926780.png
    1528499926780.png
    12.4 KB · Views: 0
  • 1528499359499.png
    1528499359499.png
    12.8 KB · Views: 0
  • 1528499252341.png
    1528499252341.png
    16 KB · Views: 0
  • 1528498805656.png
    1528498805656.png
    12.1 KB · Views: 0
I find one of the pleasures of diorama building is the mission creep that inevitably occurs as the vision broadens during execution. Some really top craftsmanship here Tim, and some great ideas too. PaulE
Paul you are right on that .
Tim .
Nice to see this again , I remember those bells and the church tower roof well .
John
 
Excellent work!! I love the way you are detailing the entire set :thumb2:
 
Thread owner
I'm glad someone apart from me is finding this interesting!

The chimney

I decided long ago that my building needed a chimney but I hadn't really thought how to finish it. It turns out that Italian chimneys are as varied as the rest of their buildings, but eventually I came across this picture:

View attachment 304962

Well, that was all the inspiration I needed. So I set about creating my own 'mini Acropolis'.

The bricks were laid as far as possible like real bricks and fixed together using a mixture of PVA and Deluxe Materials Perfect Plastic Putty. The result is a little slap happy - and I'm not going to make any jokes at the expense of Italian builders here - but I think with a little weathering it will look fine.

The chimney 'roof' roof was built, as all my others were, using a base of plastic card, covered with brown card and then the tiles were glued in place with Bostick or UHU. And that was my last bit of tiling!

View attachment 304967
View attachment 304974
 

Attachments

  • Roof and chimney complete.jpg
    Roof and chimney complete.jpg
    2.8 KB · Views: 0
  • 1528889674576.png
    1528889674576.png
    14.7 KB · Views: 0
  • 1528887590249.png
    1528887590249.png
    17.6 KB · Views: 0
Hi Tim, great to see this in action again. The roof tiles are similar to the roof tiles found in the old part of Malacca town built by the Dutch after taking over from the Portuguese. You can make them from balloon rods. I've only used them for the top section of my roof building that is still being constructed.

View attachment 304983

Your dio is turning out to be an epic even without the vehicals and unpainted ground work. :thumb2:

Cheers,
Richard
 

Attachments

  • 131.jpg
    131.jpg
    3.2 KB · Views: 0
Tim,

This is a great build your attention to detail is superb. It is all those little things that make this so good. Many thanks for the descriptions and how too's.
it is not to you read things like this that you realise that half these things are possible or available. Keep it up
 
Thread owner
Hi Tim, great to see this in action again. The roof tiles are similar to the roof tiles found in the old part of Malacca town built by the Dutch after taking over from the Portuguese. You can make them from balloon rods. I've only used them for the top section of my roof building that is still being constructed.

View attachment 304983

Your dio is turning out to be an epic even without the vehicals and unpainted ground work. :thumb2:

Cheers,
Richard

Thanks Richard. I've missed the post on your dio. Can you post a link?
 
Thread owner
Tim,

This is a great build your attention to detail is superb. It is all those little things that make this so good. Many thanks for the descriptions and how too's.
it is not to you read things like this that you realise that half these things are possible or available. Keep it up

Thanks Scottie. I don't claim to be an expert and I'm always learning - usually from my own mistakes!
 
Back
Top