Theme editor

Scale Model Shop

LTD models IAR 80 A in 1/48

yak face

Moderator
Staff member
Joined
Jun 13, 2009
Messages
14,407
Reaction score
965
Points
113
Age
60
1/3
Thread owner
First off let me apologise to anyone whos stuff I may have missed , other things have been taking up my time recently .
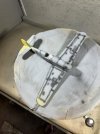
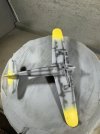
Anyways heres something I picked up at one of the shows last year- the LTD models IAR 80 A in 1/48 scale . Ive long been interested in this aircraft , and I do like a Romanian scheme . This is a limited run kit and as such requires a great deal of fettling and care during the build . I paid £10 for it and it came with extra decals too ( albeit for the later IAR 81 )
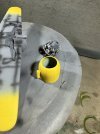
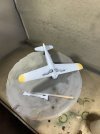
It features fine recessed panel lines and a basic cockpit and two vacformed canopies but with a big dollop of care should tutn out ok . Heres the sprues and stuffIMG_4244.jpegIMG_4245.jpegIMG_4246.jpegIMG_4247.jpegIMG_4248.jpegIMG_4249.jpegIMG_4250.jpegIMG_4251.jpegIMG_4252.jpeg
 
I've not heard of LTD Models. At £10 it looks to be quite a bargain. These short run kits are not for the faint hearted but as you say, for the experienced, willing to accept a lot fettling and care, they can build into great models of unusual subjects. This doesn't look too bad and I'm sure you'll sort it.
 
Interesting!

I was also thinking Corsair like.....or a cross between that one of the later war Soviet birds....LA7?

Looking forward to this coming together.

ATB

Andrew
 
I shall follow and sit near Andrew, he can explain the finer points of planes.
 
Thread owner
Made a start on this yesterday. As with all limited tun stuff theres a lot of cleaning up to do- every sprue gate is massive and overlaps the mating surfaces plus there are some monster ejection towers to remove . The cockpit is quite basic but a reasonable starting point. First off I cut out the middle of the floor and added a few bits . The seat had some sides and bracing added as well as a trim wheel and a couple of levers . I made a new control column with (i think ) the brake lever . The rudder pedals were sanded down and straps made from wine foil.
The cockpit sides feature ribbing but not much else so after finding a few reference pics I added the oxygen bottle and drilled shroud , pipe and various other bits - im not going too mad as it will probably have a closed cockpit ( it’ll be bad enough cutting out a vac form canopy without trying to seperate it too!) IMG_4312.jpegIMG_4319.jpegIMG_4320.jpegIMG_4321.jpegIMG_4322.jpegIMG_4323.jpegIMG_4325.jpegIMG_4324.jpeg
 
Radial engined fighter, Romanian scheme - what’s not to like?!!!
Never heard of the IAR - 80 but it looks like a superb WW2 fighter. To my eye it looks very ’late war’ but, having just done a quick Google search, it seems it actually entered service in 1941. As Neil says, it looks like a Corsair (with the cockpit set way back from the nose) but is also reminiscent of a few other late war fighters.

Looking forward ro the build Tony. I’m sure you’ll spin your magic on this limited run kit.
ATB

Paul
 
Thread owner
Radial engined fighter, Romanian scheme - what’s not to like?!!!
Never heard of the IAR - 80 but it looks like a superb WW2 fighter. To my eye it looks very ’late war’ but, having just done a quick Google search, it seems it actually entered service in 1941. As Neil says, it looks like a Corsair (with the cockpit set way back from the nose) but is also reminiscent of a few other late war fighters.

Looking forward ro the build Tony. I’m sure you’ll spin your magic on this limited run kit.
ATB

Paul
Cheers paul , its an aircraft ive always loved the look of , with the long nose and lean design . Its a fascinating backstory too , the fuselage being copied from the PZL 24 , even with that it was still a very potent fighter and ended up fighting against allied and axis opponents very effectively. Cheers tony
 
Lovely improvements to that cockpit - well done.

It's a cracking little aircraft. IIRC, Hobbyboss did a 1/48 version a while back too.
 
Thread owner
Bit more done today , although the recent nice weather means bench time is a rarity . The cockpit has been painted up and I added some etched harnesses from the spares box - not specifically for the IAR 80 but near enough. Its all a bit rough and ready but under a closed Vac form canopy itll be fine . Ive also been looking at the engine . Not much will be seen once its in the cowling and the props on but it still needed a bit of attention. The engine moulding doesnt feature the push rod tubes so these were added from styrene rod , all 28 of them ! IMG_4340.jpegIMG_4317.jpegIMG_4318.jpegIMG_4341.jpeg
 
Great detail there in the office Tony .
Also like the additions to the engine .:thumb2:
 
That cockpit is a huge improvement over what the kit offered. The engine additions are definitely worth while.
As Neil said "silk nursery".
 
I will blame either ....
autocorrect, clumsy typing, senility - or a combination of all three :smiling3:
 
Thread owner
Well progress has been slowly trickling on , not much time on my hands lately so little chance to get on the forum, much less to post updates . Nevertheless heres where its at . The main airframe is together - as with all limited run kits , much test fitting and fettling was required , but eventually it came together without needing more than a swipe of acrylic putty here and there. After priming ( Halfords grey ) the pesky yellow areas needed doing first so they were given an undercoat of white then the yellow. These were masked off and the underside painted sky blue .
The colours on Romanian aircraft were sourced from Britain early in the war but later changed to German colours , this particular aircraft having the RAF dark earth / dark green uppers with a sky blue underside . The sky blue isnt the standard RAF sky but a lighter , much bluer colour . The actual colour ( fs 35550 ) is available in vallejo model air but the local stockists dont carry the full range so I got vallejo Game color glacier blue . In my eyes this matches fine . Next up is the dark earth .
 

Attachments

  • IMG_4360.jpeg
    IMG_4360.jpeg
    4.4 KB · Views: 0
  • IMG_4361.jpeg
    IMG_4361.jpeg
    4.2 KB · Views: 0
  • IMG_4362.jpeg
    IMG_4362.jpeg
    4.4 KB · Views: 0
  • IMG_4412.jpeg
    IMG_4412.jpeg
    4.1 KB · Views: 0
Thread owner
Colour now on and unmasked , couple of tiny touch ups but pretty pleased with the result. The rudder was sprayed yellow when I did the wingtips ,cowling and fuselage band . This will now be getting a blue and red stripe added, instead of using the kit supplied decal . Ive also been cleaning up the undercarriage and improving it a bit . The wheels just sat between two nibs on the fork and were just not secure enough so after sanding the forks smooth holes were drilled in them to allow me to fit a brass axle after drilling the wheels . Another thing I forgot to mention is the canopy- I bit the bullet and decided to have a go at seperating the windscreen . Its not the easiest job cutting out a vac form canopy anyway but cutting off the windscreen is even more tricky due to the thinness of the plastic but I managed it and its now superglued in place . IMG_4417.jpegIMG_4414.jpegIMG_4415.jpegIMG_4416.jpeg
 
Back
Top