Theme editor

Scale Model Shop

Meng 1/35 Whippet WW1 Light Tank

Bigfoot57

Well-known member
Joined
Jun 24, 2015
Messages
1,179
Reaction score
298
Points
83
Age
68
1/3
Thread owner
IMG_5905.jpg IMG_5912.jpg IMG_5913.jpg IMG_5907.jpg IMG_5904.jpg
 

Attachments

  • IMG_5902.jpg
    IMG_5902.jpg
    336.5 KB · Views: 0
  • IMG_5903.jpg
    IMG_5903.jpg
    366.5 KB · Views: 0
  • IMG_5903.jpg
    IMG_5903.jpg
    366.5 KB · Views: 1
Thread owner
Click image for larger version  Name:	IMG_5922.jpg Views:	0 Size:	193.0 KB ID:	1273242 Click image for larger version  Name:	IMG_5924.jpg Views:	0 Size:	163.5 KB ID:	1273243 Click image for larger version  Name:	IMG_5926.jpg Views:	0 Size:	150.3 KB ID:	1273244 Click image for larger version  Name:	IMG_5925.jpg Views:	0 Size:	189.0 KB ID:	1273245 Click image for larger version  Name:	IMG_5930.jpg Views:	0 Size:	176.9 KB ID:	1273246 Click image for larger version  Name:	IMG_5929.jpg Views:	0 Size:	163.2 KB ID:	1273247 Click image for larger version  Name:	IMG_5931.jpg Views:	0 Size:	143.5 KB ID:	1273248 Click image for larger version  Name:	IMG_5928.jpg Views:	0 Size:	172.1 KB ID:	1273249 Click image for larger version  Name:	IMG_5936.jpg Views:	0 Size:	203.0 KB ID:	1273250 Click image for larger version  Name:	IMG_5922.jpg Views:	0 Size:	193.0 KB ID:	1273242 So onto the actual construction of this kit and first off after the body was built it was time to fill the gaps as you can see on the unpainted model All the bright white bits which are the filler followed by the first sets of painting again this plastic didn’t want to take paint despite having a grey primer coat being applied which seemed to sort out afterwards but it took three coats of green to actually cover the body anyway here’s what I’ve done so far
 
I built this last year. Really enjoyed the build. Looking forward to seeing your progress.
 
I have one of these "in waiting" so I shall be keeping an eye on your progress.

One thing I noticed is that the angle of the exhaust tails are shown wrongly in the instructions and box art.
The photos below i took earlier this year shows them pointing more upwards.
Although the lighting was variable I'm hoping to get a good idea of the khaki/brown colour they were painted in.
This Whippet and the MK IV Male next to it are believed to still be in their original shades

Click image for larger version  Name:	W1.jpg Views:	0 Size:	355.7 KB ID:	1273261 Click image for larger version  Name:	W2.jpg Views:	0 Size:	285.0 KB ID:	1273260
 

Attachments

  • W1.jpg
    W1.jpg
    355.7 KB · Views: 1
Thread owner
Well every days a school day as they say I think I’ll probably leave mine as it is because if I do up turn the exhaust then they’re gonna clash with the wooden blocks that are hanging off the side plus it would mean sawing off the entire exhaust system ends off and repositioning it and mine are really stuck on nice and firm and I’ve wrapped thread around them to represent the asbestos wrapping I think I’ll leave them but if I do another one, I’ll make sure that they are done the right way around thanks for the reference
 
Thread owner
IMG_5932.jpg IMG_5931.jpg IMG_5928.jpg IMG_5930.jpg So here’s where we’re at so far. I’ve now given it it’s 1st coat of grey primer followed by the 1 st green paint. of which there be many to give the subtle hues
 
Thread owner
filedata/fetch?filedataid=257880
wAAACH5BAEKAAAALAAAAAABAAEAAAICRAEAOw==
filedata/fetch?filedataid=257883
wAAACH5BAEKAAAALAAAAAABAAEAAAICRAEAOw==
filedata/fetch?filedataid=257884
wAAACH5BAEKAAAALAAAAAABAAEAAAICRAEAOw==
filedata/fetch?filedataid=257878
wAAACH5BAEKAAAALAAAAAABAAEAAAICRAEAOw==
​​ filedata/fetch?filedataid=257879
wAAACH5BAEKAAAALAAAAAABAAEAAAICRAEAOw==
​​ filedata/fetch?filedataid=257876
wAAACH5BAEKAAAALAAAAAABAAEAAAICRAEAOw==
​​ filedata/fetch?filedataid=257877
wAAACH5BAEKAAAALAAAAAABAAEAAAICRAEAOw==
​​ filedata/fetch?filedataid=257875
wAAACH5BAEKAAAALAAAAAABAAEAAAICRAEAOw==
​​ filedata/fetch?filedataid=257874
wAAACH5BAEKAAAALAAAAAABAAEAAAICRAEAOw==
​​ filedata/fetch?filedataid=257873
wAAACH5BAEKAAAALAAAAAABAAEAAAICRAEAOw==
​​ So onto the next stage the running gear as most of the wheels Will be invisible once the side and inside parts are all joined together they’ve have minimal cleanup and just a like dusting of paint. Next the RH running gear was atrached to the hull and clamped into place using Rebble clamps I got from Scandavia having seen them on Nigels modelling bench they took about 7 months to recieve them but they are probabbly the best clamps i have used Next comes those tiny little hooks I can’t believe I actually got them all on without losing any then it was time for another coat of paint this time a different shade before moving onto the exhaust and the wooden blocks I also wrapped tbe exausts with white thread to represent the asbestos coating that they probably used
 
Thread owner
IMG_6099.jpg IMG_6102.jpg IMG_6112.jpg IMG_6061.jpg IMG_6062.jpg 
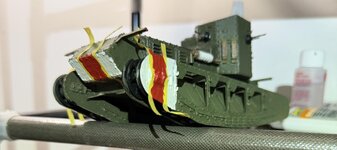
Next on the agenda is the wooden blocks as you can see these were stuck to a piece of Sellotape and then painted in various shades of brown and yellow to try and make them look like a bit of wood whether they were successful or not I don’t know they they look Woody to me so that will do after they were assembled onto the tank. The tank was in painted another shade of green mixed with khaki olive drab and a few other browns then the wooden blocks were attached and the red and white stripes added so we’ve got left to do now is the cables to go across those little Hooks and the tracks
 

Attachments

  • IMG_6058.jpg
    IMG_6058.jpg
    203.5 KB · Views: 0
  • IMG_6097.jpg
    IMG_6097.jpg
    153.9 KB · Views: 0
  • IMG_6100.jpg
    IMG_6100.jpg
    365.4 KB · Views: 0
Thread owner
Click image for larger version  Name:	IMG_6117.jpg Views:	0 Size:	292.4 KB ID:	1274970 Click image for larger version  Name:	IMG_6117.jpg Views:	0 Size:	292.4 KB ID:	1274970 Click image for larger version  Name:	IMG_6117.jpg Views:	0 Size:	292.4 KB ID:	1274970 Click image for larger version  Name:	IMG_6117.jpg Views:	0 Size:	292.4 KB ID:	1274970 
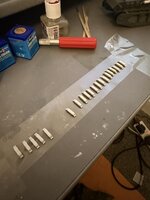
And now to the tracks, yes they clipped together and they should be workable unfortunately they don’t stay clipped together so I’m trying something totally out of the box and that is I attached them to a piece of Sellotape for painting and my understanding is that the Sellotape should hold them in place without any of them breaking and it’s flexible so I’m just gonna cut the Sellotape right to the edge of the tracks with the track still on the Sellotape and then attach it to the model yes I know that we won’t be any working tracks but they didn’t work in the first place
So far as far as I’m concerned not one manufacturer has come up with a full proof method for doing tracks we’ve had rubber tracks we’ve had linked tracks we’ve had tracks where you put pins through the joints so I’m trying my sticking the things to Sellotape and see what that does can’t be worse than any of the other methods have been tried
The paint used for the tracks is from a Galahri pen called dark steel applied with a brush after dabbing the pen tip on each of the tracks links and then spreading it with the brush
 
So far as far as I’m concerned not one manufacturer has come up with a full proof method for doing tracks we’ve had rubber tracks we’ve had linked tracks we’ve had tracks where you put pins through the joints so I’m trying my sticking the things to Sellotape and see what that does can’t be worse than any of the other methods have been tried

The Tamiya workable tracks on their MK IV Male Tank that i'm currently building are excellent.
Supplied individually, click together easily and stay together whilst remaining flexible.
Hardly any clean up required and by far the best kit supplied tracks i have ever seen.
Have a look at this video from about 12.40 to see just how good they are.
 
I remember those hooks when I built this. Nightmare. I didn't lose any but broke quite a few.
 
Looks a cracking little kit got to say meng is one of my top manufacturers.doing a superb job with yours as well
 
Thread owner
So I was wrong with the tracks upon wrapping them around the running gear links started breaking in the end after several attempts the tracks were superglued to tank hence in the pictures they are not in correct alignment but at least they stay on
Next was the towing cables and I had the broken hook syndrome and at least 4 of mine have been replaced with .5mm brass rod again superglued into place as the replacement hooks were now metal not plastic and the towing cable was braided wire as wellIMG_6178.webpIMG_6172.webpIMG_6170.webpIMG_6165.webpIMG_6164.webp
 
Back
Top