Hi Guys and Gals,
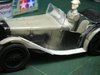
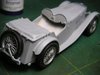
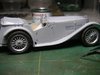
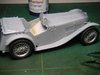
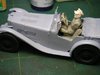
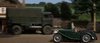
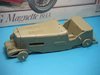
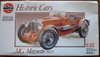
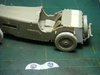
Lately the sweet shop has been flooded with military heavy posts by refugees from a long gone site. Many have hidden affections for non military subjects so much so we sometimes camouflage our builds for that ex-site associating it with a connection to a war movie. I'm happy Scale models site supports any genre. Now the Battle of Britain gave me a chance to model something civilian without infringing on the ex-sites rules. This came in the form of the MG Magnette or whatever that car was that I had to convert as close as possible with and available Airfix kit shown here...
View attachment 301329
To this...
View attachment 301328 View attachment 301339
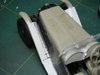
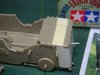
It all starts from opening the box and surveying what needed to be cut and replaced. So let the modifications begin...
View attachment 301333 View attachment 301334
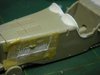
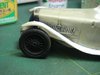
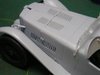
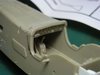
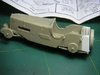
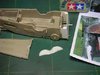
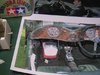
The kit although old was quite nice but shallow in detail at certain areas. I noticed the dash board was at an angle for this model of MG and had to be straightened for the movie version.
View attachment 301335 View attachment 301336
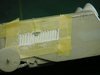
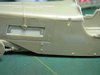
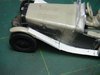
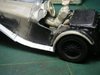
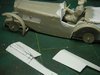
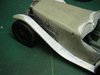
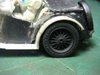
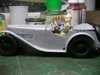
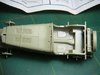
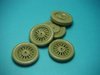
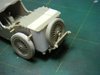
The spoked wheels were really good with no flash to clean up at all. I drew some directional lines for cutting and added extentions to the back...
View attachment 301337 View attachment 301340
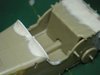
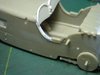
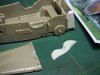
You can clearly see the amount of cut I had to do for the dash board and it's not even to be straight but with two humps as you will see in the next accompanying photos.
View attachment 301341 View attachment 301342
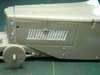
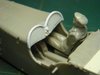
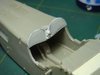
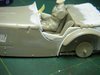
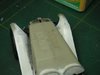
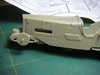
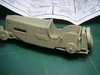
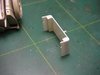
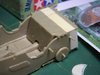
Here you see the back extention made up from plastic card and thick shims so I could sand the corners round.
View attachment 301345 View attachment 301350
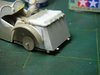
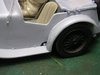
I extended the top also by using a small strip of the existing lip to save on restoring detail.
View attachment 301351 View attachment 301360 View attachment 301361 View attachment 301353
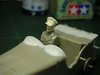
The dash board as you can see is a major modification. I traced out the unique hump shape on a 1mm card strip.
View attachment 301347 View attachment 301348
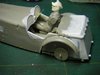
The strip was attached with some added dials and switches
View attachment 301362
I've run out of image space so more will come later in the next post.
Cheers,
Richard
Lately the sweet shop has been flooded with military heavy posts by refugees from a long gone site. Many have hidden affections for non military subjects so much so we sometimes camouflage our builds for that ex-site associating it with a connection to a war movie. I'm happy Scale models site supports any genre. Now the Battle of Britain gave me a chance to model something civilian without infringing on the ex-sites rules. This came in the form of the MG Magnette or whatever that car was that I had to convert as close as possible with and available Airfix kit shown here...
View attachment 301329
To this...
View attachment 301328 View attachment 301339
It all starts from opening the box and surveying what needed to be cut and replaced. So let the modifications begin...
View attachment 301333 View attachment 301334
The kit although old was quite nice but shallow in detail at certain areas. I noticed the dash board was at an angle for this model of MG and had to be straightened for the movie version.
View attachment 301335 View attachment 301336
The spoked wheels were really good with no flash to clean up at all. I drew some directional lines for cutting and added extentions to the back...
View attachment 301337 View attachment 301340
You can clearly see the amount of cut I had to do for the dash board and it's not even to be straight but with two humps as you will see in the next accompanying photos.
View attachment 301341 View attachment 301342
Here you see the back extention made up from plastic card and thick shims so I could sand the corners round.
View attachment 301345 View attachment 301350
I extended the top also by using a small strip of the existing lip to save on restoring detail.
View attachment 301351 View attachment 301360 View attachment 301361 View attachment 301353
The dash board as you can see is a major modification. I traced out the unique hump shape on a 1mm card strip.
View attachment 301347 View attachment 301348
The strip was attached with some added dials and switches
View attachment 301362
I've run out of image space so more will come later in the next post.
Cheers,
Richard
Attachments
-
 mag0008.jpg2.7 KB · Views: 0
 -
 mag0007.jpg2.5 KB · Views: 0
 -
 mag0006.jpg2.5 KB · Views: 0
 -
 mgtc51uu.jpg1.8 KB · Views: 0
 -
 mag0005.jpg2.6 KB · Views: 0
 -
 mag0004.jpg2.6 KB · Views: 0
 -
 mag0003.jpg2 KB · Views: 0
 -
 mag0002.jpg2.5 KB · Views: 0
 -
 mag0001.jpg3.1 KB · Views: 0
 -
 1970s_243327178.jpg2.8 KB · Views: 0
 -
 mag0009.jpg2.1 KB · Views: 0
 -
 mag0011.jpg2.8 KB · Views: 0
 -
 mag0018.jpg2.7 KB · Views: 0
 -
 mag0016.jpg2.6 KB · Views: 0
 -
 mag0017.jpg2.4 KB · Views: 0
 -
 mag0010.jpg2.9 KB · Views: 0
 -
 mag0014.jpg3 KB · Views: 0
 -
 mag0013.jpg2.8 KB · Views: 0
 -
 mag0012.jpg3.4 KB · Views: 0
 -
 mag0061.jpg3.3 KB · Views: 0