
You are using an out of date browser. It may not display this or other websites correctly.
You should upgrade or use an alternative browser.
You should upgrade or use an alternative browser.
Minicraft SS100 Jaguar (1/16th)
- Thread starter Jim R
- Start date
- Status
- Not open for further replies.
Hi all
Mick - the rest of the red has gone - see later :thumb2:
Ken - they certainly liked their bright colours
Steve - progress tends to go in fits and starts but getting there.
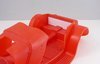
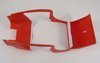
Well a fair bit of progress. What slows me down a lot is that I can't trust the fit of anything with this kit and so I am becoming obsessed with dry fitting it over and over again! The fit of the upper body at the rear needed a card sheet to get rid of quite a large gap and the dash had no locating point so that had to be addressed.
View attachment 308626
View attachment 308627
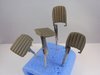
Then it was out with the Stynylrez grey primer. Did the exhausts, dash, bulkhead etc as well as the two main body parts. The body was lightly sanded back with a very fine sanding sheet.
View attachment 308628
View attachment 308629
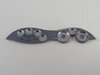
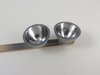
Chromed the instrument bezels and the inside of the headlamps.
View attachment 308630
Decals to go in for the instruments. Getting them straight in the holes may be awkward :sad: I have made copies of the decals in case I c**k up the kit ones.
View attachment 308631
Thanks for your support :thumb2:
Jim
Mick - the rest of the red has gone - see later :thumb2:
Ken - they certainly liked their bright colours
Steve - progress tends to go in fits and starts but getting there.
Well a fair bit of progress. What slows me down a lot is that I can't trust the fit of anything with this kit and so I am becoming obsessed with dry fitting it over and over again! The fit of the upper body at the rear needed a card sheet to get rid of quite a large gap and the dash had no locating point so that had to be addressed.
View attachment 308626
View attachment 308627
Then it was out with the Stynylrez grey primer. Did the exhausts, dash, bulkhead etc as well as the two main body parts. The body was lightly sanded back with a very fine sanding sheet.
View attachment 308628
View attachment 308629
Chromed the instrument bezels and the inside of the headlamps.
View attachment 308630
Decals to go in for the instruments. Getting them straight in the holes may be awkward :sad: I have made copies of the decals in case I c**k up the kit ones.
View attachment 308631
Thanks for your support :thumb2:
Jim
Attachments
Hi all
Francesco - welcome. I am glad you have learned from this but there are many far more experienced car builders on the forum. The chrome is *THIS*. It is a kind of felt tip pen. Comes in 4 widths. I use a brush and pump out some of the chrome liquid. It thins with lacquer thinner.
Simon - definitely submission. Just not always sure whether it is the kit or me doing the submitting!!
Ross - cheers :thumb2:
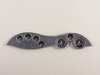
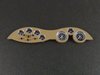
The decals for the instruments actually went on fine. They are made by Cartograph. Perhaps the decals are the high point of the kit :smiling3: Little annoyed that the rev counter is not quite straight but I'll live with it. There is a decal for a wooden dashboard which actually looks quite nice but all the reference photos show the dash as either painted body colour or leather/vinyl the same colour as the seats and door cards. I'll probably go with the latter. Body will be British Racing Green, fairly dark, with tan leather seats etc.
View attachment 308812
Jim
Francesco - welcome. I am glad you have learned from this but there are many far more experienced car builders on the forum. The chrome is *THIS*. It is a kind of felt tip pen. Comes in 4 widths. I use a brush and pump out some of the chrome liquid. It thins with lacquer thinner.
Simon - definitely submission. Just not always sure whether it is the kit or me doing the submitting!!
Ross - cheers :thumb2:
The decals for the instruments actually went on fine. They are made by Cartograph. Perhaps the decals are the high point of the kit :smiling3: Little annoyed that the rev counter is not quite straight but I'll live with it. There is a decal for a wooden dashboard which actually looks quite nice but all the reference photos show the dash as either painted body colour or leather/vinyl the same colour as the seats and door cards. I'll probably go with the latter. Body will be British Racing Green, fairly dark, with tan leather seats etc.
View attachment 308812
Jim
Attachments
So sorry for not commenting sooner Jim:rolling:, but what a great project you have.:smiling:
Very nice plumbing on the engine and corrections on the kit.:thumb2:
Will follow on closely from now on.
ps. For polishing work Alclad has this set of mesh: https://www.wonderlandmodels.com/products/alclad-ii-micromesh-polishing-cloths/
Also good for cleaning-up aircraft canopies:upside:....
Very nice plumbing on the engine and corrections on the kit.:thumb2:
Will follow on closely from now on.
ps. For polishing work Alclad has this set of mesh: https://www.wonderlandmodels.com/products/alclad-ii-micromesh-polishing-cloths/
Also good for cleaning-up aircraft canopies:upside:....
Hi all
Steve - the decals really were a pleasant surprise.
Fernando - welcome. I have some polishing clothes I bought a while ago.
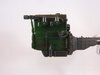
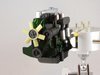
Some progress. Used Humbrol enamel (Brunswick Green 3) as recommended by Richard F to airbrush the engine block. Just detail painting now. I will use the same for the British Racing Green.
View attachment 308985
View attachment 308986
View attachment 308987
Used airbrushed Vallejo Model Color for the seats and the door cards.
View attachment 308984
I have bought some of the new Vallejo metallic paints to try. You get a black gloss base, the metallic colour itself and a clear gloss to seal it. I'll see how it goes. Just put the black base onto the headlights and the mounting frame. Doesn't look that glossy.
View attachment 308983
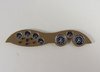
Completed the dash. Just got to make lenses with Micro Krystal Klear.
View attachment 308988
Thanks for your patient support.
Jim
Steve - the decals really were a pleasant surprise.
Fernando - welcome. I have some polishing clothes I bought a while ago.
Some progress. Used Humbrol enamel (Brunswick Green 3) as recommended by Richard F to airbrush the engine block. Just detail painting now. I will use the same for the British Racing Green.
View attachment 308985
View attachment 308986
View attachment 308987
Used airbrushed Vallejo Model Color for the seats and the door cards.
View attachment 308984
I have bought some of the new Vallejo metallic paints to try. You get a black gloss base, the metallic colour itself and a clear gloss to seal it. I'll see how it goes. Just put the black base onto the headlights and the mounting frame. Doesn't look that glossy.
View attachment 308983
Completed the dash. Just got to make lenses with Micro Krystal Klear.
View attachment 308988
Thanks for your patient support.
Jim
Attachments

- Joined
- Apr 27, 2018
- Messages
- 14,899
1/3
Jim,
Some lovely work so far, silk purse springs to mind
Some lovely work so far, silk purse springs to mind
G
Guest
Guest
Wow Jim .
What a change with the paint.The dash is stunning, did Mrs R give anymore sound advice :smiling4:
John
What a change with the paint.The dash is stunning, did Mrs R give anymore sound advice :smiling4:
John
Hi all
Thanks guys :thumb2:
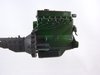
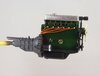
I have made lenses for the instruments with Micro Krystal Klear. I have also made a fair bit of progress with the engine. Still bits to add such as the exhaust manifolds but I think that will have to wait until the engine is fitted to the chassis as I'm not certain of the fit.
View attachment 309151View attachment 309152View attachment 309153View attachment 309154View attachment 309155View attachment 309156
Jim
Thanks guys :thumb2:
I have made lenses for the instruments with Micro Krystal Klear. I have also made a fair bit of progress with the engine. Still bits to add such as the exhaust manifolds but I think that will have to wait until the engine is fitted to the chassis as I'm not certain of the fit.
View attachment 309151View attachment 309152View attachment 309153View attachment 309154View attachment 309155View attachment 309156
Jim
Attachments

Hi all
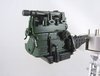
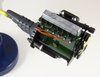
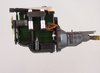
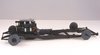
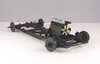
The engine is fixed to the chassis - simples as had had many dry fits.
View attachment 309321
View attachment 309322
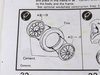
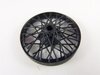
Then I thought I'd see what the wheels and tyres were like. The moulding was OK but putting them together was impossible. I swear that no one could have put them together as per the instructions.
View attachment 309323
The wheel is in two halves. The rear half, part A6, has a ridge around the outside which is supposed to fit into a groove in the tyre. Here's the groove.
View attachment 309325
Now there is no way that that will work. The tyre is rubber and so has some give in it but it is just far too tight a fit. Force it and you'll break the spokes for certain. I tried putting the tyre in hot water but no difference. In the end I simple sanded/cut the ridge off. The wheel now fits into the tyre and is still a nice tight fit :thumb2:
View attachment 309324
Four more to do although I might only do three more and make a cover for the spare using just the tyre :smiling4:
Jim
The engine is fixed to the chassis - simples as had had many dry fits.
View attachment 309321
View attachment 309322
Then I thought I'd see what the wheels and tyres were like. The moulding was OK but putting them together was impossible. I swear that no one could have put them together as per the instructions.
View attachment 309323
The wheel is in two halves. The rear half, part A6, has a ridge around the outside which is supposed to fit into a groove in the tyre. Here's the groove.
View attachment 309325
Now there is no way that that will work. The tyre is rubber and so has some give in it but it is just far too tight a fit. Force it and you'll break the spokes for certain. I tried putting the tyre in hot water but no difference. In the end I simple sanded/cut the ridge off. The wheel now fits into the tyre and is still a nice tight fit :thumb2:
View attachment 309324
Four more to do although I might only do three more and make a cover for the spare using just the tyre :smiling4:
Jim
Attachments

1/3
Coming along nicely Jim.
Hi all
Steve - not sure yet whether to lightly weather the engine or leave concourse.
A lot of personal stuff has kept me from the bench and also the Tour de France has been on so progress has been slow.
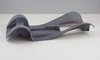
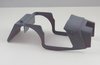
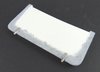
The kit supplies an erected soft top or a folded tonneau cover. It does not give a folded soft top. Because virtually all reference photos show restored cars the tonneau covers vary in design. I will go with the kit part. I textured the sides with stippled on Mr Surfacer 500 and added straps.
View attachment 309897
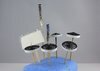
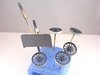
Wheels, cover etc mounted up and primed.
View attachment 309898
View attachment 309899
Off now to watch Geraint Thomas ride the Yellow Jersey into Paris :smiling:
Jim
Steve - not sure yet whether to lightly weather the engine or leave concourse.
A lot of personal stuff has kept me from the bench and also the Tour de France has been on so progress has been slow.
The kit supplies an erected soft top or a folded tonneau cover. It does not give a folded soft top. Because virtually all reference photos show restored cars the tonneau covers vary in design. I will go with the kit part. I textured the sides with stippled on Mr Surfacer 500 and added straps.
View attachment 309897
Wheels, cover etc mounted up and primed.
View attachment 309898
View attachment 309899
Off now to watch Geraint Thomas ride the Yellow Jersey into Paris :smiling:
Jim
Attachments
- Status
- Not open for further replies.
Legal Notice
scalemodelling.co.uk is a privately operated online discussion forum. All content posted by members reflects their own views and opinions and does not necessarily represent those of the forum owners or administrators. While reasonable efforts are made to moderate content, no responsibility is accepted for user-generated material. By using this site, you agree to comply with UK law and the forum rules.