Theme editor

Scale Model Shop

Mitsubishi A6M2b Zero - Tamiya 1/32 scale

Status
Not open for further replies.

BarryW

Active member
SMF Supporters
Joined
Jul 23, 2011
Messages
6,147
Reaction score
462
Points
83
Age
70
1/3
Thread owner
Its been a while since I posted a build thread so here we go with my latest.

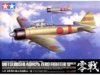
Tamiya released their first 1/32 WW2 warbird in 2000, a A6M5 Zero and it set a new standard of engineering and fit for others to aspire to. It was only in 2006 when they released the next in this series, this model the A6M2b Zero as was used in the Pearl Harbour attack.

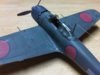
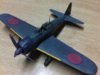
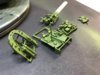
Here are a couple of pics of my A6M5 build from several years ago.
View attachment 282001
View attachment 282002

Now it is the turn of this later release...


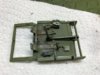
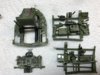
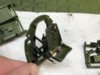
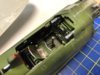
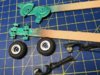
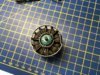
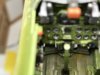
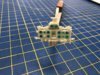
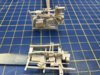
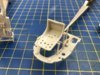
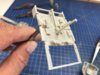
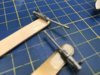
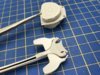
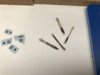
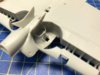
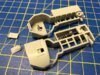
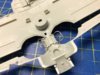
Like the other early kits in this 1/32 series this model has a number of toy like features, removable engine panels and u/c that can be raised and lowered. There are plenty of screws and springs in this kit!

View attachment 282000
I will be building an aircraft from the Pearl Harbour attack.

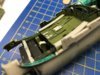
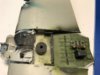
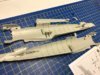
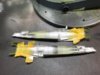
The plastic is not the usual Tamiya plastic and it seems a bit brittle but should not be a problem. Unusually it is also two colours with the engine a silver and the rest a kind of mustard shade.

I will be using the AKI Air Series IJN acrylics plus some Vallejo MA Air War series IJN acrylics with AKI weathering. I will be doing a fairly light weathering, light that is for a Japanese aircraft.

Eduard Steel IJN sealtbelts will be used along with Masketar paint masks. I will make a start tonight....
 

Attachments

  • 106310-10911-pristine.jpg
    106310-10911-pristine.jpg
    3.3 KB · Views: 0
  • IMG00900-20121203-0641.jpg
    IMG00900-20121203-0641.jpg
    2.5 KB · Views: 0
  • IMG00885-20121203-0635.jpg
    IMG00885-20121203-0635.jpg
    2.5 KB · Views: 0
Thread owner
Now did I say the plastic was mustard coloured? well my memory played tricks, it was a few months ago when I last looked but when I opened the box last night I found that it is a light grey after all, but I was right in that its not the normal Tamiya plastic and is harder and more brittle. The engine parts are silver so I remembered that accurately...

This is the aircraft I am building:
View attachment 282027

I did not get a lot of time last night so not a lot of progress. I started on the interior sub-assemblies and there are a lot more to do... I do love the thoughtful engineering using panel lines to minimise the seams that will need sanding...
View attachment 282028

I will continue tonight and will post regular updates in my usual style!
 

Attachments

  • IMG_1989.JPG
    IMG_1989.JPG
    2.8 KB · Views: 0
  • IMG_1990.JPG
    IMG_1990.JPG
    3.3 KB · Views: 0
Got this in the stash with the intention of building a similar Pearl Harbour machine so I'll be watching with interest.
Thanks
P
 
It looks great Barry. I think I need another 1:32 Tamiya in my life, but I'm holding out hoping for a Hurricane.
 
Thread owner

Attachments

  • IMG_1991.JPG
    IMG_1991.JPG
    3.5 KB · Views: 0
  • IMG_1992.JPG
    IMG_1992.JPG
    3.6 KB · Views: 0
  • IMG_1993.JPG
    IMG_1993.JPG
    3.5 KB · Views: 0
  • IMG_1994.JPG
    IMG_1994.JPG
    3.1 KB · Views: 0
  • IMG_1996.JPG
    IMG_1996.JPG
    3.3 KB · Views: 0
  • IMG_1997.JPG
    IMG_1997.JPG
    3.7 KB · Views: 0
  • IMG_1998.JPG
    IMG_1998.JPG
    1.8 KB · Views: 0
Thread owner
Gradual progress to report...
Lots of metal springs etc to help make the undercarraige lower and raise. Great in theory and Tamiya do bring it off, most companies could not but I certainly will not be playing with the model because even with Tamiya's engineering it will not be long before bits broke.
View attachment 282283
You can see the springs attached above and below, how it looks from the other side once the wheel wells are in place.
View attachment 282286
Below is a pic of the wheel leg lowering mechanism before I glued it into place.
View attachment 282284
I will start detail painting the 'pit detail soon.
View attachment 282285
View attachment 282287
Above I have sprayed some aluminium and when cured I will spray Vallejo Aotake Blue over the top which is a transparent blue. Not much will show though when buttoned up.
 

Attachments

  • IMG_2013.JPG
    IMG_2013.JPG
    2.5 KB · Views: 0
  • IMG_2014.JPG
    IMG_2014.JPG
    2.9 KB · Views: 0
  • IMG_2012.JPG
    IMG_2012.JPG
    2.7 KB · Views: 0
  • IMG_2011.JPG
    IMG_2011.JPG
    4.1 KB · Views: 0
  • IMG_2010.JPG
    IMG_2010.JPG
    3.2 KB · Views: 0
This office is looking really cool Barry, keep the good work coming ;)
 
Thread owner
I have progressed the detail painting and 'pit fitted
View attachment 283253 View attachment 283254

Aotake is the Vallejo colour from their IJN set. You lay down a silver metaliser then spray the Aotake over the top.
View attachment 283255

The engine, I will be buttoning up the cowl so not much will be seen.
View attachment 283256
The prop, some of the anti-glare blue-black need to be painted on the reverse of the blades.
View attachment 283257

The I hit a problem unusual for a modern Tammy kit, fit issues. I remember getting the same with the first Zero build. I had a problem fitting the fuse to the wing getting a ridge between the two. I used wet black paint to try to see where the problem was but it was inconclusive. I ended up doing a lot of sanding, adzing, cutting and carving away, frequent test fits and more wet black paint.... here it is during the process...
View attachment 283258 View attachment 283259

White at it the knife slipped and ended up dislodging the pedals, I had a tricky operation to get them stuck back into place. Thick superglue gel was used and after a lot of fiddling around got it into place.
View attachment 283260
Not the best of pics, the angle was difficult specially getting it under the light. But as you can see it is in place, eventually.
View attachment 283261
Anyway - still not resolved the fit of the fuse to wing but it is nearly there. Hopefully it will be sorted tonight.
 

Attachments

  • IMG_2021.JPG
    IMG_2021.JPG
    33.1 KB · Views: 0
  • IMG_2022.JPG
    IMG_2022.JPG
    3.1 KB · Views: 0
  • IMG_2024.JPG
    IMG_2024.JPG
    33.2 KB · Views: 0
  • IMG_2025.JPG
    IMG_2025.JPG
    3.9 KB · Views: 0
  • IMG_2026.JPG
    IMG_2026.JPG
    3.4 KB · Views: 0
  • IMG_2030.JPG
    IMG_2030.JPG
    3.5 KB · Views: 0
  • IMG_2031.JPG
    IMG_2031.JPG
    2.5 KB · Views: 0
  • IMG_2032.JPG
    IMG_2032.JPG
    3.6 KB · Views: 0
  • IMG_2033.JPG
    IMG_2033.JPG
    2.9 KB · Views: 0
Status
Not open for further replies.
Back
Top