Theme editor

Scale Model Shop

Mossy TR33

Status
Not open for further replies.

Ian M

Active member
Staff member
Admin
Joined
Dec 14, 2008
Messages
18,336
Reaction score
574
Points
113
Location
Falster, Denmark
1/3
Thread owner
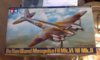
As a warm up to a more complex conversion, I thought I would get my aim in with this one. Its been in the stash for a while now.

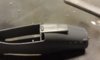
So you take one of these

View attachment 69319
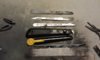

And some of this

View attachment 69320
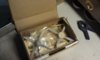
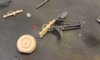
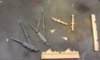
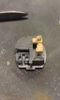

And these.

View attachment 69321


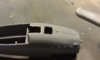
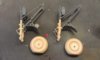
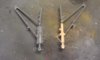
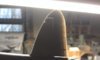
First stop and chop the air intakes

View attachment 69322

View attachment 69323

View attachment 69324


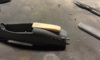
The kit intakes have to get the knife to make room for the longer type fitted to this Mk.

Well to late to change my mind now.

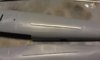
View attachment 69325


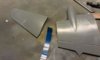
Wing folds in this Mossy.

That's it for now, I'm off to play with some plastic.

Ian M

View attachment 182345

View attachment 182346

View attachment 182347

View attachment 182348

View attachment 182349

View attachment 182350

View attachment 182351
 

Attachments

  • IMAG1129.jpg
    IMAG1129.jpg
    2.5 KB · Views: 0
  • IMAG1136.jpg
    IMAG1136.jpg
    1.8 KB · Views: 0
  • IMAG1135.jpg
    IMAG1135.jpg
    1.8 KB · Views: 0
  • IMAG1134.jpg
    IMAG1134.jpg
    1.7 KB · Views: 0
  • IMAG1133.jpg
    IMAG1133.jpg
    1.7 KB · Views: 0
  • IMAG1132.jpg
    IMAG1132.jpg
    2 KB · Views: 0
  • IMAG1130.jpg
    IMAG1130.jpg
    2 KB · Views: 0
Nice start Ian, i'll be watching this one as the Mozzy is my all time favourite plain. :)
 
Of the very few aircraft I actually like the look of... This is one of them ....

Who's got the popcorn then?

Is the box of gubbins just plastic extras, or is it resin, and are you playing with that pe stuff on this?
 
Thread owner
The box of gubbins, Colin, is indeed a resin conversion set from Paragon designs. There is a little bit of brass PE for the wing folds, but I might see if I can find some more. I'll be getting a new tail wheel for it as the kit one is pretty naff.

Ian M
 
A unique version of the Mosquito Ian, look forward to more progress soon.
 
Thread owner
So what was on the cards today. New legs!? gulp.

The Kits legs with the rubber dampers together with the resin parts to change them to oleo struts.

These legs also used smaller diameter tyres. Two of the stuts had gotten the "wire" frame knocked of so I have the fun job of mending them as well!!

View attachment 69370

View attachment 69371


So the unwanted damper gets cut off and the new part, after cutting from the casting block, gets stuck on. The Hard part was drilling them out to allow a brass rod to be inserted. They do have a fair lump of plastic to hold up...

View attachment 69372


After a good half an hour you have a new undercarriage. After an hour you have two. I have also added, (or is it removed?) the lightening holes on the supports for the stone guards.

View attachment 69373

View attachment 69374


Time for a bit of primer for these.

I saw a nice pair of resin seats last night, while looking for a tail wheel. So I now have to wait for them to turn up before I can get the cock pit sorted out.

Ian M

View attachment 182396

View attachment 182397

View attachment 182398

View attachment 182399

View attachment 182400
 

Attachments

  • IMAG1142.jpg
    IMAG1142.jpg
    1.8 KB · Views: 0
  • IMAG1141.jpg
    IMAG1141.jpg
    1.7 KB · Views: 0
  • IMAG1139.jpg
    IMAG1139.jpg
    1.6 KB · Views: 0
  • IMAG1138.jpg
    IMAG1138.jpg
    2.8 KB · Views: 0
  • IMAG1137.jpg
    IMAG1137.jpg
    1.9 KB · Views: 0
Ah the old mossie its looking good so far and seeing as it's BOB day tomorrow its a good choice :)
 
OOH! a chop job , right up my street! Its a superb kit of a superb aircraft Ian so it will be great to see it converted into a sea mossie , is it going to have the wart on the nose too? cheers tony
 
Thread owner
hanks chaps.

Tony yes this will be warts and all.

Last update for today (?)...

The only real change in the cockpit, well that can be seen, it the sight for the torpedo. There may well be other small details; knobs, switches and lights, but hey ho.

I also added the reinforcing strip to the other side of the fuselage and filled the access hatch on the starboard side. The new one will be scribed onto the bottom, just aft of the bomb doors, once the fuselage is together.

View attachment 69375

View attachment 69377


Got the control surfaces on the tail planes cut free and sorted out the resin replacements, which are more rounded at the ends than the standard ones.

View attachment 69376

View attachment 69378


I also cut through the rudder at the top and bottom so now it is not fixed to the tail and fuselage!

A small detail but that tail is sort of in your face.

I'm seriously considering dropping the flaps as well...?

Ian M

View attachment 182401

View attachment 182402

View attachment 182403

View attachment 182404
 

Attachments

  • IMAG1145.jpg
    IMAG1145.jpg
    1.5 KB · Views: 0
  • IMAG1144.jpg
    IMAG1144.jpg
    1.8 KB · Views: 0
  • IMAG1143.jpg
    IMAG1143.jpg
    1.6 KB · Views: 0
  • IMAG1146.jpg
    IMAG1146.jpg
    2 KB · Views: 0
Thread owner
\ said:
Looking good Ian, how about tackling the new Airfix 1/24 scale after this beauty?Si:)
LOL Just a couple of foot to big for me. I'd rather have the big Lancaster but thats not going to happen either.

Ian M
 
Some nice chopping and shaping there Ian.

I take it the resin sticks to the plastic with normal adhesives, or is there a specialist one for the job?
 
Thread owner
Thanks Colin. I normally use CA/super-glue call it what you will. You can also use epoxy but I find it messy (and slow) to work with.

Off to find some pictures of flaps. (that just reads so wrong. o.O )

Ian M
 
Right, so superglue does the job .. That's reduced my hesitence in getting any kits with resin parts, I just imagined having to get new glues etc . thanks for the info.

\ said:
Off to find some pictures of flaps. (that just reads so wrong. o_O )
I'm not even going to ask .... Whatever floats your boat :)
 
Thread owner
\ said:
Right, so superglue does the job .. That's reduced my hesitance in getting any kits with resin parts, I just imagined having to get new glues etc . thanks for the info.I'm not even going to ask .... Whatever floats your boat :)
Erm its not a boat, its an aeroplane... :) Could not find any parked with wings up and flaps down, so I don't think I'll bother. But I did get a good look at the profile of them.

Ian M
 
Status
Not open for further replies.
Back
Top