Theme editor

Scale Model Shop

Mossy TR33

Status
Not open for further replies.
Thread owner
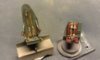
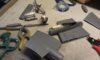
So late last night I started to prime a few bits and today I started to paint said bits...

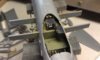
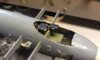
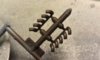
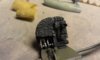
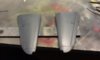
Got the Nacelles fitted which in true Tamiya form was perfect. Due to the way the kit is designed, I found that I could carry on while waiting for the seats, so I did. The front section is only dry fitted and can be taken off again to put the rest of the cockpit in then glue it up.

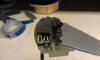
There is a decal for the dials on the IP but haven't looked at that yet..

View attachment 69420

View attachment 69421

View attachment 69422

View attachment 69423


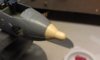
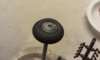
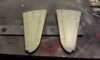
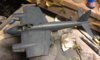
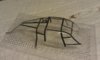
The "thimble" radar nose is on and a fitted perfectly in the hole! Small bits painted; legs, wheels and exhausts, So the next frightening bit will be cutting out the vac formed canopy and getting all those frames painted. Oh Joy.

View attachment 69424

View attachment 69425

View attachment 69426

View attachment 69427


Oh well back to it.

Ian M

View attachment 182446

View attachment 182447

View attachment 182448

View attachment 182449

View attachment 182450

View attachment 182451

View attachment 182452

View attachment 182453
 

Attachments

  • IMAG1147.jpg
    IMAG1147.jpg
    2.5 KB · Views: 0
  • IMAG1148.jpg
    IMAG1148.jpg
    2.4 KB · Views: 0
  • IMAG1149.jpg
    IMAG1149.jpg
    2.3 KB · Views: 0
  • IMAG1150.jpg
    IMAG1150.jpg
    2.3 KB · Views: 0
  • IMAG1151.jpg
    IMAG1151.jpg
    1.8 KB · Views: 0
  • IMAG1153.jpg
    IMAG1153.jpg
    1.8 KB · Views: 0
  • IMAG1154.jpg
    IMAG1154.jpg
    2.1 KB · Views: 0
  • IMAG1155.jpg
    IMAG1155.jpg
    2 KB · Views: 0
Thread owner
An experiment. I have as I mentioned a Vac formed canopy for this and there was only the one in the box...It needs to be done right first time.

I put the tamiya decals on the inside of the canopy and thought they looked a bit naff...I also had another thought.

View attachment 69511

Take a bit of clear decal paper and paint it Interior green and leave to dry
then paint it the exterior when that has had a day to dry, cut thin strips off with a sharp blade.

View attachment 69512

Place the "decals" on the frames for the cockpit....
View attachment 69513

Not finished yet but it looks OK. Or does it...?
The best of it is if it goes wrong I can wash them off again with out leaving any marks.

I have also done a patch in red for those keep off crosses on the oil coolers. Always a pain in the...

Ian M

View attachment 182537

View attachment 182538

View attachment 182539
 

Attachments

  • IMAG1159.jpg
    IMAG1159.jpg
    1.8 KB · Views: 0
  • IMAG1158.jpg
    IMAG1158.jpg
    2.2 KB · Views: 0
  • IMAG1156.jpg
    IMAG1156.jpg
    1.6 KB · Views: 0
Looking good Ian.Ive got the mkiv in my stash.Looks like a superb kit in true Tamiya style.
 
Last time I tried painting clear decal the paint flaked off when I put the decal in water.I painted it with enamel.Havent tried it with acrylic paint.Is that what you use?.
 
Thread owner
\ said:
Last time I tried painting clear decal the paint flaked off when I put the decal in water.I painted it with enamel. Havent tried it with acrylic paint.Is that what you use?.
Yes I use Vallejo model color. I just gave it a couple of light coats, then a wet coat and left it over night to dry. I removed the kit's canopy decals and will do them again with my own.

I wish I could say that it was my own idea, but I read it on the www someplace.

Ian M
 
Thread owner
An update!

Well I got some paint on it. The decal for the instrument panel was in a nut shell, naff, so that got painted as well.

View attachment 69577


The post shading on the EDSG just shows through and on the Sky shows quite well.

View attachment 69575

View attachment 69576

View attachment 69578

View attachment 69579

View attachment 69580

View attachment 69581


The main wing and nose are only dry fitted pt. Still waiting for the seats to turn up so I still can't button it yet!

The canopy...I think it worked out OK. It actually looks like frames!! You can see the colour difference better over the dark back ground. All I have to do now is cut the s*dding thing out. Hate that bit. (the very bottom frame will be painted on after the canopy is glued on.

View attachment 69582

View attachment 69583


I made some decals yesterday, but they are only the black under-wing codes.

More about that later.

Ian M

View attachment 182601

View attachment 182602

View attachment 182603

View attachment 182604

View attachment 182605

View attachment 182606

View attachment 182607

View attachment 182608

View attachment 182609
 

Attachments

  • IMAG1163.jpg
    IMAG1163.jpg
    1.9 KB · Views: 0
  • IMAG1164.jpg
    IMAG1164.jpg
    2 KB · Views: 0
  • IMAG1165.jpg
    IMAG1165.jpg
    2.6 KB · Views: 0
  • IMAG1166.jpg
    IMAG1166.jpg
    2.6 KB · Views: 0
  • IMAG1167.jpg
    IMAG1167.jpg
    2.5 KB · Views: 0
  • IMAG1168.jpg
    IMAG1168.jpg
    1.9 KB · Views: 0
  • IMAG1170.jpg
    IMAG1170.jpg
    1.6 KB · Views: 0
  • IMAG1171.jpg
    IMAG1171.jpg
    2.3 KB · Views: 0
  • IMAG1162.jpg
    IMAG1162.jpg
    1.8 KB · Views: 0
Thread owner
Ha ha. Here is a good tip for others that are building, or are going to build a mossy a la Tamiya. The nose section HAS to be built AROUND the cockpit. Failure to do so will result in one having to "un-build" the cockpit and half the nose.

Lesson learned!

The good news is the resin seats came today and are stuck on a stick waiting for the paint to dry. I wont bore you with the before but I will post an after when they are done.

I will just say they look rather nice!

Ian M
 
Oh yes Ian this is looking fantastic , I particularly like that instrument panel .

I want one and and I'm going to get one :)
 
Thread owner
Thanks Alan. The Tamiya Mosquito's are, I think, one of their best. Every thing just fits perfectly.

And the old airfix one ain't bad either!

Anyhow.. Those seats. They came from Ultracast and I got them from 3D-models. (sorry John).

View attachment 69619


A bit of paint, a splash of wash and thats those sorted. (maybe a new pair of glasses might help). I think they look rather better than the kits seats. However, thats due to the lack of harnesses, and the decal ones just don't do it for me.

Ian M

View attachment 182645
 

Attachments

  • IMAG1176.jpg
    IMAG1176.jpg
    1.9 KB · Views: 0
They look really neat Ian.

I take it the seats are an odd shape as they are ''offset'' in the cockpit?
 
Thread owner
\ said:
They look really neat Ian.I take it the seats are an odd shape as they are ''offset'' in the cockpit?
Correct. The nav is right and rear the pilot front left (Duh). The pilots seat, the high backed one has the slope so it can come tighter over to the cockpit wall/canopy.

Ian M
 
\ said:
The nose section HAS to be built AROUND the cockpit. Failure to do so will result in one having to "un-build" the cockpit and half the nose.
Would this apply to the Tamiya FBVI and BIV in 1/72 as well? Do the instructions say otherwise? Great work so far Ian, it's looking fantastic mate.
 
Thread owner
\ said:
Would this apply to the Tamiya FBVI and BIV in 1/72 as well? Do the instructions say otherwise? Great work so far Ian, it's looking fantastic mate.
Never built the 1/72 version so I can't really say. The fault was entirely my own Joe. I was waiting for the seats and just wanted to get on. It looked like it could be done "my way" but as it turned out it couldn't :mad:

Ian M
 
Status
Not open for further replies.
Back
Top