Theme editor

Scale Model Shop

My Little Harry Tate completed build blog

Status
Not open for further replies.

rtfoe

Active member
Joined
Apr 29, 2018
Messages
9,251
Reaction score
542
Points
113
Location
Shah Alam, Malaysia
1/3
Thread owner
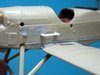
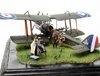
Hi, I have always been an Airfix fan till now even with its old tooled kits which I try to bring up to present standards. One such kit is the 1/72 RE8. I acquired this kit a while back and the tooling is even older than I am. I tackled it whenever the mojo suited and this build ebbed with the tide lasting three to four years...lost the blog in MM so can't remember. I will start with showing the completed build which I set in diorama and then work from the start...

View attachment 302463

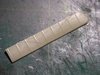
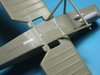
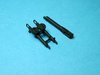
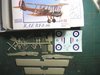
Firstly the number of parts to the kit gave me the impression that I could do this over the weekend but never guessed how wrong I was.:smiling6:

View attachment 302464View attachment 302465

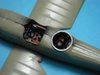
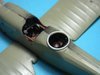
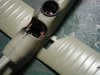
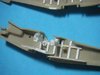
I made sure the cockpit and turret openings aligned and cleaned them up with a motor tool.

View attachment 302466View attachment 302467

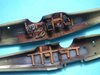
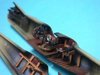
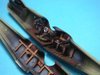
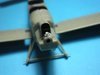
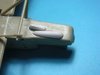
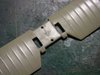
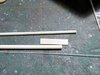
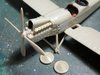
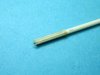
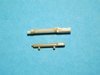
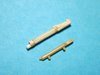
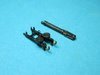
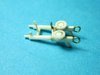
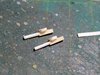
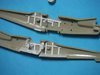
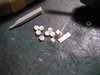
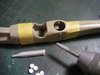
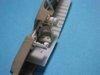
I anticipated filling the aircraft with spare Lewis gun magazines and made them from tube and rod. I then proceeded to add framing, dashboard and magazine holder to the interior.

View attachment 302468View attachment 302469

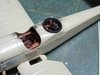
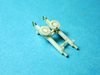
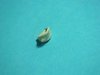
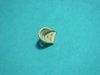
Seriously the kit cockpit was totally void of anything except for protrusions for the pilot figure to sit on so I made a seat with two part putty and mesh to simulate a wicker seat.

View attachment 302470View attachment 302471

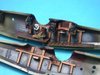
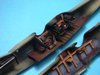
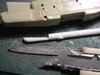
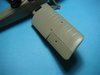
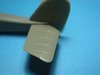
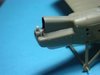
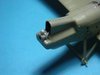
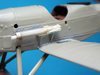
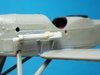
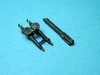
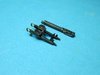
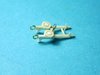
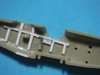
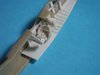
I made a false floorboard for both the pilot and gunner. The pilots was slightly elevated.

View attachment 302472View attachment 302473View attachment 302474View attachment 302475

All these detail was basically eyeballed from reference pictures and were not accurate in scale and slightly exagerated.

View attachment 302476 Next comes the painting...

Cheers,
Richard
 

Attachments

  • 487700.jpg
    487700.jpg
    2.3 KB · Views: 0
  • 487694.jpg
    487694.jpg
    2.1 KB · Views: 0
  • 487693.jpg
    487693.jpg
    1.2 KB · Views: 0
  • 487692.jpg
    487692.jpg
    1.2 KB · Views: 0
  • 487691.jpg
    487691.jpg
    2.6 KB · Views: 0
  • 487690.jpg
    487690.jpg
    2.5 KB · Views: 0
  • 487689.jpg
    487689.jpg
    2.5 KB · Views: 0
  • 487688.jpg
    487688.jpg
    2.6 KB · Views: 0
  • 487687.jpg
    487687.jpg
    2.8 KB · Views: 0
  • 487686.jpg
    487686.jpg
    3 KB · Views: 0
  • 487685.jpg
    487685.jpg
    3 KB · Views: 0
  • 487701.jpg
    487701.jpg
    2 KB · Views: 0
  • 487702.jpg
    487702.jpg
    1.9 KB · Views: 0
  • 245.jpg
    245.jpg
    3.2 KB · Views: 0
Thread owner
Hi, somehow when you're given an empty blank sheet of canvas, you just want to splash away with your brush. Lucky for me a friend lent me his Wingnut instruction sheet which had colour references to follow.

View attachment 302482 View attachment 302483

If I ever was to do this again I would have painted a shade lighter.

View attachment 302484 View attachment 302485View attachment 302486 View attachment 302487

Once I glued the fuselage halves together I shored up the gunners position with a raised ring by bending plastic strip along the edge.

View attachment 302489 View attachment 302490

More later...

Cheers,
Richard
 

Attachments

  • 487703.jpg
    487703.jpg
    3.1 KB · Views: 0
  • 554724.jpg
    554724.jpg
    2.6 KB · Views: 0
  • 487709.jpg
    487709.jpg
    2.8 KB · Views: 0
  • 487708.jpg
    487708.jpg
    2.4 KB · Views: 0
  • 487707.jpg
    487707.jpg
    3.3 KB · Views: 0
  • 487706.jpg
    487706.jpg
    2.8 KB · Views: 0
  • 487705.jpg
    487705.jpg
    3 KB · Views: 0
  • 487704.jpg
    487704.jpg
    3 KB · Views: 0
Thread owner
Hi Jon, was posting at the same time. Thanks...I have to look up the word tableau. :smiling2:...it's another word for picture right?

Cheers,
Richard
 
Thread owner
Thanks Colin...:smiling2: noticed you're a well-knowned member...how do we get these headings?:thinking:

Cheers,
Richard
 
Superb stuff Richard , I love this type of build and am partial to doing up old kits in this way too. Im also a fan of the older airfix stuff too and have done a similar thing to this with a few of their ancient 1/72 kits (cac boomerang , westland whirlwind ,DH 88 comet) .like the re8 they had no real interior and scratching a cockpit in 1/72 is quite a challenge! The satisfaction of getting a good result at the end is great though, cheers tony
 
Thread owner
Hi, the plastic being old was brittle so cutting was a challenge. I had to cut out vision slots on the lower wing.

View attachment 302494 View attachment 302495

Reference showed some chin extentions so I wittled sprue for these shapes and pasted them under the chin. I also added a nut and tubejust before the propeller housing.

View attachment 302506 View attachment 302496View attachment 302497 View attachment 302498

After sanding the bottom fuslage smooth I stuck on the undercarriage struts.

View attachment 302499 View attachment 302500

I also detailed the tail skid and dropped the tail flaps and did the same for the wings

View attachment 302501 View attachment 302502View attachment 302503 View attachment 302504

While doing that the brittle plastic gave way for one of the flaps in three places. I just glued them back and sanded making sure I didn't loose any ribbing detail.

View attachment 302505

More later...

Cheers,
Richard
 

Attachments

  • 554725.jpg
    554725.jpg
    2.8 KB · Views: 0
  • 554737.jpg
    554737.jpg
    2.6 KB · Views: 0
  • 554736.jpg
    554736.jpg
    2.2 KB · Views: 0
  • 554735.jpg
    554735.jpg
    2 KB · Views: 0
  • 554734.jpg
    554734.jpg
    1.7 KB · Views: 0
  • 554733.jpg
    554733.jpg
    1.6 KB · Views: 0
  • 554732.jpg
    554732.jpg
    2.7 KB · Views: 0
  • 554731.jpg
    554731.jpg
    2 KB · Views: 0
  • 554730.jpg
    554730.jpg
    1.9 KB · Views: 0
  • 554729.jpg
    554729.jpg
    2.1 KB · Views: 0
  • 554728.jpg
    554728.jpg
    2.1 KB · Views: 0
  • 554727.jpg
    554727.jpg
    2.7 KB · Views: 0
  • 554726.jpg
    554726.jpg
    2.6 KB · Views: 0
Thread owner
Superb stuff Richard , I love this type of build and am partial to doing up old kits in this way too. Im also a fan of the older airfix stuff too and have done a similar thing to this with a few of their ancient 1/72 kits (cac boomerang , westland whirlwind ,DH 88 comet) .like the re8 they had no real interior and scratching a cockpit in 1/72 is quite a challenge! The satisfaction of getting a good result at the end is great though, cheers tony

Hi Tony, nice to have you here and glad we share the same love for this type of refurbishing as I like to call it. The Westland Whirlwind is a nice one but I do have a Classic Airframes 1/48 of that to do. I even have some Frog kits, the Vultee and Fairy Fulmar in 1/72 that cries for detailing...cool.

Cheers,
Richard
Ive done the Vengeance richard and with a bit of added detail it turns out very nice http://www.scale-models.co.uk/threads/im-back-with-a-vengeance.13926/ , Ive also just got an old Novo (frog) blackburn skua and the Airwaves photo etched fret so that will be getting a makeover sometime too! cheers tony
 
Just superb. Very rich effects and so beyond the basic kit. That does intrigue to make a better Airfix. I had about 20 of them hanging from my ceiling as a kid. Took a few days to make each one as I recall. No stash back then. I could build faster than I could buy 'em.
 
Thread owner
Tony...that's a nice build of the Vengeance. I've got the Special Hobby Skua and she's a beaut.

Jim, thanks. The good old days where we could build faster than our pocket money could buy.

Cheers,
Richard
 
Thread owner
Hi, when I got to the propeller I turned my attention to building a Typhoon 1B having read about two Malaysian brothers who joined the RAF in WW2. One flew the Mustang and the other the Typhoon. I'll feature both blogs later. As for the propeller below I added a circular plate and bolts.

View attachment 302632

After a year with rejuvenated mojo I had aspirations to further persue the enhancement of the kit .

View attachment 302634

I glued the engine pistons which were surprisingly well molded and drilled the tyre shields. I plugged up the locating holes on the side walls for the up coming Vickers gun.

View attachment 302635

Since the kit gun didn't resemble a Vickers I decided to scratch one with rod and stretched sprue.

View attachment 302636View attachment 302637View attachment 302638

Comparing the kit part and the scratched Vickers clearly shows that it needed to be done.

View attachment 302639View attachment 302640

I made the Vickers cradle with its supports and later fashioned the trigger leaver rod connecting to the engine.

View attachment 302641View attachment 302642 The Vickers is dry fitted with blu tac.

Cheers,
Richard
 

Attachments

  • 554742.jpg
    554742.jpg
    2.5 KB · Views: 0
  • 554741.jpg
    554741.jpg
    2.8 KB · Views: 0
  • 554740.jpg
    554740.jpg
    3.2 KB · Views: 0
  • 554739.jpg
    554739.jpg
    1.6 KB · Views: 0
  • 554738.jpg
    554738.jpg
    1.5 KB · Views: 0
  • 555229.jpg
    555229.jpg
    1.6 KB · Views: 0
  • 555230.jpg
    555230.jpg
    1.6 KB · Views: 0
  • 555231.jpg
    555231.jpg
    1.9 KB · Views: 0
  • 555234.jpg
    555234.jpg
    2.7 KB · Views: 0
  • 555233.jpg
    555233.jpg
    2.4 KB · Views: 0
  • 555232.jpg
    555232.jpg
    2.8 KB · Views: 0
Hi Richard I've just found this outstanding build, fantastic work on all the extra detailing :thumb2:
Pete.
 
Thread owner
Hi Gavin, Andrew and Peter, thanks for looking in.

This dio and build has been around for threes years and been to Shizuoka last year. I'm glad to be able to show it here.

Cheers,
Richard
 
Thread owner
The Lewis gun was also very crude so instead of making one I decided for a twin mounted assembly.

Actually my scratch was just as crude...the only difference was the addition of the handles, pistol grips, sights and barrel configuration.

View attachment 302841

Plastic strip and wire were the material used.

View attachment 302842View attachment 302843View attachment 302844

The final asseblies were painted flat black and dry brushed with steel...

View attachment 302845

I picked out detail like the shell chute and handles with brass.

View attachment 302846View attachment 302847View attachment 302848View attachment 302849

Next will come the Lewis gun mount on the turret.

Cheers,
Richard
 

Attachments

  • 555725.jpg
    555725.jpg
    1.7 KB · Views: 0
  • 555724.jpg
    555724.jpg
    1.9 KB · Views: 0
  • 555723.jpg
    555723.jpg
    1.6 KB · Views: 0
  • 555722.jpg
    555722.jpg
    1.7 KB · Views: 0
  • 555721.jpg
    555721.jpg
    1.7 KB · Views: 0
  • 555468.jpg
    555468.jpg
    1.9 KB · Views: 0
  • 555467.jpg
    555467.jpg
    1.8 KB · Views: 0
  • 555466.jpg
    555466.jpg
    1.7 KB · Views: 0
  • 555235.jpg
    555235.jpg
    2.7 KB · Views: 0
Very nice looking Richard, the things you can do with old 1/72 kits is amazing.:thumb2::hugging-face:
Hope to see the next installment soon.

Fernando
 
Status
Not open for further replies.
Back
Top